Category Archives: Api Managmenet

Azure APIM POST Request Caching: Cut Backend Load by 70% With a Custom Cache Key

Most engineers assume POST requests cannot be cached. That assumption is costing their teams unnecessary backend load, slower response times, and wasted infrastructure spend — every single day. When I was working on a high-traffic travel booking API on Azure API Management, our backend was getting hammered by identical POST requests with the same payload, dozens of times per minute. The backend processing was heavy. The response never changed for the same input. We were rebuilding the same result over and over.

The fix was custom POST request caching in Azure APIM — using cache-lookup-value and cache-store-value policies with a dynamically built cache key from the request body. After implementing it, backend calls for repeated payloads dropped by over 70%. Response times for cache hits went from 400ms to under 10ms.

In this guide, you will learn exactly how to build a complete Azure APIM POST request caching solution — handling all three real-world content types, building a reliable cache key, and knowing precisely when to use this pattern and when to avoid it.

Why POST Request Caching in Azure APIM Is Worth Your Attention

Azure APIM’s built-in cache-lookup and cache-response policies work out of the box for GET requests — they use the URL as the cache key. However, POST requests send their data in the request body, not the URL. As a result, APIM cannot cache POST responses automatically.

Furthermore, most tutorials only show caching for application/json content types. In real production environments, APIs receive POST requests in three different formats — and your caching policy needs to handle all of them reliably. Specifically, the three content types you will encounter are:

  • application/json — the most common modern API format. Payload arrives as a JSON body.
  • application/x-www-form-urlencoded — used by legacy clients, HTML forms, and many third-party integrations.
  • multipart/form-data — used when clients send both JSON data and file uploads in the same request.

💡 Key principle: APIM never compares request payloads directly. Instead, you extract the fields that drive your response, build a unique string called a cache key, and APIM uses that string as the lookup identifier. Same input fields = same key = cache hit.

When Should You Cache a POST Request in Azure APIM?

Before writing a single line of policy XML, confirm your POST endpoint actually qualifies for caching. Not every POST call should be cached — and caching the wrong one causes serious problems.

Cache these POST calls:

  • Read-heavy search or filter operations sent as POST because the query is too complex for a URL query string — for example, flight searches, product filters, or report generation.
  • Heavy computation endpoints where identical inputs always produce identical outputs — pricing calculations, eligibility checks, or recommendation engines.
  • Third-party API proxies where the upstream call is slow and expensive but the response is stable for a known time window.

Never cache these POST calls:

  • State-changing operations — anything that creates, updates, or deletes data. Caching these means repeated identical requests silently skip the backend, and your data is never written.
  • Payment or transaction endpoints — retrying a cached payment response causes silent double-charge risks or missed payments.
  • Authentication or token endpoints — one-time tokens, OTPs, and session credentials must never be served from cache.
  • Real-time or per-user personalised responses — if the same payload returns different results for different users, a shared cache key will return the wrong user’s data.

⚠️ Rule of thumb: if you could safely call the same POST endpoint 100 times with the same payload and always expect the same response — it is safe to cache. If the 100th call should behave differently from the first — never cache it.

How Azure APIM POST Request Caching Works

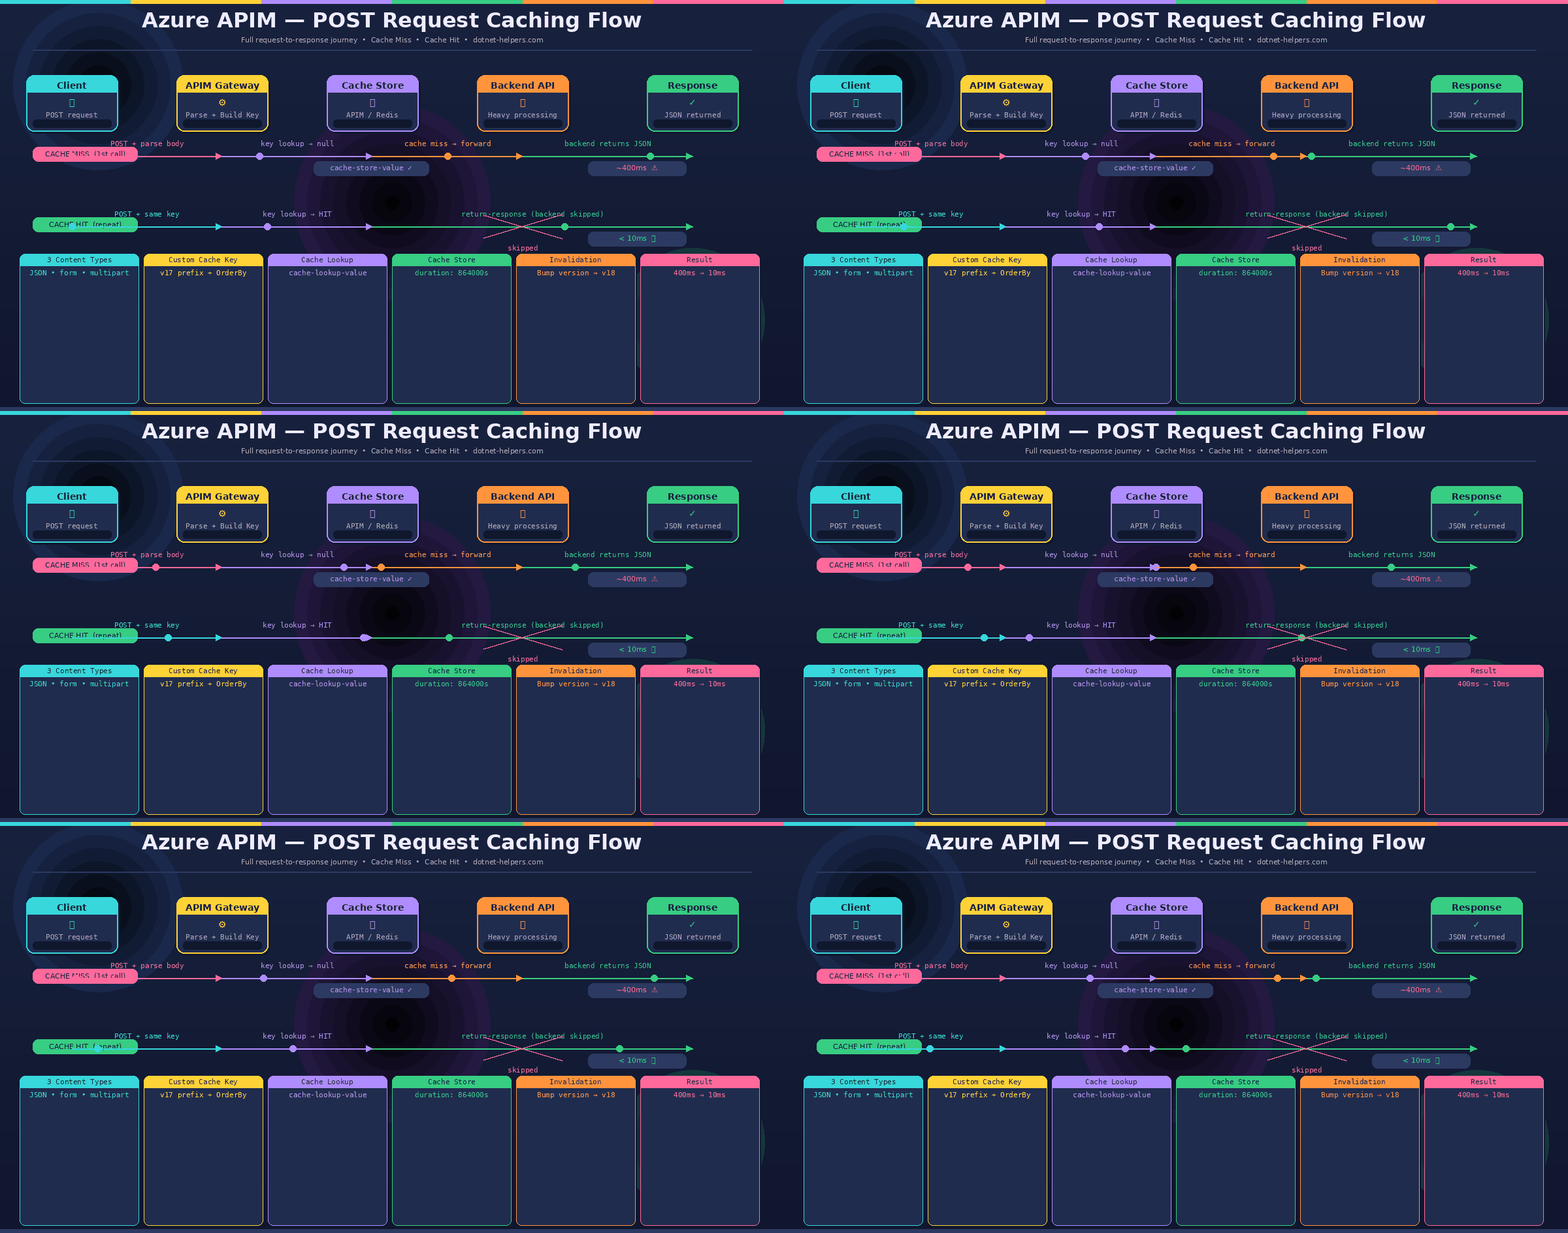
Understanding the flow before writing the policy saves a lot of debugging time. Here is what happens on the first call (cache miss) and the second call (cache hit):

First call — cache miss: The request arrives at APIM. The inbound policy reads the request body, extracts the relevant fields, and builds a unique cacheKey string. Next, cache-lookup-value checks whether that key exists in the cache. Because it is the first call, nothing is found. Therefore, APIM forwards the request to the backend. The backend returns a response. In the outbound policy, cache-store-value saves the response body against the cacheKey for a set duration.

Second call — cache hit: The same payload arrives. APIM builds the identical cacheKey string. This time, cache-lookup-value finds the stored response. As a result, APIM immediately returns the cached response using return-response — without ever touching the backend. The entire round-trip is eliminated.
Understanding the Cache Key Design

Your cache key is the most critical part of the entire solution. Get it wrong and you either serve stale data to the wrong callers or fragment your cache so badly that you never get a hit. Here is the key design used in the complete policy below:

cacheKey = "v2_mycustomcache-" + all JSON fields sorted alphabetically + joined by "-"
// Example payload: { "Channel": "DESKTOP", "Type": "TRAIN", "Unit": "BU-UNIT" }
// Result: v2_mycustomcache-DESKTOP-BU-UNIT-TRAIN

Three important design decisions are built into this key. First, the v2_ prefix acts as a version tag — when you need to invalidate all cached responses after a backend change, simply change this prefix and all existing keys instantly become misses. Second, properties are sorted alphabetically with .OrderBy(p => p.Name) — this ensures the key is identical regardless of the order fields arrive in the payload. Third, all field values are joined into a single flat string — making the key readable in logs and easy to debug.

The Complete Azure APIM POST Request Caching Policy

This policy handles all three content types in a single implementation. Copy it into your APIM policy editor and adjust the cache key prefix and duration to match your use case:

<policies>
    <inbound>
        <base />
        <!-- Step 1: Clear cookies to prevent cache pollution -->
        <set-header name="Cookie" exists-action="override">
            <value />
        </set-header>
        <!-- Step 2: Read and preserve the full request body -->
        <set-variable name="requestBodyRaw"
            value="@(context.Request.Body.As<string>(preserveContent: true))" />
        <set-variable name="isCacheable" value="@(false)" />
        <!-- Step 3: Parse body by Content-Type -->
        <choose>
            <!-- Handler 1: application/x-www-form-urlencoded -->
            <when condition="@(context.Request.Headers
                    .GetValueOrDefault('Content-Type','')
                    .ToLower().Contains('application/x-www-form-urlencoded'))">
                <set-variable name="isCacheable" value="@(true)" />
                <set-variable name="jsonEncoded"
                    value="@(((string)context.Variables['requestBodyRaw'])
                        .Substring(((string)context.Variables['requestBodyRaw'])
                        .IndexOf('=') + 1))" />
                <set-variable name="jsonDecoded"
                    value="@(System.Net.WebUtility.UrlDecode(
                        (string)context.Variables['jsonEncoded']))" />
                <set-variable name="innerRequest"
                    value="@((JObject)Newtonsoft.Json.JsonConvert
                        .DeserializeObject(
                            (string)context.Variables['jsonDecoded']))" />
            </when>
            <!-- Handler 2: multipart/form-data -->
            <when condition="@(context.Request.Headers
                    .GetValueOrDefault('Content-Type','')
                    .ToLower().StartsWith('multipart/form-data'))">
                <set-variable name="isCacheable" value="@(true)" />
                <set-variable name="boundary" value="@{
                    string ct = context.Request.Headers
                        .GetValueOrDefault('Content-Type', '');
                    int idx = ct.IndexOf('boundary=');
                    if (idx >= 0)
                        return ct.Substring(idx + 9).Split(';')[0].Trim();
                    return '';
                }" />
                <set-variable name="jsonPart" value="@{
                    string body = (string)context.Variables['requestBodyRaw'];
                    string boundary = (string)context.Variables['boundary'];
                    if (string.IsNullOrEmpty(boundary)) return '';
                    string delim = '--' + boundary;
                    int start = body.IndexOf('name=\'jsonRequest\'');
                    if (start >= 0) {
                        int cs = body.IndexOf('\r\n\r\n', start) + 4;
                        int ce = body.IndexOf(delim, cs);
                        if (ce == -1) ce = body.IndexOf(delim + '--', cs);
                        if (cs > 3 && ce > cs)
                            return body.Substring(cs, ce - cs).Trim();
                    }
                    return '';
                }" />
                <set-variable name="innerRequest" value="@{
                    string json = (string)context.Variables['jsonPart'];
                    if (!string.IsNullOrEmpty(json)) {
                        try { return (JObject)Newtonsoft.Json.JsonConvert
                                .DeserializeObject(json); }
                        catch { return new JObject(); }
                    }
                    return new JObject();
                }" />
            </when>
            <!-- Handler 3: application/json -->
            <when condition="@(context.Request.Headers
                    .GetValueOrDefault('Content-Type','')
                    .ToLower().Contains('application/json'))">
                <set-variable name="isCacheable" value="@(true)" />
                <set-variable name="requestBody"
                    value="@(context.Request.Body
                        .As<JObject>(preserveContent: true))" />
                <set-variable name="jsonRequestString"
                    value="@((string)((JObject)context.Variables['requestBody'])
                        ['jsonRequest'])" />
                <set-variable name="jsonRequestUnescaped"
                    value="@(System.Text.RegularExpressions.Regex
                        .Unescape((string)context.Variables
                            ['jsonRequestString']))" />
                <set-variable name="innerRequest" value="@{
                    try { return (JObject)Newtonsoft.Json.JsonConvert
                            .DeserializeObject((string)context.Variables
                                ['jsonRequestUnescaped']); }
                    catch { return new JObject(); }
                }" />
            </when>
        </choose>
        <!-- Step 4: Build cache key and look up cache -->
        <choose>
            <when condition="@((bool)context.Variables['isCacheable'])">
                <set-variable name="cacheKey" value="@('v2_mycustomcache-' +
                    string.Join('-',
                        ((JObject)context.Variables['innerRequest'])
                            ?.Properties()
                            .OrderBy(p => p.Name)
                            .Select(p => p.Value?.ToString() ?? '')
                        ?? new string[] { })
                )" />
                <cache-lookup-value
                    key="@((string)context.Variables['cacheKey'])"
                    variable-name="cacheResponse" />
                <choose>
                    <when condition="@(context.Variables
                            .ContainsKey('cacheResponse')
                            && context.Variables['cacheResponse'] != null)">
                        <return-response>
                            <set-header name="Content-Type"
                                exists-action="override">
                                <value>application/json</value>
                            </set-header>
                            <set-body>
                                @((string)context.Variables['cacheResponse'])
                            </set-body>
                        </return-response>
                    </when>
                </choose>
            </when>
        </choose>
    </inbound>
    <backend>
        <base />
    </backend>
    <outbound>
        <base />
        <!-- Step 5: Store response in cache on 200 OK -->
        <choose>
            <when condition="@((bool)context.Variables['isCacheable']
                    && context.Response != null
                    && context.Response.Body != null
                    && context.Response.StatusCode == 200)">
                <cache-store-value
                    key="@((string)context.Variables['cacheKey'])"
                    value="@(context.Response.Body
                        .As<string>(preserveContent: true))"
                    duration="172800" />
            </when>
        </choose>
    </outbound>
    <on-error>
        <base />
    </on-error>
</policies>

Policy Walkthrough: What Each Section Does

Step 1 — Clear the Cookie Header

Cookies are cleared from the inbound request before any caching logic runs. This prevents session cookies from polluting the cache key or causing different users to share cached responses they should not see.

Step 2 — Read and Preserve the Request Body

The request body is read once and stored in requestBodyRaw with preserveContent: true. This is critical — in APIM, reading a request body consumes it by default. Without preserveContent: true, the backend receives an empty body. Furthermore, the isCacheable flag starts as false — it only becomes true if a supported Content-Type is detected.

Step 3 — Content-Type Detection and Azure APIM POST Caching Payload Parsing

The choose block detects which Content-Type was sent and parses the payload accordingly. Each handler extracts the same end result — a JObject named innerRequest containing the relevant fields. As a result, Step 4 (key building) works identically regardless of how the payload arrived.

Step 4 — Build Cache Key and Azure APIM POST Cache Lookup

The cache key is built by sorting all properties of innerRequest alphabetically and joining their values with a hyphen. Next, cache-lookup-value checks whether this exact key string exists in the cache. If a hit is found, return-response immediately returns the cached body — the backend is never called.

Step 5 — Store the Response After a Backend Call

In the outbound policy, if the backend returned a 200 OK and the request was cacheable, cache-store-value saves the response body against the cache key for 172,800 seconds — that is 48 hours. Consequently, any identical request within the next 48 hours gets served from cache instantly.

💡 Adjust the duration value to match your data freshness requirements. For real-time pricing, use 300 seconds (5 minutes). For stable reference data, 172800 seconds (48 hours) or more is appropriate.

Common Mistakes That Break Azure APIM POST Request Caching

  • Not using preserveContent: true when reading the body. This is the most common mistake. Without it, APIM reads and discards the request body — the backend receives nothing and returns a 400 or 500 error. Always set preserveContent: true on every Body.As<>() call.
  • Building a cache key that is too broad. If your key only uses one field from a five-field payload, requests with different values for the other four fields will all hit the same cache entry and get wrong responses. Include every field that meaningfully changes the response.
  • Building a cache key that is too granular. Conversely, including timestamp or session ID fields in the key means you never get a cache hit. Only include stable, response-determining fields.
  • Caching without checking the status code. The outbound cache-store-value must check context.Response.StatusCode == 200 before storing. Otherwise, error responses get cached and served to subsequent callers — causing hard-to-diagnose intermittent failures.
  • Not versioning the cache key prefix. When your backend response schema changes, you need a way to invalidate all cached entries immediately. Without a version prefix like v2_, old cached responses continue being served. Incrementing the prefix instantly invalidates the entire cache without touching any infrastructure.

Internal vs External Redis Cache for Azure APIM POST Caching

The policy above works with both APIM’s built-in internal cache and an external Azure Cache for Redis. Here is when to use each:

  • Internal APIM cache — suitable for development, staging, and single-region deployments. Simple to set up with no extra infrastructure. However, in the classic APIM tiers, internal cache contents do not persist across service updates. The v2 tiers provide persistent built-in cache.
  • External Azure Cache for Redis — recommended for production, multi-region, or high-throughput deployments. Provides persistence, higher capacity, and cache sharing across multiple APIM units. For production workloads, connecting an external Azure Cache for Redis is usually the better option — create a Redis instance in the same region as your APIM instance, then go to APIM → External cache → Add and provide the Redis connection string.

Conclusion: Azure APIM POST Request Caching Done Right

Azure APIM POST request caching is one of the highest-impact performance optimisations available in the APIM policy toolkit — and one of the most underused. By combining careful payload parsing across all three content types with a well-designed cache key, you can transform heavy POST endpoints into near-instant responses for repeated inputs. Furthermore, the versioned key prefix gives you a clean invalidation mechanism whenever your backend schema changes.

In summary, the five things that make this work reliably are: always preserve the request body, handle all three content types, sort your key fields alphabetically, only store on 200 OK responses, and version your cache key prefix from day one. Apply this pattern only to idempotent read-heavy POST operations — and never to state-changing or security-sensitive endpoints.

Quick Reference

  • Read body: always use Body.As<string>(preserveContent: true)
  • Build key: extract fields → sort alphabetically → join with hyphen → prefix with version tag
  • Cache lookup: <cache-lookup-value key="..." variable-name="cacheResponse" />
  • Cache store: <cache-store-value key="..." value="..." duration="172800" />
  • Invalidate all: increment the version prefix in the cache key

Frequently Asked Questions

Q: Does APIM automatically compare the full POST payload to decide on a cache hit?
No. APIM never compares payload content directly. It only checks whether the exact cache key string you generate already exists in the cache store. Your key design entirely determines what counts as a cache hit or miss.

Q: What happens if a field in my payload changes by even one character?
A new cache key is generated, resulting in a cache miss. APIM forwards the request to the backend, gets a fresh response, and stores it under the new key. The old cached entry remains until it expires.

Q: How do I invalidate the cache immediately without waiting for the duration to expire?
The fastest way is to increment the version prefix in your cache key — for example, change v2_mycustomcache- to v3_mycustomcache-. All existing v2 keys instantly become orphaned and new requests build fresh v3 entries. Alternatively, use the APIM Management REST API to delete specific cache entries by key.

Q: Can I use this pattern with Azure Cache for Redis instead of the internal cache?
Yes. The cache-lookup-value and cache-store-value policies work with both APIM’s internal cache and an external Redis cache. No policy changes are needed — APIM automatically uses the external cache when one is configured, falling back to the internal cache if the external cache is unavailable.

Q: The cached response is being returned but the Content-Type header is wrong. How do I fix it?
In the return-response block, always explicitly set the Content-Type header using set-header. When APIM returns a response directly from cache without hitting the backend, it does not automatically carry forward the original response headers — you must set them manually in the policy.
Related Articles

Your Backend Isn’t Ready — But Your Frontend Doesn’t Have to Wait: Azure APIM Mock APIs Explained

Your backend team says they will be ready in two weeks. Meanwhile, your frontend developers are stuck. Your QA team cannot test. Your client demo is tomorrow. Sound familiar? If you have worked on any API-driven project, you have hit this wall before. Fortunately, Azure API Management (APIM) mock responses solve this exact problem — and most developers do not know they are already included in their APIM subscription at no extra cost.

In this guide, you will learn not just how to set up APIM mock APIs — but when to use them, what mistakes to avoid, and how to use dynamic mocking for real-world scenarios that the official Microsoft docs do not cover.

Introduction: Why Mock APIs Save Real Projects

On a recent project, our team needed to integrate a payment gateway API that was still three weeks away from being production-ready. Instead of blocking three frontend developers, we stood up an APIM mock in under 10 minutes. The frontend team shipped on time. QA ran a full regression suite against the mock. The client saw a working demo. When the real backend arrived, we swapped it in with zero frontend changes.

That is the real value of APIM mock responses — not just as a development convenience, but as a team productivity multiplier that eliminates blockers across the entire delivery pipeline.

What Can You Mock in Azure APIM?

Before diving into the steps, it helps to understand what APIM mocking actually supports. Most tutorials only show the basic 200 OK response. In reality, you can mock much more:

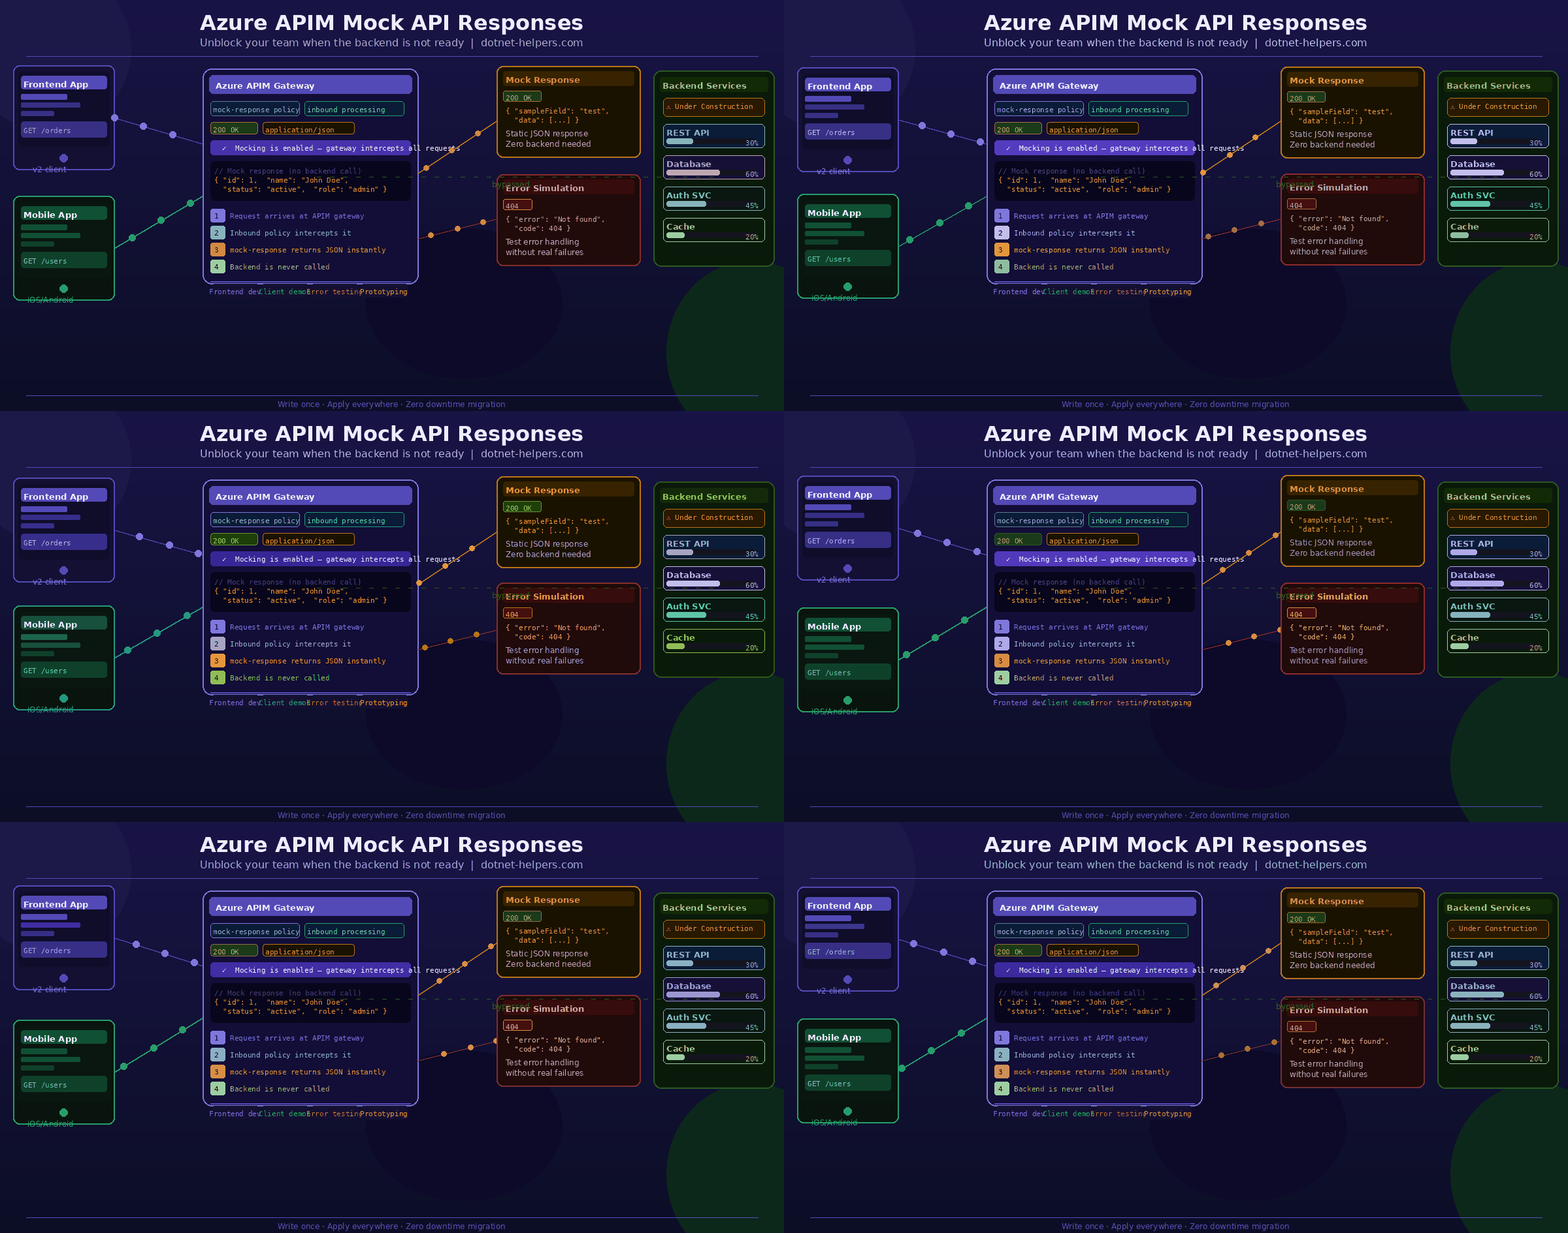
  • Static responses — a fixed JSON body returned every time. Good for happy-path testing.
  • Dynamic responses — responses that change based on query parameters, headers, or request body values. Essential for realistic testing.
  • Error simulation — return 404, 429, 500, or any HTTP status code to test how your frontend handles failures.
  • Conditional responses — return different data based on who is calling (e.g., admin vs. standard user).

💡 Key insight: APIM mock responses live in the inbound policy pipeline. This means they intercept the request before it ever reaches your backend — making them completely safe to use alongside live APIs in the same APIM instance.

When Should You Use APIM Mock Responses?

Here are the four most common real-world scenarios where mocking in APIM saves the day:

  • Backend not ready yet: Frontend and QA teams can start immediately. No more waiting on the backend team to hit a deadline before other work can begin.
  • Client demos and prototypes: Stand up a fully working API in minutes. Show the client a live demo without deploying a single line of backend code.
  • Error handling validation: Return 500, 503, or 429 on demand to confirm your frontend degrades gracefully. This is almost impossible to test reliably against a real backend.
  • Contract-first API design: Define the API contract up front. Let both backend and frontend teams build against the mock simultaneously — then replace the mock when the real service is ready.

Step-by-Step: Create an Azure APIM Mock API Response

Follow these steps to set up your first mock API in Azure APIM. All screenshots below are from the Azure portal.

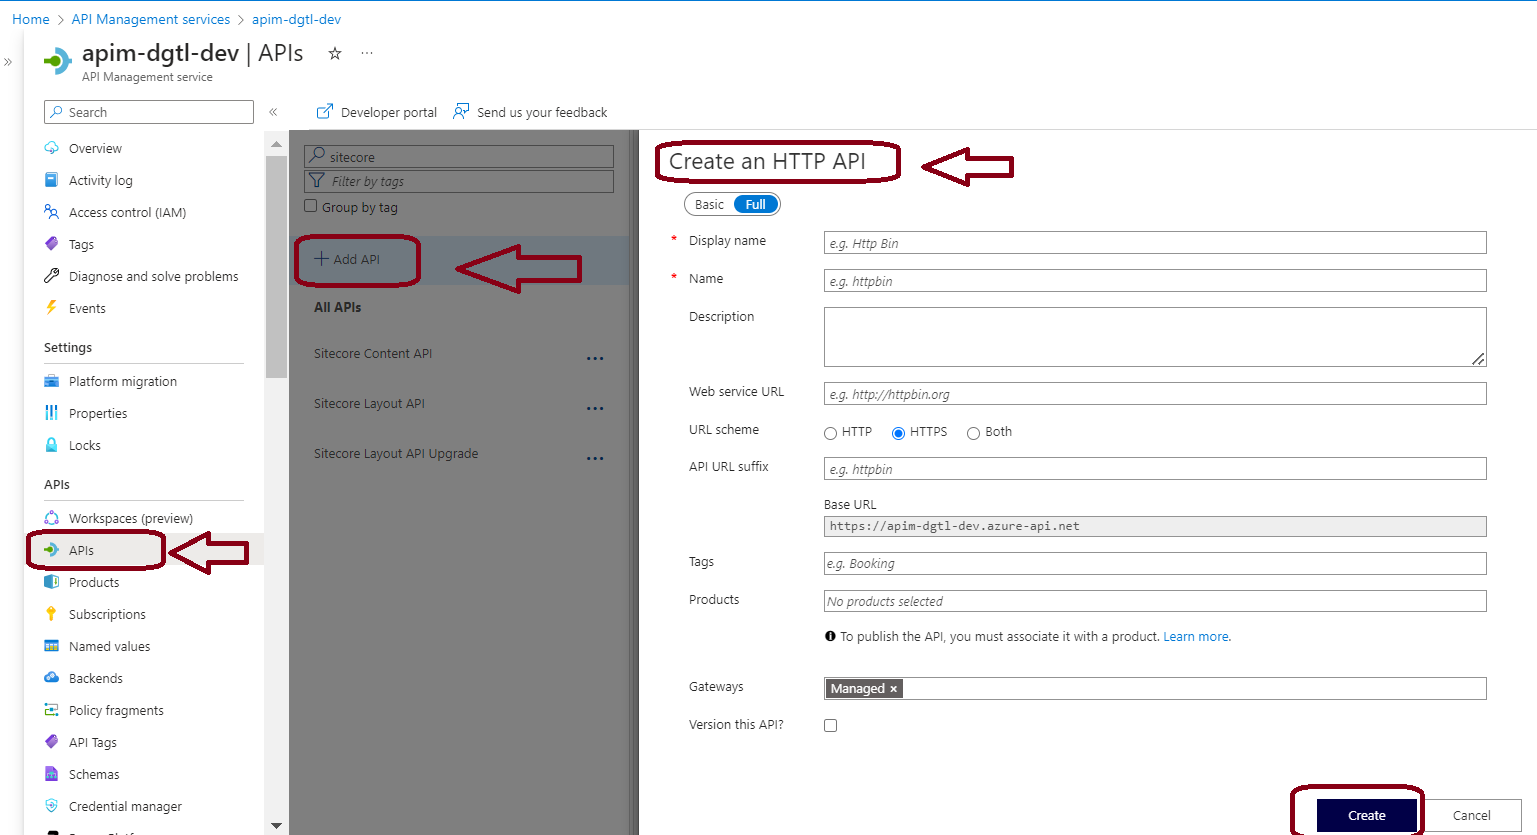
Step 1: Create a Test API (No Backend Required)

First, create an HTTP API with no backend. This is the blank canvas you will attach your mock policy to.

  1. Sign in to the Azure portal and navigate to your API Management instance.
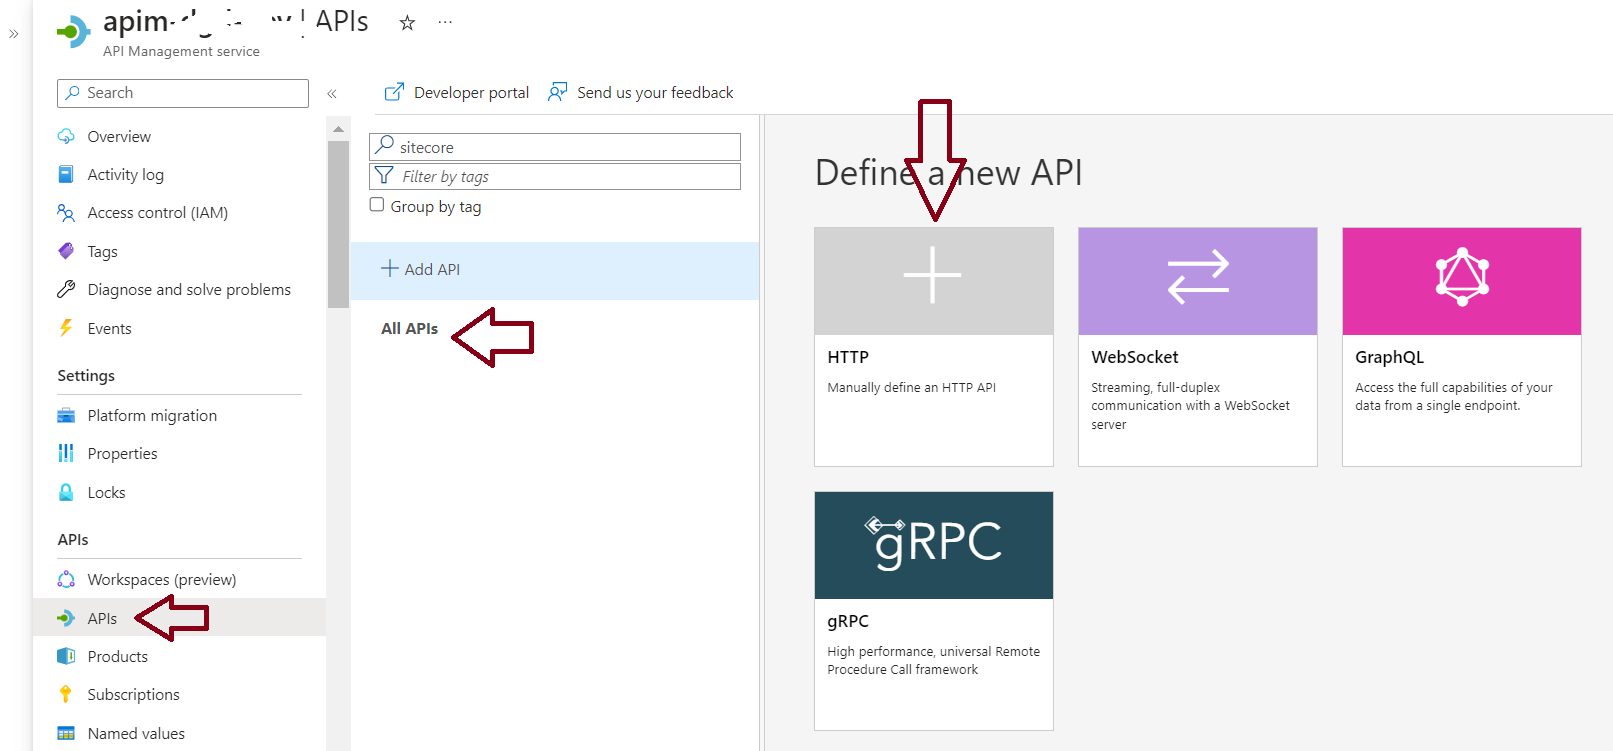
  2. Select APIs → + Add API → HTTP tile.
  3. In the Create an HTTP API window, select Full.
  4. Enter Test API for Display name.
  5. Select Unlimited for Products.
  6. Ensure that Managed is selected for Gateways.
  7. Click Create.

💡 Pro tip: Use a clear naming convention like “mock-[service-name]-api” so your team can instantly tell which APIs are mocks versus live. For example: mock-payment-api, mock-user-api.

Step 2: Add an Operation to the Test API

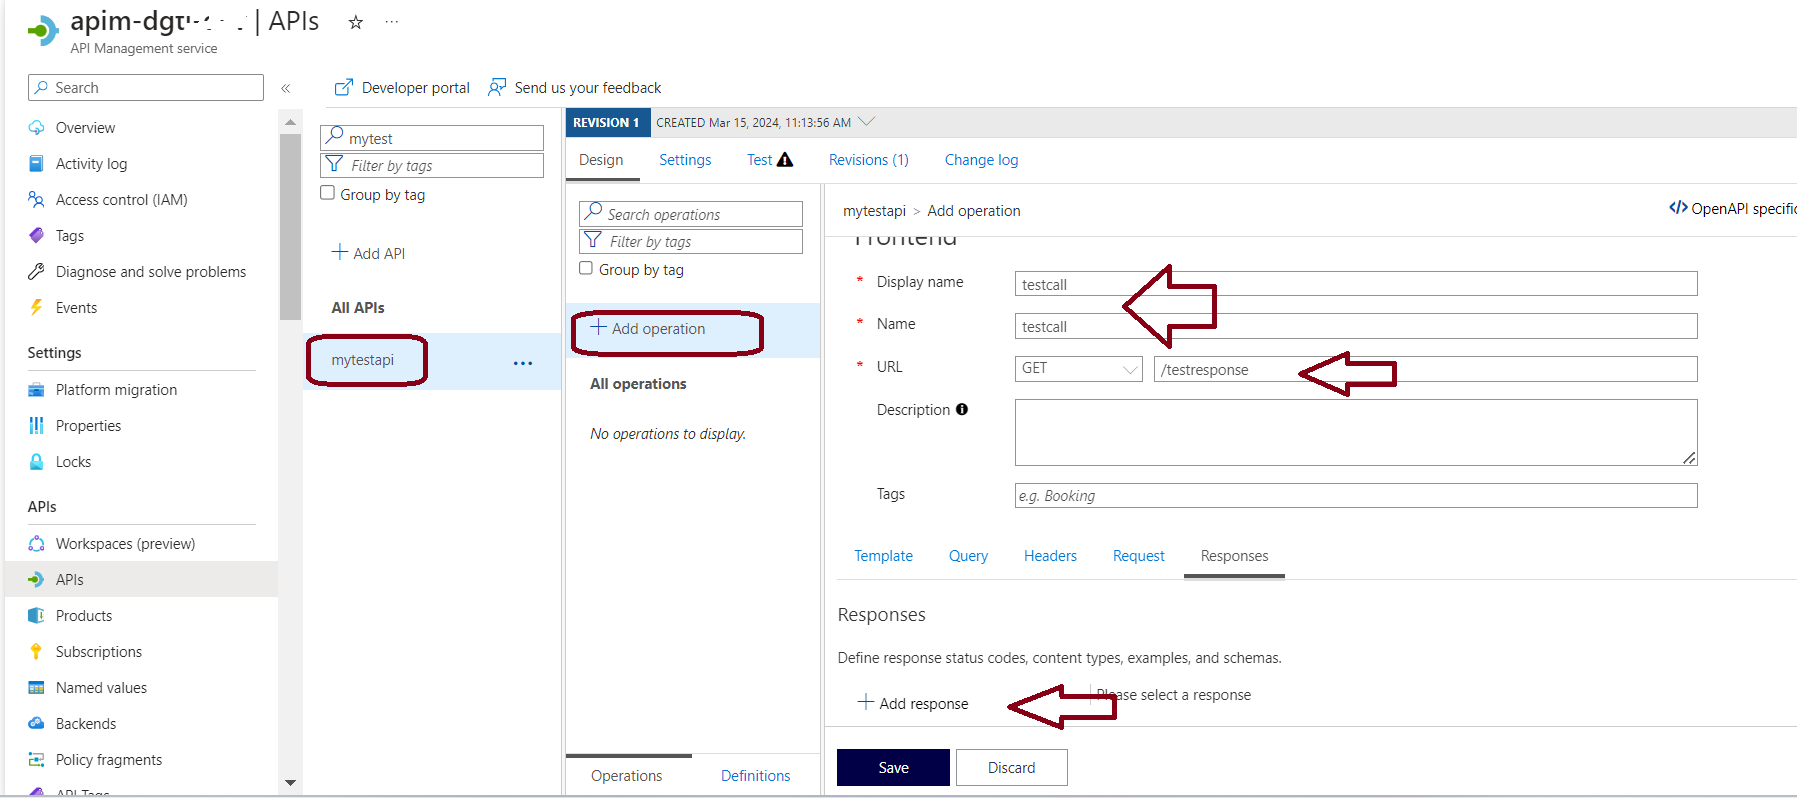
Next, add an operation. An operation is a single endpoint — for example, GET /users or POST /orders. In this step, you also define what the response should look like so APIM knows what to return when mocking is enabled.

  1. Select the API you just created and click + Add Operation.
  2. In the Frontend window, enter values for Display name, Name, and URL.
  3. Select the Responses tab, located under the URL and Description fields.
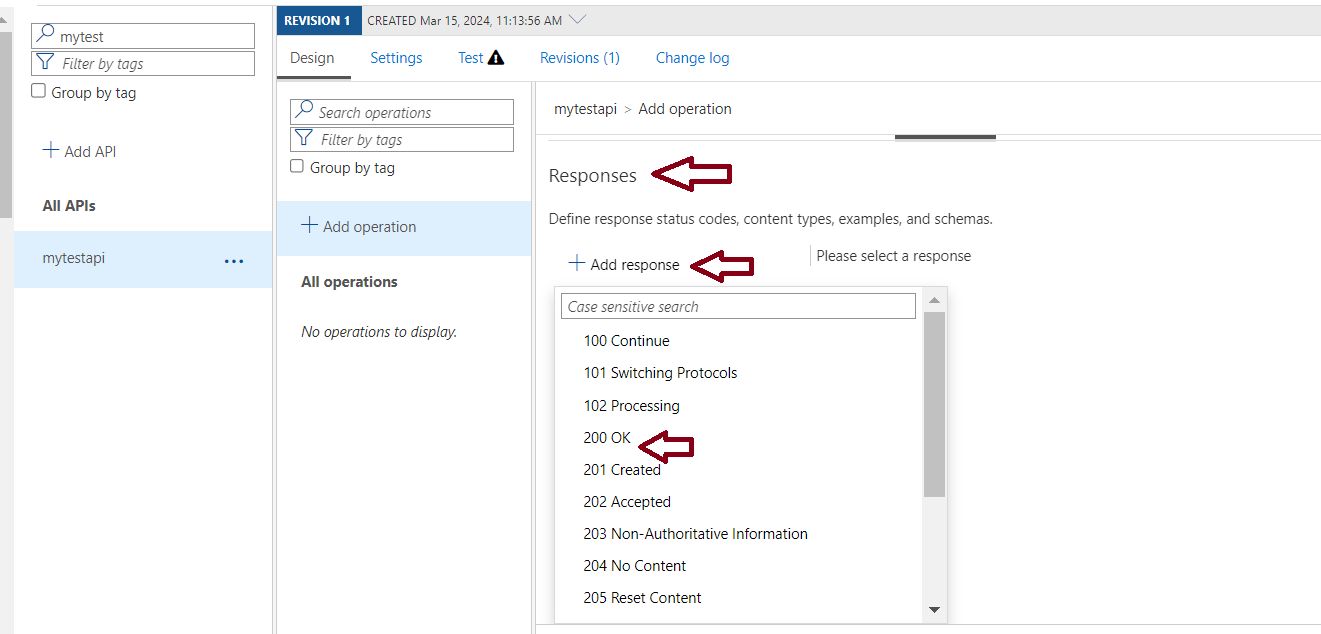
  4. Select + Add response and choose 200 OK from the list.
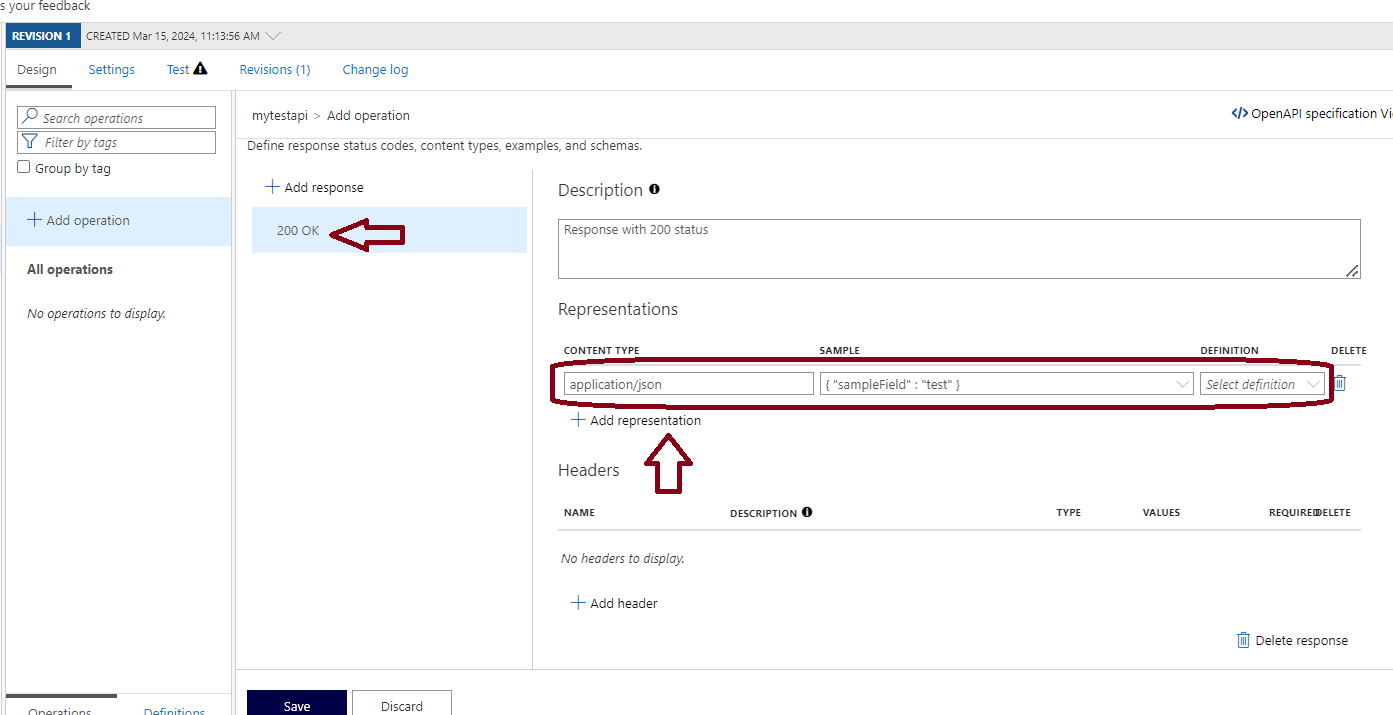
  5. Under Representations, select + Add representation. Enter application/json and in the Sample text box, enter your mock JSON body. For example:
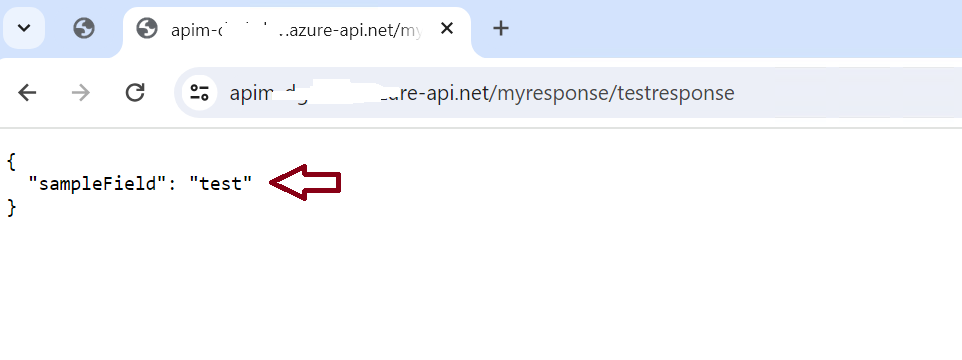
    { "sampleField" : "test" }

  6. Click Save.

⚠️ Common mistake: Many developers enter a minimal sample like { “id”: 1 } and then wonder why their frontend tests miss edge cases. Instead, use a realistic payload that matches your actual API contract — including all fields the frontend will consume.

Step 3: Enable the Mock Response Policy

Now, enable mocking by attaching the mock-response policy to the operation. This is the step that tells APIM to intercept the request and return your sample — without ever calling a backend.

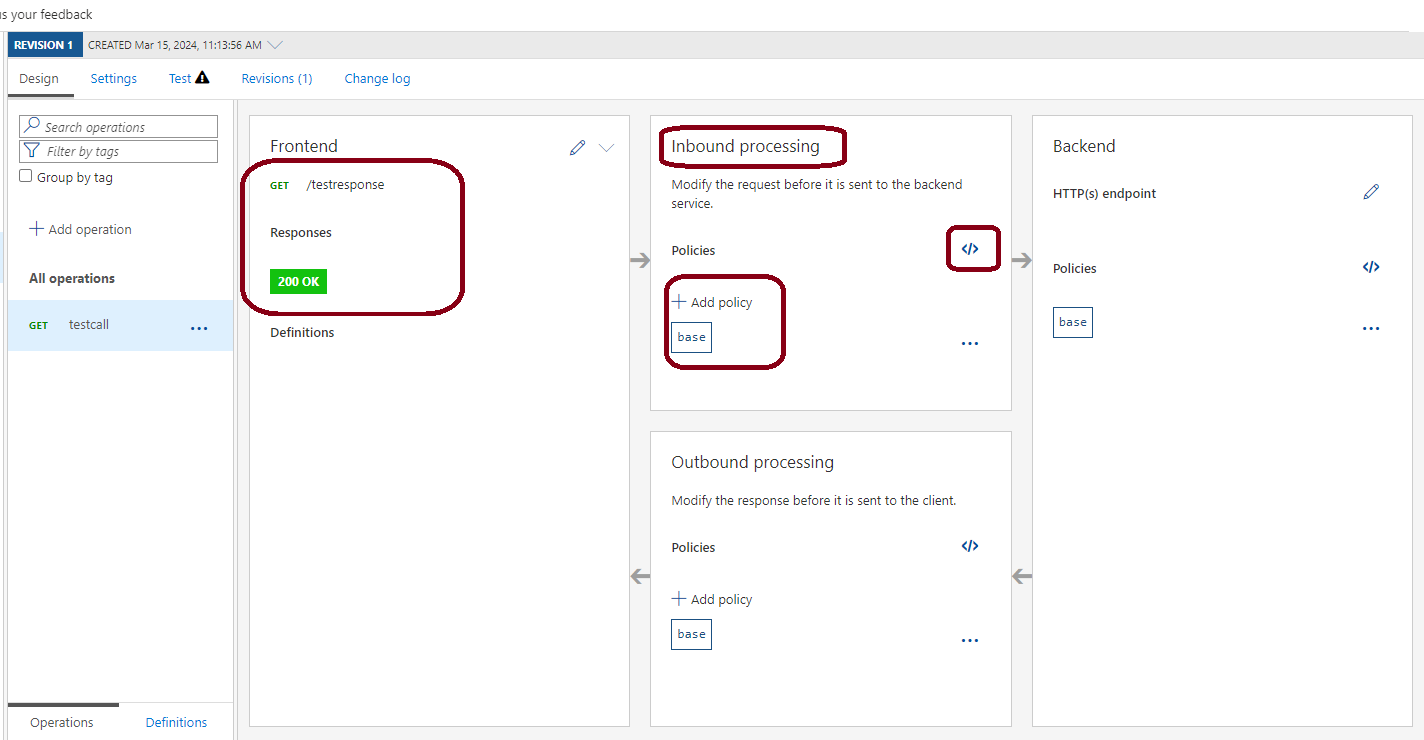
  1. Select the API and ensure the Design tab is selected.
  2. Select the test operation you added in Step 2.
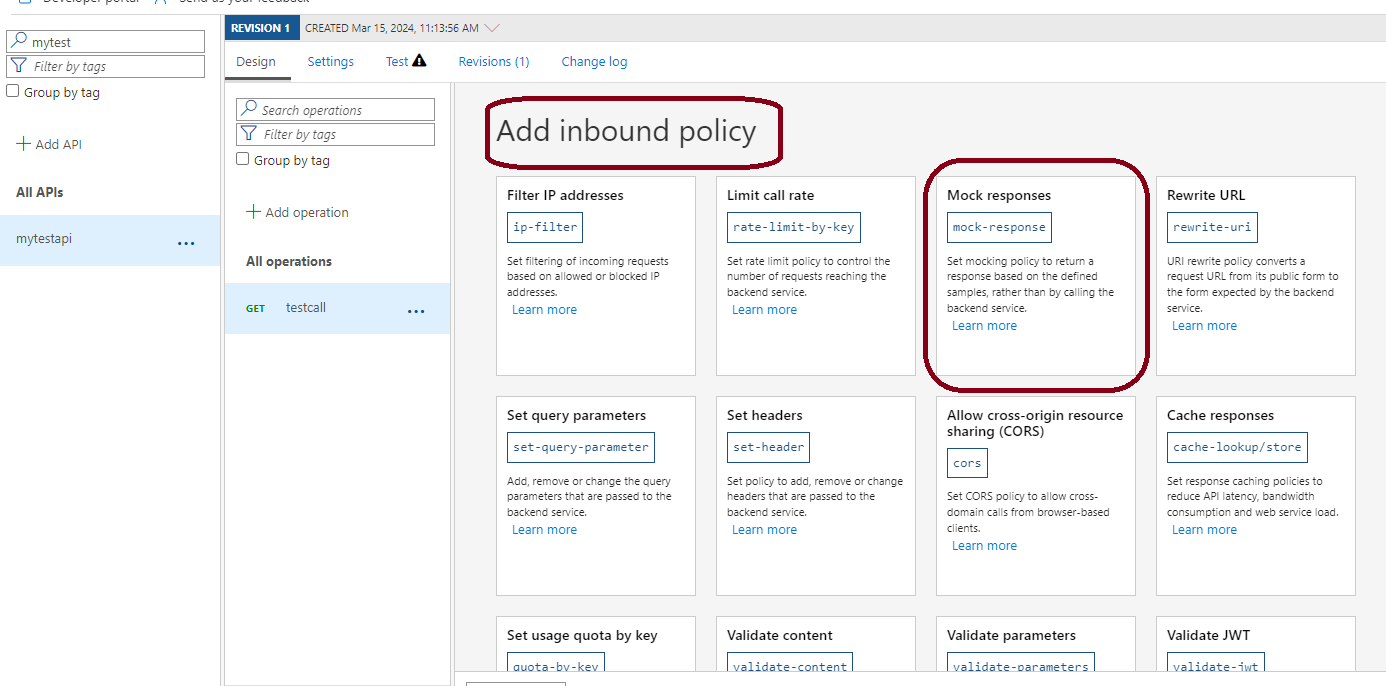
  3. In the Inbound processing window, select + Add policy.
  4. Select Mock responses from the policy gallery.
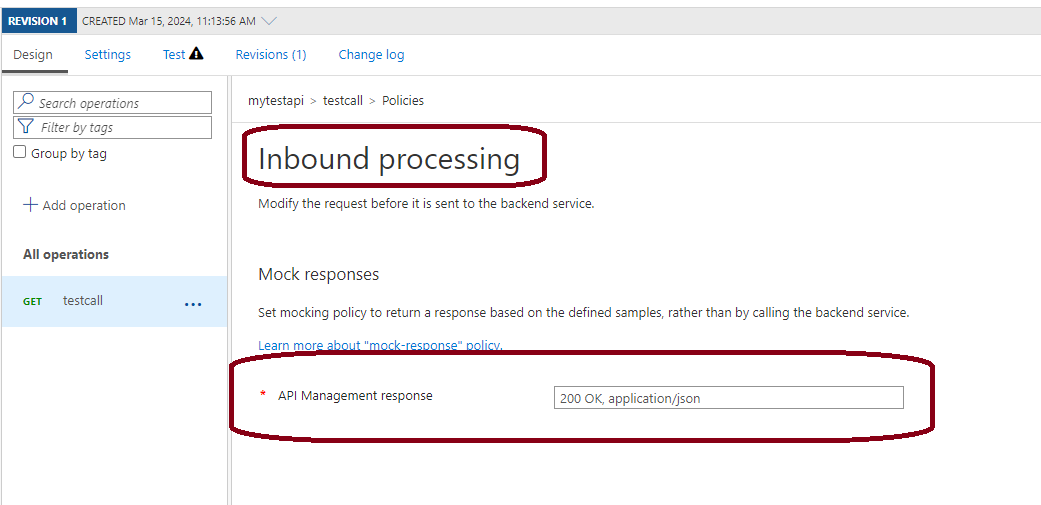
  5. In the API Management response textbox, type 200 OK, application/json.
  6. Click Save. You will see a yellow “Mocking is enabled” banner appear at the top of the operation. That confirms the policy is active.

Step 4: Test the Mocked API

Finally, verify that your mock is working correctly. APIM has a built-in Test Console — no Postman needed.

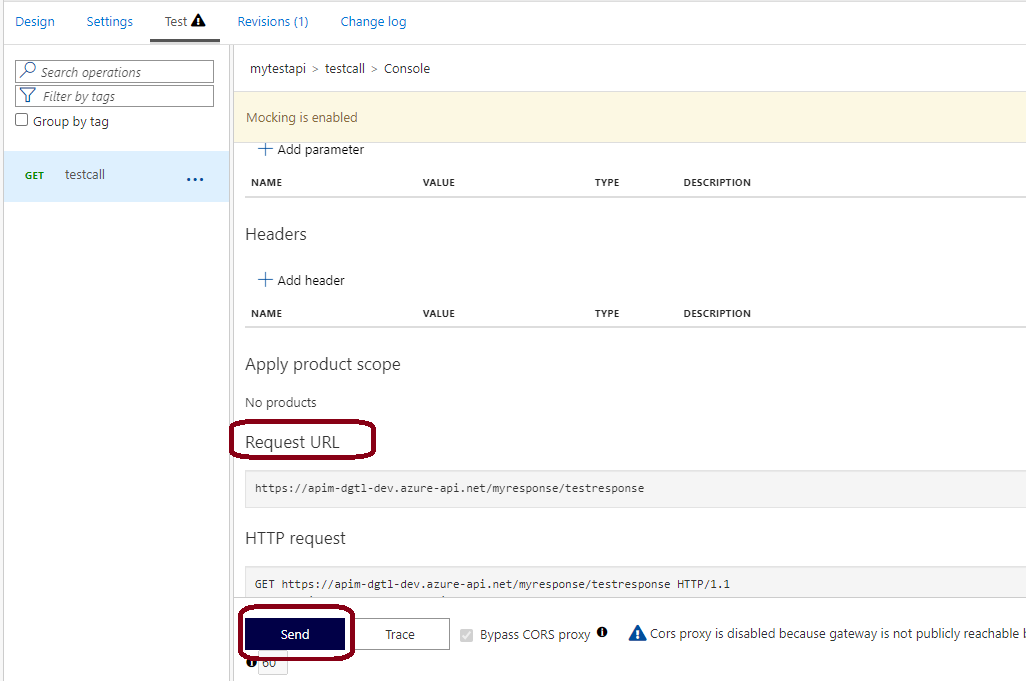
  1. Select your API and click the Test tab.
  2. Select the Test call operation and click Send.
  3. The HTTP response appears at the bottom of the screen. You should see a 200 OK status and the JSON body you defined.
  4. Confirm the JSON response matches the sample you entered in Step 2.

💡 If your APIM instance has IP restrictions, test by calling the APIM gateway URL directly in a browser or Postman. Find your gateway URL in the APIM instance → Overview tab.

Beyond Basics: Dynamic Mock Responses in Azure APIM

The basic setup above returns the same JSON every time. However, real-world testing needs more. For instance, you may want to return different data based on a query parameter, or simulate a 404 when a resource is not found. Fortunately, APIM policies make this straightforward.

Here is an example that returns a different response based on a userId query parameter:

<policies>
  <inbound>
    <base />
    <choose>
      <when condition="@(context.Request.Url.Query.GetValueOrDefault("userId", "") == "999")">
        <return-response>
          <set-status code="404" reason="Not Found" />
          <set-header name="Content-Type" exists-action="override">
            <value>application/json</value>
          </set-header>
          <set-body>{ "error": "User not found", "userId": "999" }</set-body>
        </return-response>
      </when>
      <otherwise>
        <mock-response status-code="200" content-type="application/json" />
      </otherwise>
    </choose>
  </inbound>
</policies>

With this policy in place, calling /users?userId=999 returns a 404 error. Any other userId returns the standard 200 mock. As a result, your frontend team can test both success and failure paths without any backend at all.

Mistakes to Avoid When Using APIM Mock Responses

Based on real project experience, here are the most common mistakes teams make with APIM mocking — and how to avoid them:

  • Forgetting to remove the mock policy before go-live. The mock intercepts requests before they reach your backend. If you forget to remove it, your production API will keep returning fake data. Always add a task to your go-live checklist to verify the mock policy is removed.
  • Using unrealistic sample data. A sample body of { "id": 1 } tells your frontend almost nothing. Instead, use a full realistic payload with all fields — including optional and nullable ones.
  • Only mocking the happy path. Most bugs happen at the edges — 404s, 500s, timeouts, and empty arrays. Mock those too so your frontend handles them correctly from day one.
  • Not communicating which APIs are mocked. Without clear naming or documentation, developers may not realise they are calling a mock. Consequently, they report bugs that do not actually exist in the real backend. Use a naming convention and keep a shared list of active mocks.

Summary

Azure APIM mock responses are one of the most underused features in the entire APIM toolset. By using the mock-response policy, your team can eliminate development blockers, run realistic QA cycles, and deliver client demos — all without a live backend. Furthermore, dynamic mocking with the choose policy takes this further by simulating real error scenarios and conditional logic.

Key Takeaways

  • Use mock-response policy to return static JSON responses without a backend.
  • Combine choose and return-response policies for dynamic, conditional mock responses.
  • Always use realistic sample payloads — not minimal placeholders.
  • Remove mock policies before go-live and add it to your deployment checklist.
  • Validate responses using APIM’s built-in Test Console or Postman.

Frequently Asked Questions

Q: Does enabling mock responses affect other APIs in the same APIM instance?
No. Mock policies are scoped to a specific operation. They only affect the operation they are applied to — all other APIs and operations remain completely unaffected.

Q: Can I mock different HTTP status codes like 404 or 500?
Yes. Use the return-response policy with set-status to return any HTTP status code. This is particularly useful for testing how your frontend handles error states.

Q: Will APIM mock responses work in all pricing tiers?
Yes. The mock-response policy is available across all Azure APIM tiers, including the Consumption tier.

Q: How do I know if a mock policy is active on an operation?
A yellow “Mocking is enabled” banner appears at the top of the operation design view whenever a mock policy is active. In addition, always check the inbound policy XML before deploying to production.

Q: Can I use APIM mock responses for load testing?
Yes — and this is one of the best use cases. Because the mock bypasses your backend entirely, you can run load tests against the APIM gateway itself without stressing your backend services at all.

Related Articles

How Azure API Management Fragments Prevent API Failures from Outdated Mobile Apps

Introduction

Azure API version handling is one of the most overlooked challenges in mobile app development. When older Android and iOS clients send outdated API version headers, backends built on newer versions break. As a result, you get cascading failures across downstream services. Moreover, these failures do not just affect one team — they hit backend engineers, frontend developers, and operations staff all at once.

When building modern APIs, supporting multiple app versions is very common. Over time, backend services evolve — and older mobile apps keep sending requests with outdated headers. In addition, missing metadata makes the problem worse. As a result, three practical challenges appear:

  • How do you enforce the correct API version without breaking older clients?
  • How do you ensure backward compatibility during a migration period?
  • How do you apply routing and transformation logic consistently across multiple APIs?

Fortunately, Azure API Management (APIM) policy fragments solve all three. A fragment lets you share reusable policy logic across APIs. In other words, you write the logic once and apply it everywhere — covering conditional logic, header checks, routing rules, and transformation.

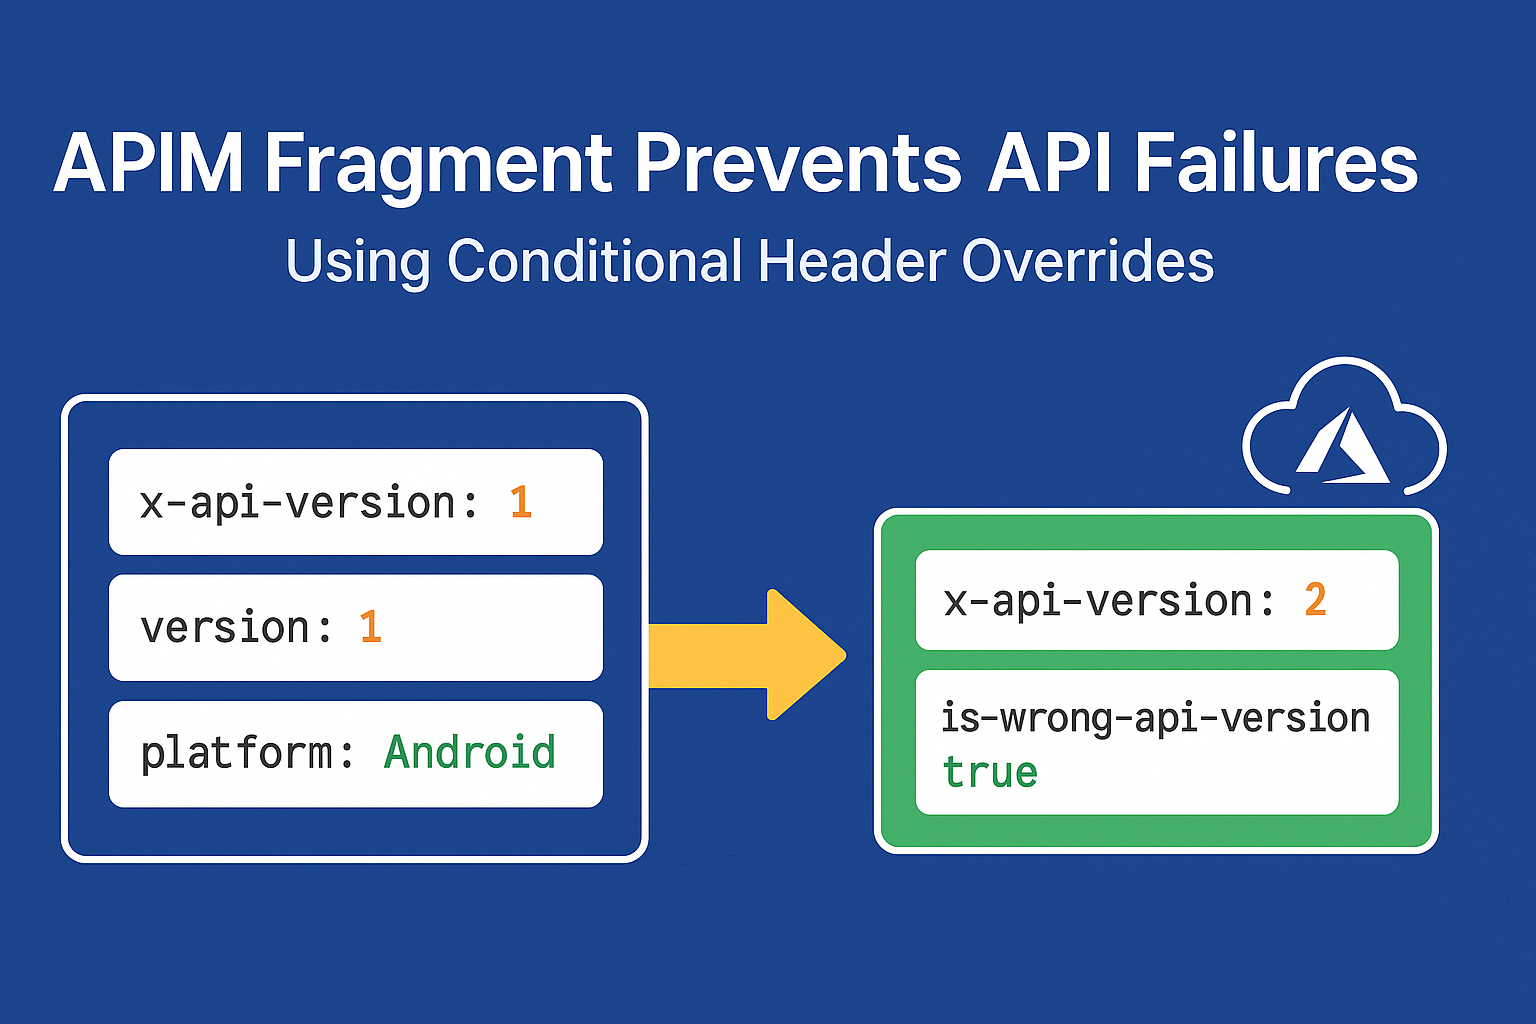
In this article, we walk through a real-world example. Specifically, a fragment checks incoming request headers for platform and API version. It then upgrades outdated mobile clients to the current version automatically — so you get predictable behavior without emergency patches.

Prerequisites

  • An Azure API Management instance with at least one API configured.
  • Access to the APIM portal or ARM/Bicep templates to manage policy fragments.
  • Basic familiarity with APIM inbound policies and C# policy expressions.

Why Azure API Version Handling Fails Without a Gateway Layer

In real-world mobile environments, not all users upgrade their apps right away. For example, some apps still send x-api-version: 1 long after the backend has moved to version 2. Consequently, this gap causes serious problems.

Specifically, this becomes critical when:

  • The microservice backend no longer supports API version 1.
  • Newer frontend apps (web, kiosk, partner systems) already expect API version 2.
  • The backend team has already removed version 1 logic.
  • Older devices or users cannot — or will not — update their apps quickly.

⚠️ Without a protective layer, requests from old mobile apps cause backend failures, break dependent downstream services, and force frontend teams into costly emergency deployments.

Therefore, proper Azure API version handling at the gateway is essential. Instead of patching each service one by one, you apply a single policy fragment. It upgrades outdated requests silently and works the same way every time.

Step-by-Step Guide to Configure the APIM Policy Fragment

Step 1: How Azure API Version Handling Reads Incoming Headers

First, the fragment reads three headers from every incoming request. If any header is missing, safe defaults apply automatically. In other words, the policy never fails on missing input.

[table]

Step 2: Azure API Version Handling — Apply Conditional Logic

Next, the condition checks two things at once. It looks for x-api-version == "1" and also checks whether the platform is Android or iOS. Both must be true for the override to fire. As a result, web, kiosk, and partner systems are completely unaffected.

💡 Why target only Android and iOS? Web browsers and partner integrations are updated centrally and quickly. Only mobile apps — distributed via app stores with slow adoption curves — require this protective fallback.

Step 3: Set Override Headers When Condition Matches

When both conditions are true, the fragment takes two actions:

  • Rewrites x-api-version to "2" — so the backend always treats the request as version 2.
  • Adds is-wrong-api-version: true — a tracking header for logging pipelines, analytics dashboards, and push notification systems.

1️⃣ x-api-version — API version override

This header is rewritten from "1" to "2" transparently. Consequently, the backend never sees the old version at all.

🔹 exists-action=”override” replaces the header value if it already exists, rather than adding a duplicate.

2️⃣ is-wrong-api-version — Observability flag

This tracking header is useful in several ways. For instance, backend services can log a warning. Similarly, analytics pipelines can track how many outdated clients are still active. In addition, push notification systems can use it to prompt users to upgrade.

Step 4: Silent Failure Handling

Furthermore, the entire condition block sits inside a try-catch. If an exception occurs during header parsing, the catch block returns false. As a result, the request moves forward unchanged through the normal pipeline. In other words, the fragment fails open, not closed — so one bad request never causes a service outage.

⚠️ Never remove the try-catch. In production APIM policies, an unhandled exception in a condition expression will return HTTP 500 to the caller.

Step 5: The Complete Policy Fragment

To get started, open the APIM portal and go to APIs → Policy Fragments → Add Fragment. Next, paste the code below and save. Finally, reference it from any API’s inbound policy using <include-fragment fragment-id="api-version-handler" />.

<!--
  APIM Policy Fragment: API Version Handler
  Scope: Global / Per-API / Per-Operation
  Purpose: Upgrade mobile clients on x-api-version=1 to version 2
-->
<fragment>
  <choose>
    <when condition="@{
      var version  = context.Request.Headers
                     .GetValueOrDefault("x-api-version", "1");
      var platform = context.Request.Headers
                     .GetValueOrDefault("platform", "other");
      try {
        if (version == "1" &&
           (platform == "Android" || platform == "iOS")) {
          return true;
        }
        return false;
      } catch (Exception e) {
        return false;
      }
    }">
      <!-- Upgrade the API version transparently -->
      <set-header name="x-api-version" exists-action="override">
        <value>2</value>
      </set-header>
      <!-- Flag the request for analytics and monitoring -->
      <set-header name="is-wrong-api-version" exists-action="override">
        <value>true</value>
      </set-header>
    </when>
  </choose>
</fragment>

Step 6: Reference the Fragment in Your API Policy

Once the fragment is saved, add it to any API’s inbound policy block. As a result, Azure API version handling logic applies to that API instantly — with no duplicated code.

<policies>
  <inbound>
    <base />
    <include-fragment fragment-id="api-version-handler" />
  </inbound>
  <backend>
    <base />
  </backend>
  <outbound>
    <base />
  </outbound>
</policies>

💡 You can include the same fragment across multiple APIs — changes to the fragment automatically apply to all APIs referencing it, with no need to edit each policy individually.

Step 7: Validate the Azure API Version Handling Behaviour

To verify the setup, use the APIM Test Console or Postman. Simply send the headers below and confirm the backend gets the correct overridden values.

Test case 1 — Old mobile client (override should fire)

GET /api/flights HTTP/1.1
x-api-version: 1
platform: Android
version: 3.2.1

Expected result: Backend receives x-api-version: 2 and is-wrong-api-version: true.

Test case 2 — Web client on version 1 (no override)

GET /api/flights HTTP/1.1
x-api-version: 1
platform: web

Expected result: Backend gets the request unchanged — x-api-version: 1 stays as-is and no tracking header is added.

Test case 3 — Updated mobile client (no override)

GET /api/flights HTTP/1.1
x-api-version: 2
platform: iOS
version: 4.0.0

Expected result: Backend gets the request unchanged — version is already 2, so the condition does not match.

Conclusion: Reliable Azure API Version Handling at Scale

In summary, this APIM policy fragment gives you a practical way to enforce Azure API version handling rules without breaking existing clients. By checking requests at the gateway and upgrading outdated headers silently, the fragment delivers four key benefits:

  • Zero downtime — old clients keep working during the migration period without any changes on their end.
  • Consistent versioning — one fragment applies the same logic across all APIs, with no duplicated policy code.
  • Observability — the is-wrong-api-version header flags outdated clients for analytics and logging.
  • Safe failure handling — the try-catch ensures the fragment never breaks the pipeline if an exception occurs.

Without this setup, outdated client requests cascade into backend failures. Moreover, they break downstream services and force emergency responses across multiple teams. Fortunately, a single Azure API version handling fragment — applied once at the gateway — stops all of that before it starts.

Notes

  • Security: The is-wrong-api-version header is added server-side. As a result, clients cannot spoof it — making it reliable for audit trails.
  • Performance: Policy fragment checks add negligible latency. In addition, the try-catch stops any exception from affecting request throughput.
  • Extensibility: You can extend the condition to cover more platform values (e.g. "HuaweiOS") or version ranges without touching any individual API policy.
  • Monitoring: Pair the is-wrong-api-version header with Azure Monitor or Application Insights to build a real-time dashboard of outdated client traffic.

Related Articles

How to Use Policy Fragments to Simplify Your Azure API Management Policies

In the evolving landscape of API-driven architectures, Azure API Management (APIM) has emerged as a critical tool for securing, scaling, and streamlining API interactions. At its core, APIM policies empower developers to manipulate requests and responses across the API lifecycle—enforcing security, transforming data, or throttling traffic. But as organizations scale, managing these policies across hundreds of APIs and operations becomes a labyrinth of duplicated code, hidden configurations, and maintenance nightmares.

Introduction: 

A policy fragmentation, a game-changing feature in APIM that re-imagines policy management by breaking monolithic configurations into modular, reusable components. Imagine defining a rate-limiting rule once and applying it seamlessly across all APIs, or centralizing authentication logic to ensure consistency while eliminating redundancy. Policy fragments not only streamline development but also turn maintenance into a single-step process—fix a fragment once, and every API referencing it inherits the update.

When you work with Azure API Management on a regular basis, you probably are familiar with policies. Policies allow you to perform actions or adjustments on the incoming request before it’s sent to the backend API, or adjust the response before returning to the caller.

Policies can be applied on various levels, so called scopes, and each lower level can inherit the policy of a higher level.

  • Global level => executed for all APIs
  • Product level => executed for all APIs under a product
  • API level => executed for all operations under an API
  • Operation level => executed for this single operation

What is Fragmentation in APIM?

Fragmentation in Azure API Management (APIM) refers to the ability to break down API policies into smaller, reusable components called policy fragments. These fragments can then be applied across multiple APIs or operations within an API Management instance. Each policy fragment typically consists of one or more policy elements that define a set of instructions to be executed within a specific stage of the API request-response lifecycle (inbound, outbound, backend, on-error).

Fragments promote reusability by allowing you to define common sets of policies that can be shared and applied across different APIs or operations

Fragmentation improves development efficiency by eliminating the need to duplicate policy configurations across APIs. Changes made to a policy fragment propagate to all APIs where it’s applied, reducing maintenance efforts

Why Fragmentation required for policy creation?

The main problems with policies always have been maintenance and reuse. Policy code is quite hidden within the portal (especially with so many scope levels where it can reside), so it’s hard to see where a policy is used. When a certain piece of policy is used in multiple places, it’s even harder to keep track where they’re used and keeping them consistent. Bug fixing is difficult and cumbersome, as you need to find out all the places where you need to fix it.

To overcome the above problem, Microsoft introduced the apim Fragmentation.

Benefits of using policy fragments

There are several benefits to using policy fragments in your Azure API Management policies:

Reusability : Policy fragments allow you to create reusable code snippets that can be used in multiple policies. This promotes code reuse and reduces the amount of code you need to maintain.

Modularity : Policy fragments promote modularity by allowing you to create self-contained code snippets that can be added to a policy when needed. This makes it easier to read and understand policies, as well as test and debug them.

Maintainability : Policy fragments make policies more maintainable by allowing you to make changes to the code in a single place, rather than having to update the same code in multiple policies.

Readability : Making it easier for other developers to understand and review your code. With modular and reusable fragments, it’s easier to spot mistakes and ensure consistency across policies.

Use case:

Consider, your organization has three APIs: PaymentAPI, UserAPI, and InventoryAPI. All APIs need a rate limit of 100 requests per minute per client to prevent abuse. Instead of duplicating the rate-limiting policy in each API’s configuration, you’ll create a reusable policy fragment and apply it centrally.

Let’s consider a simple example of APIM fragmentation for rate limiting, which is a common use case in API management. In this example, we’ll create a policy fragment for rate limiting and apply it to multiple APIs within an API Management instance. For this example we are going to have create policy for controlling the API request.

Understanding the <rate-limit> Policy in Azure API Management

The <rate-limit> policy in Azure API Management (APIM) is a critical tool for controlling API traffic by restricting the number of requests a client can make within a specified time window. This policy helps prevent abuse, manage resource consumption, and ensure fair usage across consumers. Below is a detailed breakdown of its attributes, behavior, and practical use cases for your article.

Step: 1 Click & go to  “Policy Fragments”

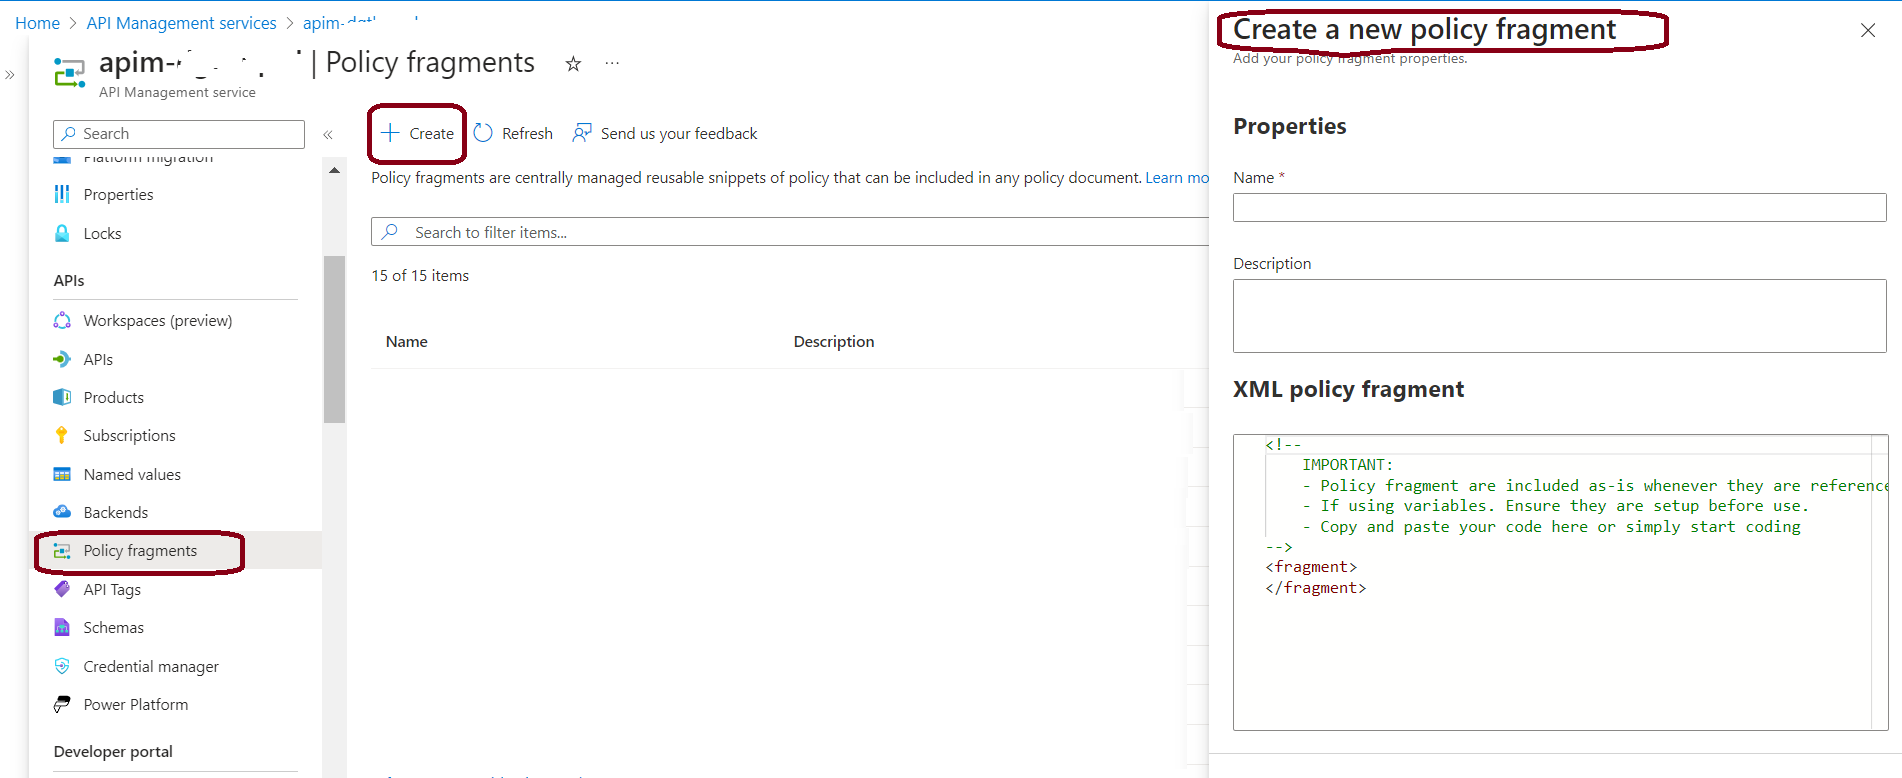
Go to “Policy fragments” in the left menu panel and click create button. You can able to view like below snap.


Step: 2  Enter the properties to create New Fragments

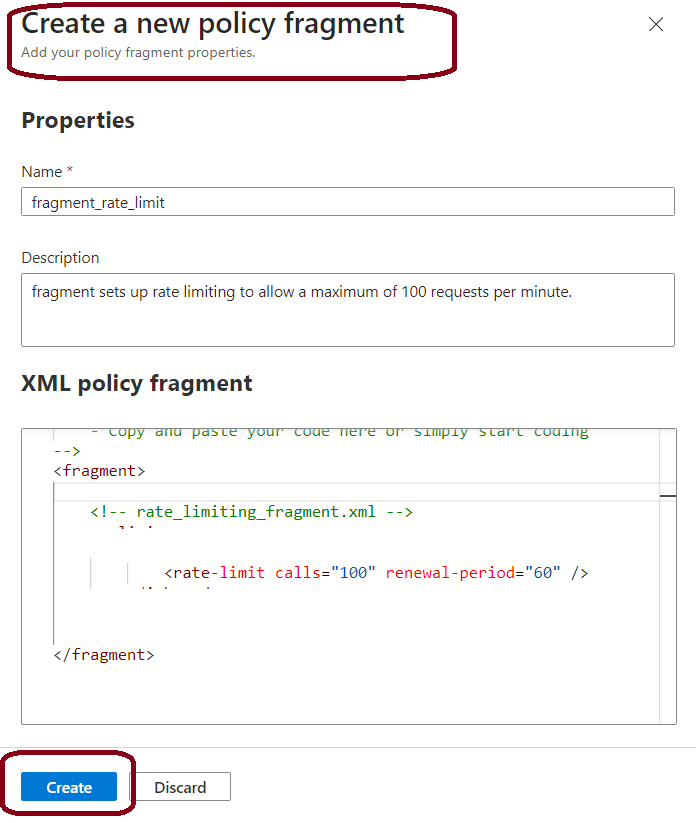
Apply the details, of Name of Fragment, its description and policy like shown below. 

[su_highlight background=”#ffffff” color=”#f91355″]rate-limit – The  policy in Azure API Management (APIM) enforces a request quota per client to prevent overuse or abuse of your API.[/su_highlight]

<!-- rate_limiting_fragment.xml -->
<rate-limit calls="100" renewal-period="60" />


Step: 3 Finally click create button

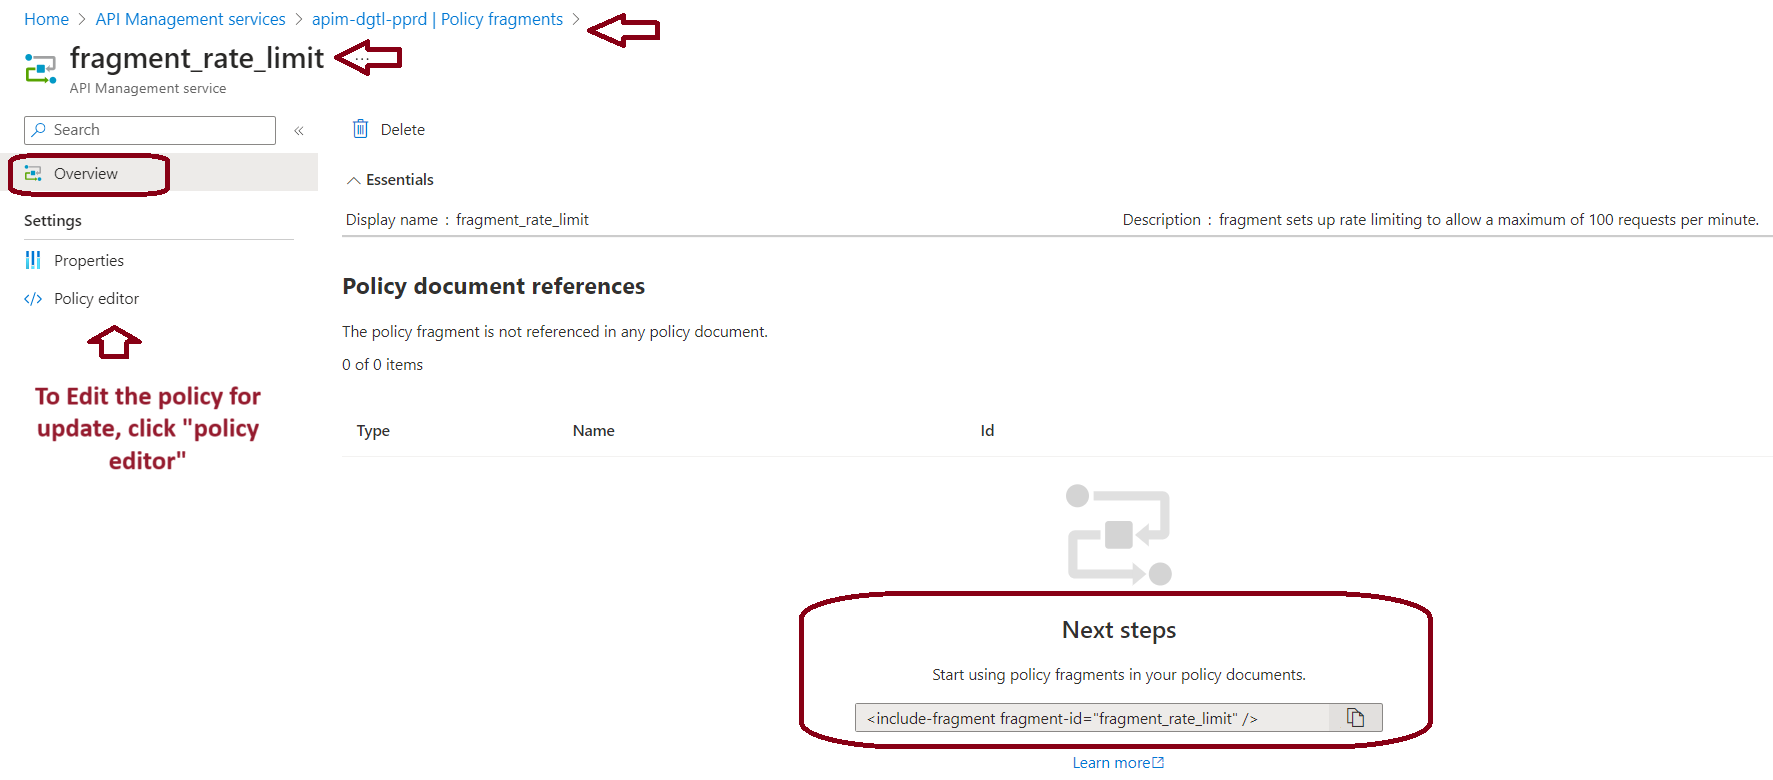
You can able to see, our Fragment is created and there is 0 reference, means it is yet to apply to any policy.                                                                                                                                                   

How to add the fragment in the policy

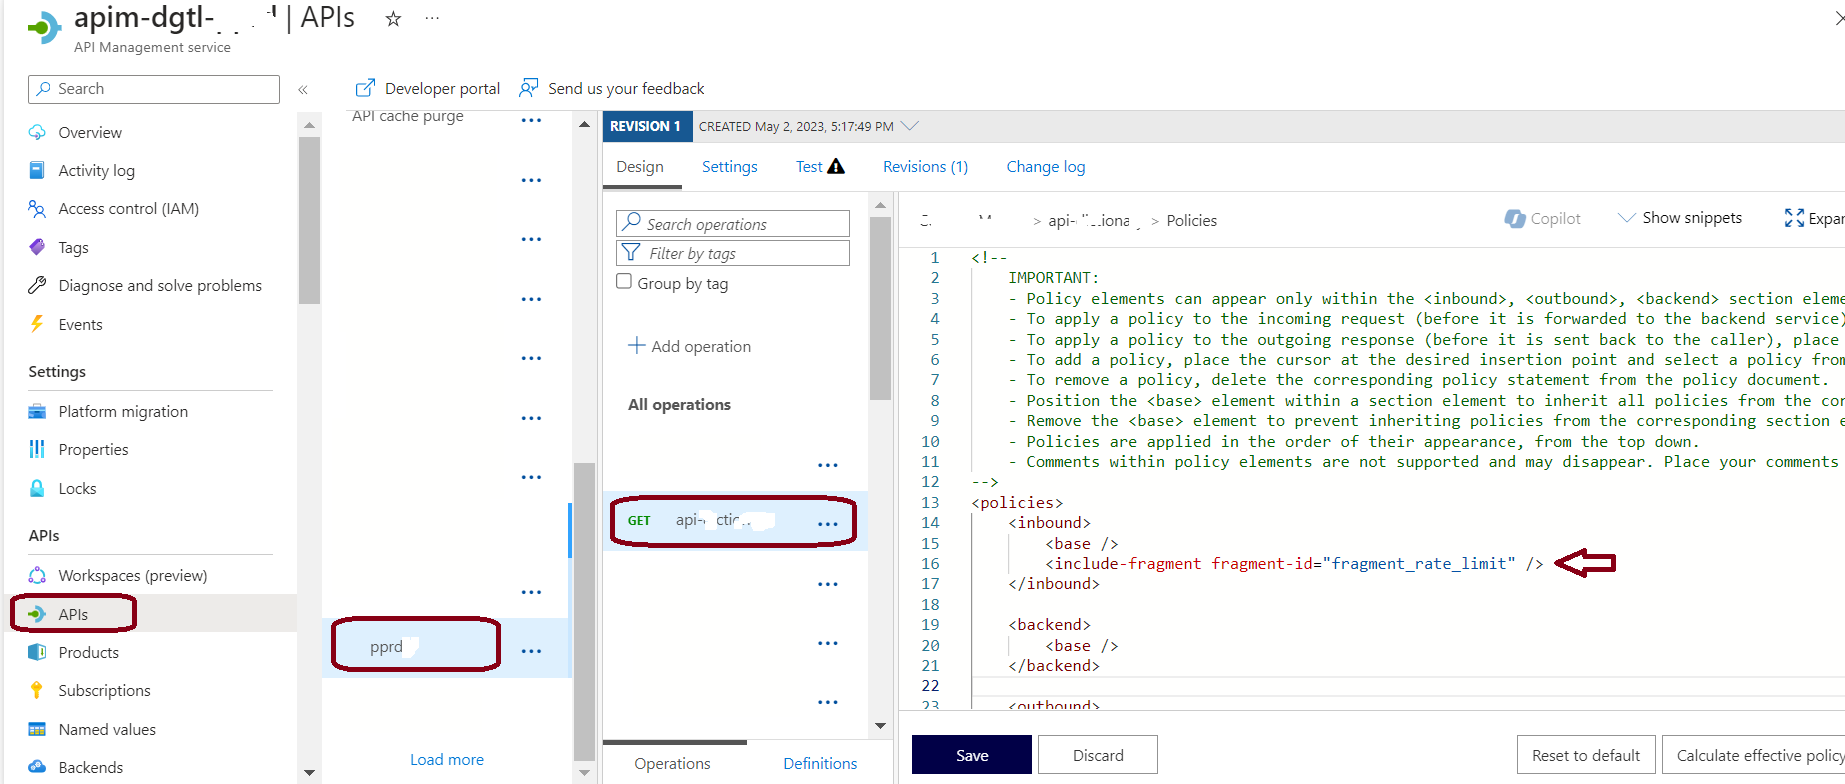
These fragments can be included in the policy of individual APIs or operations using the <include> element, allowing for modular and reusable policy configurations. If you click on the created fragments, you can able to see the view, how to include this fragment in the policy (pls refer the last snap mentioned in the post).

## Add below line in the policy to include the Fragment
<include-fragment fragment-id="fragment_rate_limit" />


Edit Fragment for update:

You can click on Policy editor to open the policy to edit/update and save

Best Practices

  • Naming Conventions: Prefix fragments with fragment_ for easy identification.
  • Documentation: Add <description> tags in fragments to clarify usage.
  • Reference Tracking: Use the References column in the Policy fragments list to identify impacted APIs.

By leveraging policy fragments, APIM becomes a scalable, maintainable solution for enterprise-grade API governance.

Summary 

Azure API Management (APIM) policies enable customization of request/response behavior at four scopes: Global, Product, API, and Operation. However, maintaining and reusing policies across these scopes can be challenging due to hidden configurations and duplication. Policy Fragmentation addresses this by breaking policies into reusable XML components (fragments). These fragments centralize common logic (e.g., rate limiting, authentication) and are included via <include-fragment>, ensuring consistency, reducing redundancy, and simplifying updates. For example, a rate-limiting fragment can be applied across multiple APIs, and changes propagate automatically. Fragments improve maintainability, enforce standardization, and streamline debugging.