All posts by Thiyagu

How To Connect Azure Kubernetes Cluster Using Kubectl

Introduction

Azure Kubernetes Service (AKS) simplifies the deployment, management, and scaling of containerized applications using Kubernetes. To interact with an AKS cluster, you need to establish a connection using kubectl, the Kubernetes command-line tool. This guide provides a step-by-step process to explain How To Connect Azure Kubernetes Cluster Using Kubectl

Why Kubectl needed?

Connecting to an AKS cluster is an essential step for managing workloads, monitoring performance, and deploying applications. This process is especially critical for:

  • Monitoring Cluster Health: Using kubectl commands to retrieve performance metrics and check node status.
  • Application Deployment: Deploying and managing containerized applications in the AKS cluster.
  • Cluster Administration: Performing administrative tasks like scaling, updating, or debugging resources within the cluster.

Whether you’re a developer or administrator, establishing this connection ensures you can effectively manage your Kubernetes environment.

To connect to an Azure Kubernetes Service (AKS) cluster using kubectl, you will need to perform the following steps:

Prerequisites ( install both Azure CLI and Kubectl)

STEP: 1 Install the Azure CLI

If you haven’t installed the Azure CLI on your local machine, you can download and install it from the official Microsoft documentation here.

STEP: 2 Install Kubectl

Install the Kubernetes command-line (click here) tool “Kubectl” , if you haven’t installed it already.

Steps to connect Azure account:

STEP: 3 Authenticate with Azure

Open command prompt, run az login command to authenticate your CLI with your Azure account. Once you run this command, you will be prompted to enter your Azure account credentials.

az login

Steps to connect Azure AKS Cluster:

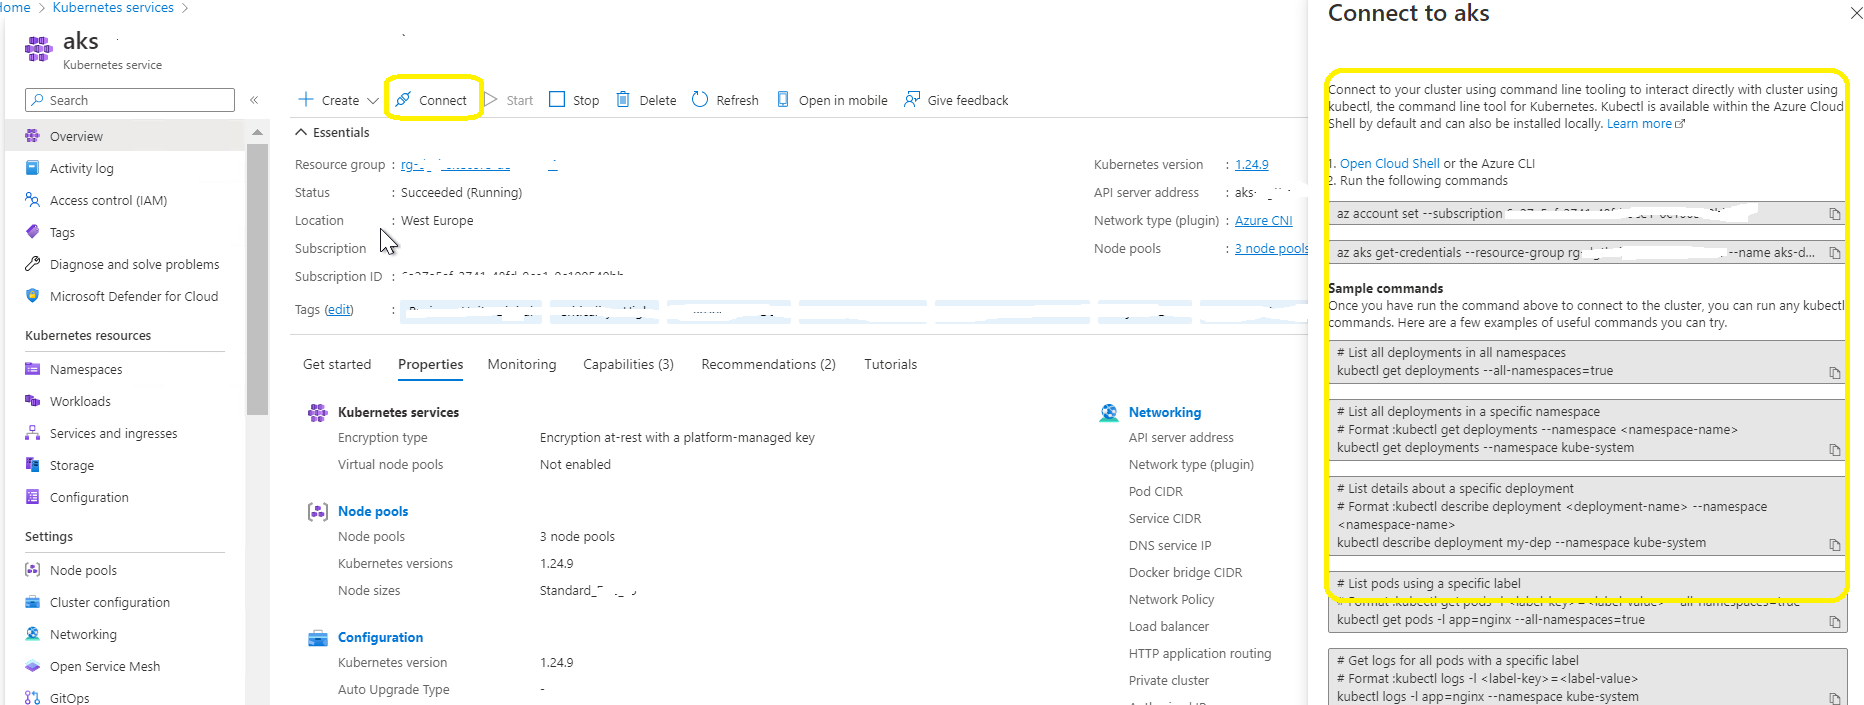
Go to Azure Portal -> Kubernetes Services -> Select the required Cluster -> Overview -> Connect -> to find the entire command for the specific cluster itself or follow the below commands one by one by replacing with subscription Id, cluster name and resource group name.
STEP: 4 Set the subscription

To set subscription, run

az account set --subscriptiond 95fe7-8d2c-4297-ad8b-a8eb08322955

STEP: 5 Generate kubeconfig file

Open command prompt, run the below command and run az aks get-credentials command to connect to your AKS cluster. The get-credentials command downloads credentials and configures the Kubernetes CLI to use them.

#Syntax: 
az aks get-credentials --resource-group <resource-group-name> --name <cluster-name>

Replace <resource-group-name> with the name of the resource group that contains your AKS cluster, and <cluster-name> with the name of your AKS cluster.

az aks get-credentials --resource-group rg-dgtl-pprd-we-01 --name aks-dgtl-pprd-we-01

Above command will create the kubeconfig file in the user root directory. To get kubeconfig file in the specific location

Connect Azure Kubernetes Cluster Using Kubectl

STEP: 6 Verify the connection

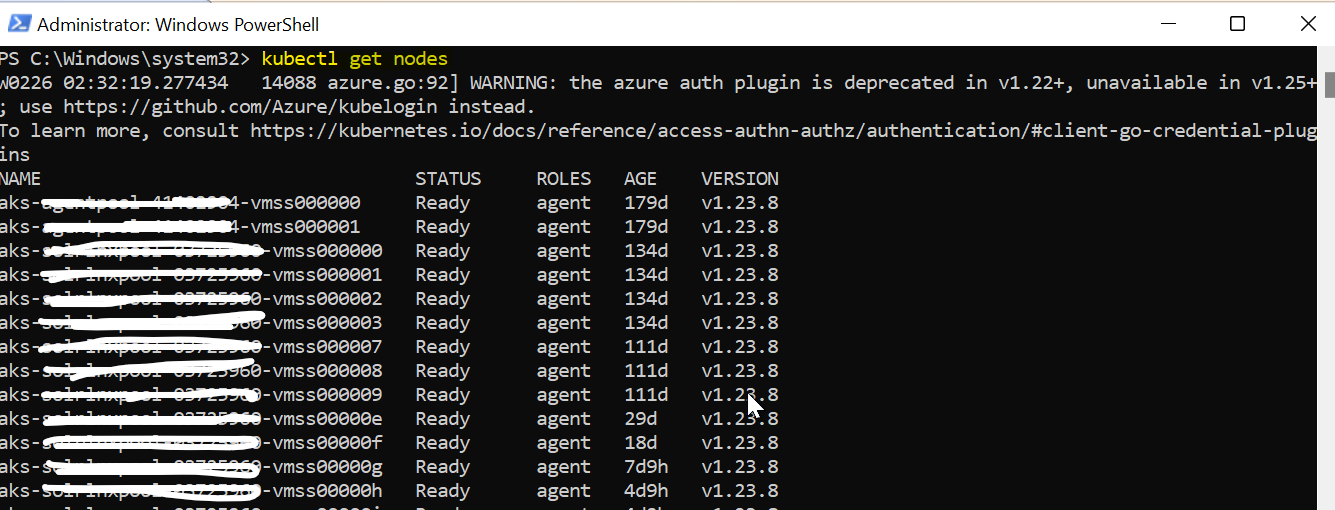
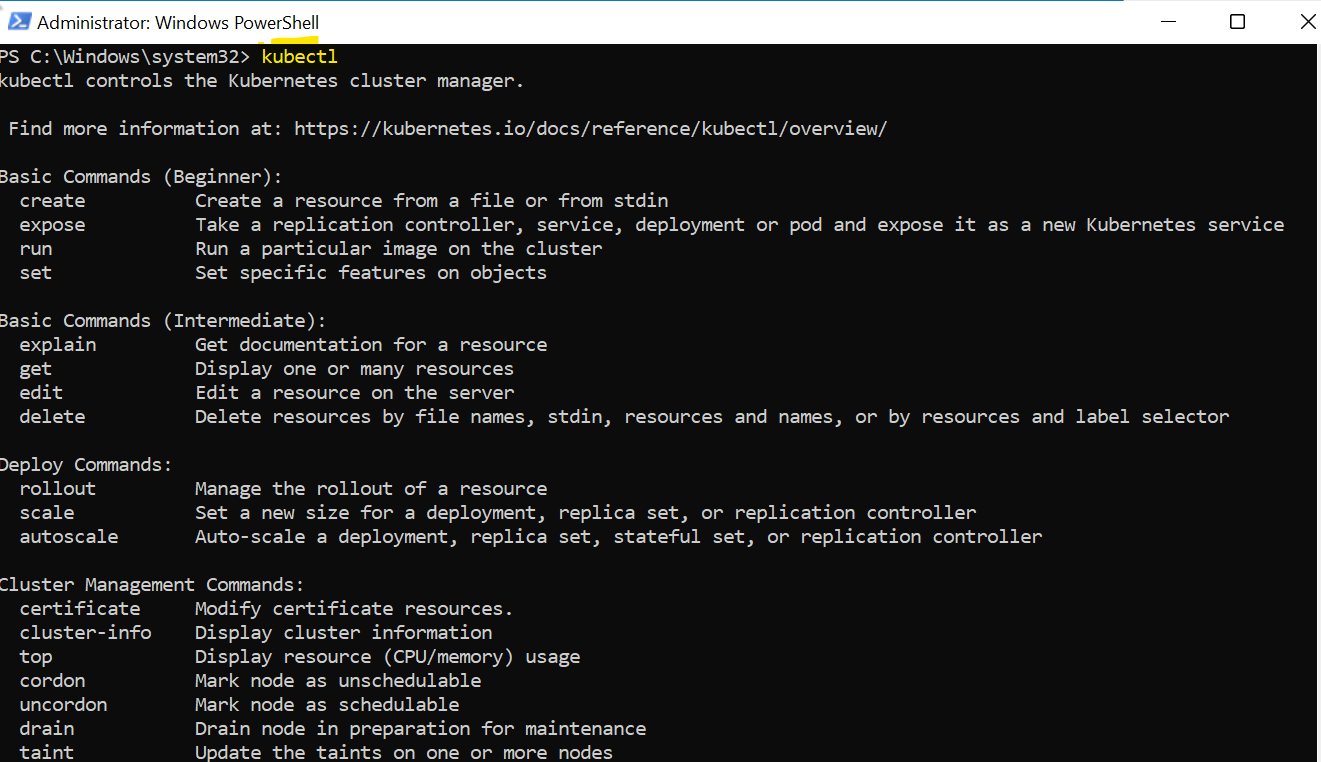
To verify that Kubectl is connected to your AKS cluster, run the Kubectl get nodes command. This command should display a list of the nodes in your AKS cluster. If the command returns the list of nodes, then you have successfully connected to your AKS cluster using Kubectl.

kubectl get nodes
Points to Remember

  • Go to Azure Portal -> Kubernetes Services -> Select the required Cluster -> Overview -> Connect -> to find the entire command for the specific cluster itself or follow the below commands one by one by replacing with subscription Id, cluster name and resource group name.
  • First we need to login to the Azure account by configuring Azure subscription and login details. And then we need to connect to Kubernetes Cluster only then we can able to run Kubectl commands.

Conclusion

Connecting to an AKS cluster using kubectl is a fundamental skill for managing Kubernetes workloads in Azure. By following this guide, you can authenticate, configure, and verify your connection to the AKS cluster seamlessly. This enables you to monitor cluster performance, deploy applications, and manage resources effectively.

As Kubernetes continues to be a vital platform for container orchestration, mastering tools like kubectl and Azure CLI is essential for efficient cluster management.

How To Copy Secrets From KeyVault To Another KeyVault In Azure

Introduction

Azure Key Vault is a secure cloud service for managing secrets, encryption keys, and certificates. In modern multi-region deployments, ensuring that application secrets are consistently available across regions is essential for high availability and disaster recovery. However, manually copying secrets from one Key Vault to another can be tedious, error-prone, and time-consuming, especially when dealing with numerous secrets.

This blog post demonstrates how to automate the process of copying secrets from one Azure Key Vault to another using a PowerShell script. By following this guide, you can efficiently replicate secrets between regions, ensuring consistency and reducing manual intervention.

Use Case:

In our application setup, we aimed to configure high availability by deploying the application in two Azure regions. The primary Key Vault in region 1 contained numerous secrets, which we needed to replicate to the Key Vault in region 2. Manually moving each secret one by one was impractical and error-prone.

To overcome this, we developed an automated process using PowerShell to copy all secrets from the source Key Vault to the destination Key Vault. This approach eliminates human errors, saves time, and ensures seamless secret replication for high availability.

e. This blog will help you to understand How To Copy Secrets From KeyVault To Another In Azure using PowerShell script.

To clone a secret between key vaults, we need to perform two steps:

  1. Retrieve/export the secret value from the source key vault.
  2. Import this value into the destination key vault.

You can also refer below link to learn how to maintain your secrets in key vault and access in YAML pipeline

Step 1: Install Azure AZ module

Use the below cmdlet to Install the Azure PowerShell module if not already installed

# Install the Azure PowerShell module if not already installed
  Install-Module -Name Az -Force -AllowClobber

Step 2: Set Source and destination Key Vault name

# Pass both Source and destination Key Vault Name
Param( [Parameter(Mandatory)] 
[string]$sourceKvName, 
[Parameter(Mandatory)] 
[string]$destinationKvName )

Step 3:  Connect the Azure portal to access the Key Vault (non-interactive mode)

As we are doing the automation, so you can’t use Connect-AzAccount (which will make the popup to authenticate), if want to execute without any manual intervention then use az login with non-interactive mode as shown in below.

# Connect to Azure portal (you can also use Connect-AzAccount)
az login --service-principal -u "0ff3664821-0c94-48e0-96b5-7cd6422f46" -p "XACccAV2jXQrNks6Lr3Dac2B8z95BAt~MTCrP" --tenant "116372c23-ba4a-223b-0339-ff8ba7883c2"

Step 4:  Get the all the secrets name from the source KV

# Get all the Source Secret keys
$secretNames = (Get-AzKeyVaultSecret -VaultName $sourceKvName).Name

Step 5: Copy Secrets From source to destination KV.

The below script will loop based on the number of key names to fetch both name of the key and its value from the source key Vault and started to set the key and value in the destination KvName.

# Loop the Secret Names and copy the key/value pair to the destination key vault
$secretNames.foreach{
Set-AzKeyVaultSecret -VaultName $destinationKvName -Name $_ `
-SecretValue (Get-AzKeyVaultSecret -VaultName $sourceKvName -Name $_).SecretValue
}

Full code

# Pass both Source and destination Key Vault Name
Param(
[Parameter(Mandatory)]
[string]$sourceKvName,
[Parameter(Mandatory)]
[string]$destinationKvName
)
# Connect to Azure portal (you can also use Connect-AzAccount)
az login --service-principal -u "422f464821-0c94-48e0-96b5-7cd60ff366" -p "XACccAV2jXQrNks6Lr3Dac2B8z95BAt~MTCrP" --tenant "116372c23-ba4a-223b-0339-ff8ba7883c2"
# Get all the Source Secret keys
$secretNames = (Get-AzKeyVaultSecret -VaultName $sourceKvName).Name
# Loop the Secret Names and copy the key/value pair to the destination key vault
$secretNames.foreach{
Set-AzKeyVaultSecret -VaultName $destinationKvName -Name $_ `
-SecretValue (Get-AzKeyVaultSecret -VaultName $sourceKvName -Name $_).SecretValue
}

Conclusion

Managing secrets across multiple Azure regions can be challenging but is crucial for ensuring high availability and disaster recovery. Automating the process of copying secrets between Key Vaults not only streamlines the operation but also enhances reliability and reduces the risk of errors.

By following the steps outlined in this blog, you can easily replicate secrets between Azure Key Vaults using PowerShell. This solution ensures that your applications in different regions are configured with consistent and secure credentials, paving the way for robust and scalable deployments.

Implement this process to save time, minimize errors, and focus on scaling your applications while Azure handles secure secret management for you.


Where to use the –replace operator and Replace() method & its difference

Introduction

Manipulating text is a common task in any scripting or programming language, and PowerShell is no exception. Whether you need to replace a single word, a pattern, or handle more complex transformations using regular expressions, PowerShell provides two powerful tools for the job: the .Replace() method and the -replace operator.

In this article, we’ll explore the differences between these two approaches, highlight their strengths, and demonstrate practical examples to help you choose the right one for your needs. From simple string substitutions to advanced regex-based replacements, you’ll learn how to effectively use these features to handle text in PowerShell scripts with ease.

By the end of this tutorial, you’ll understand:

  • When to use the .Replace() method for straightforward replacements.
  • How the -replace operator leverages the power of regular expressions for more complex scenarios.
  • Common pitfalls and tips for working with special characters.

Let’s dive into how you can make the most of these string replacement techniques in your PowerShell scripts!

–replace operator and Replace() method

In this post, you’re going to learn where to use the PowerShell replace() method and PowerShell replace operator. The tutorial will cover the basics and even drive into some regular expressions.

.Replace is a .NET method and -replace is a PowerShell operator that uses regular expressions. In another word, the .Replace() method comes from the .NET String class whereas the -Replace operator is implemented using System.Text.RegularExpressions.Regex.Replace().

The -replace operator takes a regular expression (regex) replacement rule as input and replaces every match with the replacement string.

When and where to use it?

Like other languages, PowerShell can work with strings and text. One of those useful features is to use PowerShell to replace characters, strings, or even text inside of files. In PowerShell, Replace() method and -replace operator is used to finding specified characters and replace them with a new string. To perform simple replacements, you can use the replace() method but if you need to match and replace anything more advanced, always use the replace operator.

.Replace Method:

Example 1: Replace characters in strings.

$string = ‘hello, dotnet-helpers.com’

In the above code, we gave the string that likes to replace. From the above string value, we would like to replace “hello” with “Welcome”. To do this in PowerShell, first you need to figure out the matched text. Once it’s found, need to replace that text with a user-defined value.

$string = ‘hello, dotnet-helpers.com’
$string.replace(‘hello’,’Welcome’)

The replace() method has two arguments; the string to find and the string to replace. As shown above, the “hello” string is going to replace with “Welcome”.

Points to Remember:

You can call the replace() method on any string to replace any literal string with another. If the string-to-be-replaced isn’t found, the replace() method returns nothing.

Example 2: Replacing multiple strings

You aware that replace() method returns a string, to replace another instance, you can append another replace() method at the end ( .replace(‘dotnet-helpers’,’dotnet-helpers.com!!!’) ). In the previous example, we try to replace “hello” with “Welcome”, in this example we trying to replace another string with one more .replace method as shown below.

$string = ‘hello, dotnet-helpers’
$string.replace(‘hello’,’welcome’).replace(‘dotnet-helpers’,’dotnet-helpers.com!!!’)

Points to Remember:

You can chain together as many replace() method calls as necessary

-Replace Operator:

The replace operator is similar to the .Replace method (in that you provide a string to find and replace). But, it has one big advantage; the ability to use regular expressions to find matching strings.

Example 1: Replacing single string

$string = ‘hello, dotnet-helpers.com’
$string -replace ‘hello,’, ‘Welcome to’

Example 2: Replacing multiple strings

Like the replace() method, you can also chain together usages of the replace operator.

$string = ‘hello, dotnet-helpers’
$string -replace ‘hello,’,’Welcome to’ -replace ‘dotnet-helpers’,’dotnet-helpers.com!!!’

-Replace Operator with Regex:

Replacing strings in PowerShell with the replace() method works but it’s limited. You are constrained to only using literal strings. You cannot use wildcards or regex. If you’re performing any kind of intermediate or advanced replacing, you should use the replace operator.

The -replace operator takes a regex (regular expression) replacement rule as input and replaces every match with the replacement string. The operator itself is used as shown in the following examples : <input string> -replace <replacement rule>,<replacement string>

Example 1: With Simple Regex

In this example, you can use the expression hello|hi to match both required strings using the regex “or” (|) character as you can see below. In the below regex, it finds the match for a string like “hello” or “hi” and if a match is found it will replace with the given string.

$string = ‘hi, dotnet-helpers.com’
$string -replace ‘hello|hi’,’Good day’

Example 2: Direct Replace of special character

As per the below example, you need to replace text in a string. That string contains a couple of regex special characters like a bracket and an exclamation mark. If you try to replace the string [dotnethelpers!] with dotnet-helpers.com as shown below, then it will not work as expected because the characters will have special meaning in regex language.

$string = “hi, [dotnethelpers!]”
$string -replace ‘[dotnethelpers!]’,’dotnet-helpers.com’

The problem is you often need to replace “[]”, “!” or other characters that have special meaning in regex language. One way to achieve this is to escape every special character by “\”.

To overcome this problem, you have two options. You can either escape these special characters by prepending a backslash to the front of each character or using the Escape() method (([regex]::Escape(‘[dotnethelpers]’)).

Points to Remember:

If you try to replace any special characters directly from the string using Replace operator then it won’t work correctly as characters will have special meaning in regex language.

Conclusion :

Replacing characters or words in a string with PowerShell is easily done using either the replace method or -replace operator. When working with special characters, like [ ], \ or $ symbols, it’s often easier to use the replace() method than the operator variant. Because this way you don’t need to escape the special character.

To perform simple replacements, you can use the replace() method but if you need to match and replace anything more advanced, always use the replace operator.

How to Use PowerShell for DNS Record Monitoring and Troubleshooting

Introduction

DNS (Domain Name System) records are the backbone of internet connectivity for web servers, mail servers, and other networked systems. Missing or misconfigured DNS records can lead to service disruptions, causing websites to become unreachable or emails to fail. PowerShell offers a robust cmdlet, Resolve-DnsName, that enables administrators to monitor, validate, and troubleshoot DNS configurations (PowerShell DNS record monitoring).

This article introduces a PowerShell script designed to simplify the process of checking DNS resolution for multiple domains. By leveraging this script, you can automate DNS checks, verify propagation of updates, and ensure compliance with best practices for security and network reliability.

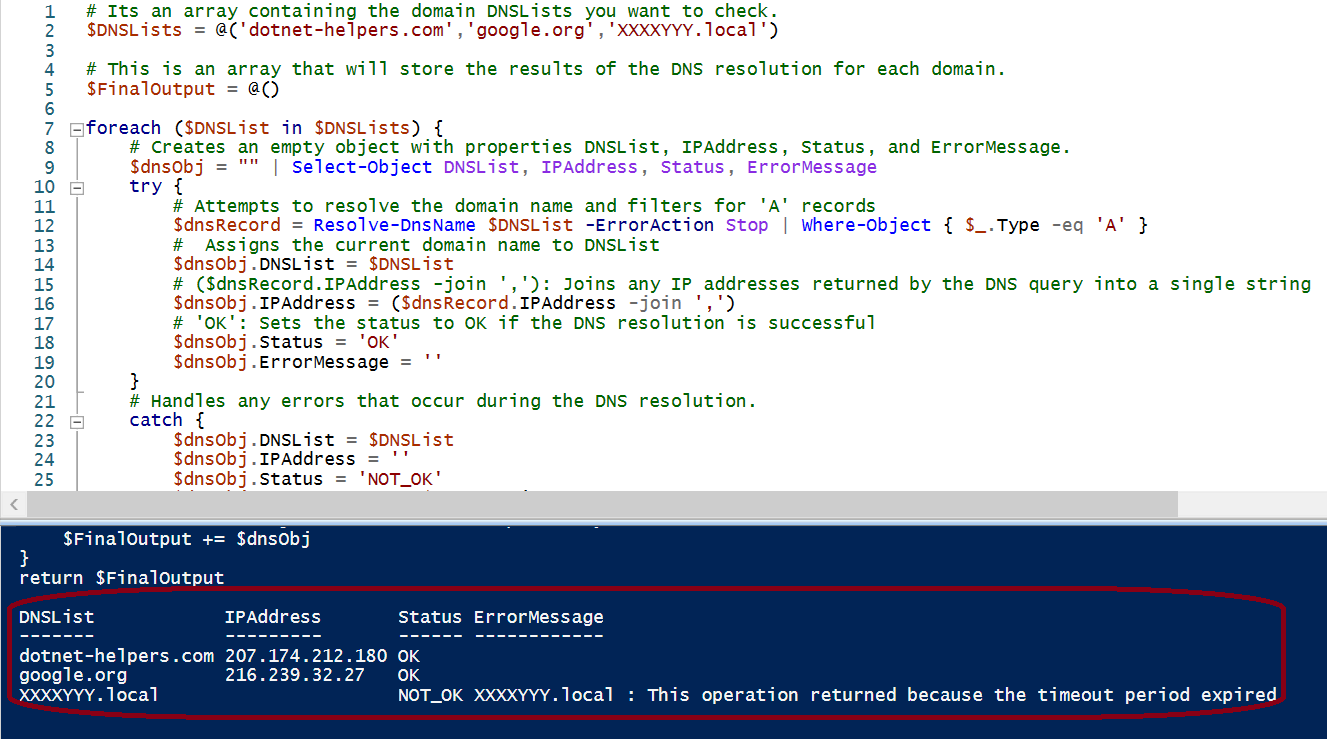
The script processes a list of domain DNSLists and retrieves their resolution status, IP addresses, and any associated errors, providing a comprehensive overview in a single execution.

If you’re managing web or mail servers, you know how heavily these servers rely DNS records. Error/Missing DNS records can cause all sorts of problems, including users not being able to find your website or the non-delivery of emails. It is a good thing that the PowerShell Resolve-DnsDNSList cmdlet exists, and with it, monitoring DNS records can be automated through scripting.

This script is designed to check the DNS resolution status for a list of domain DNSLists against a set of DNS servers, and it returns detailed results including the IP address, status, and any error messages.

When to Use This Script

You might use this script in several scenarios:

Monitoring and Troubleshooting DNS Issues: If you’re managing multiple domains and want to verify that they resolve correctly across different DNS servers, this script provides a quick way to gather and assess that information.

Validation of DNS Configurations: When you’re updating DNS records (e.g., for a new website, email configuration, or any other service), you can use this script to confirm that the records have propagated properly and are resolving as expected.

Security and Compliance Checks: Ensuring that all your domains are resolving correctly can be a part of your security checks to avoid phishing or man-in-the-middle attacks due to incorrect or hijacked DNS records.

Network Operations: In a larger network or data center, you might want to regularly check the resolution of internal or external domains to ensure consistent access to critical services.

Explanation for PowerShell DNS record monitoring Script

Here’s a breakdown of how the script works:

# Its an array containing the domain DNSLists you want to check.
$DNSLists = @('dotnet-helpers.com','google.org','XXXXYYY.local')
# This is an array that will store the results of the DNS resolution for each domain.
$FinalOutput = @()
foreach ($DNSList in $DNSLists) {
    # Creates an empty object with properties DNSList, IPAddress, Status, and ErrorMessage.
    $dnsObj = "" | Select-Object DNSList, IPAddress, Status, ErrorMessage
    try {
        # Attempts to resolve the domain name and filters for 'A' records
        $dnsRecord = Resolve-DnsName $DNSList -ErrorAction Stop | Where-Object { $_.Type -eq 'A' }
        #  Assigns the current domain name to DNSList
        $dnsObj.DNSList = $DNSList
        # ($dnsRecord.IPAddress -join ','): Joins any IP addresses returned by the DNS query into a single string
        $dnsObj.IPAddress = ($dnsRecord.IPAddress -join ',')
        # 'OK': Sets the status to OK if the DNS resolution is successful
        $dnsObj.Status = 'OK'
        $dnsObj.ErrorMessage = ''
    }
    # Handles any errors that occur during the DNS resolution.
    catch {
        $dnsObj.DNSList = $DNSList
        $dnsObj.IPAddress = ''
        $dnsObj.Status = 'NOT_OK'
        $dnsObj.ErrorMessage = $_.Exception.Message
    }
    # Adds the result object to the $FinalOutput array.
    $FinalOutput += $dnsObj
}
return $FinalOutput

Conclusion

DNS record validation is a critical task for maintaining the functionality and security of web and mail servers. The PowerShell script outlined in this article provides a reliable way to monitor DNS resolution for multiple domains. By automating the DNS-checking process, administrators can quickly identify and address issues, ensuring minimal downtime and improved reliability of services.

Whether you’re validating recent DNS updates, troubleshooting network issues, or performing routine security audits, this script serves as an efficient tool for managing DNS records. Its ability to handle errors gracefully and provide detailed output makes it a valuable addition to any IT professional’s toolkit.


Cache Purging in Azure Front Door with Azure PowerShell and CLI

Introduction

Azure Front Door is a global, scalable entry point for fast delivery of your applications. It provides load balancing, SSL offloading, and caching, among other features. One critical task for maintaining optimal performance and ensuring the delivery of up-to-date content is cache purging. This article provides a step-by-step guide to performing cache purging in Azure Front Door using Azure PowerShell and the Azure Command-Line Interface (CLI).

What is Cache Purging?

Cache purging, also known as cache invalidation, is the process of removing cached content from a caching layer. This is essential when the content served to the end users needs to be updated or deleted. In the context of Azure Front Door, purging ensures that the latest version of your content is delivered to users instead of outdated cached versions.

Prerequisites for Cache Purging in Azure Front Door

Step 1: Open Azure PowerShell

Open your preferred PowerShell environment (Windows PowerShell, PowerShell Core, or the PowerShell Integrated Scripting Environment (ISE)).

Step 2: Sign in to Azure

Sign in to your Azure account using the following command:

Connect-AzAccount

Step 3: Select the Subscription

If you have multiple subscriptions, select the appropriate subscription:

Select-AzSubscription -SubscriptionId "your-subscription-id"

Step 4: Cache Purge using PowerShell

Method 1: Using Invoke-AzFrontDoorPurge

Purpose: Invoke-AzFrontDoorPurge is used specifically for purging content from the Azure Front Door caching service.

Usage: This cmdlet is part of the Azure PowerShell module and is used to remove specific cached content from the Azure Front Door service (ie., Cache Purging in Azure Front Door).

Use the Invoke-AzFrontDoorPurge cmdlet to purge the cache. You’ll need the name of your Front Door profile and the list of content paths you want to purge.

Here’s an example:

# prerequisite Parameters
$frontDoorName = "your-frontdoor-name"
$resourceGroupName = "your-resource-group-name"
$contentPaths = @("/path1/*", "/path2/*")
Invoke-AzFrontDoorPurge -ResourceGroupName $resourceGroupName -FrontDoorName $frontDoorName -ContentPath $contentPaths

This command purges the specified paths in your Front Door profile.

When to Use:

When you need to remove cached content specifically from Azure Front Door using Azure PowerShell.
Ideal for scenarios involving global load balancing and dynamic site acceleration provided by Azure Front Door.

Method 2: Using Clear-AzFrontDoorCdnEndpointContent

Purpose: Clear-AzFrontDoorCdnEndpointContent is used for purging content from Azure CDN endpoints, which might also be linked to an Azure Front Door service. However, it specifically targets the CDN layer.

Usage: This cmdlet clears content from Azure CDN endpoints, which can be part of a solution using Azure Front Door.

$endpointName = "your-cdn-endpoint-name"
$resourceGroupName = "your-resource-group-name"
$contentPaths = @("/path1/*", "/path2/*")
Clear-AzFrontDoorCdnEndpointContent -ResourceGroupName $resourceGroupName -EndpointName $endpointName -ContentPath $contentPaths

When to Use:

  • When working specifically with Azure CDN endpoints.
  • Useful for content distribution network scenarios where you need to clear cached content from CDN endpoints.

Step 5: Cache Purge using Azure CLI

Method 3: Using Clear-AzFrontDoorCdnEndpointContent

Purpose: az afd endpoint purge is an Azure CLI command used for purging content from Azure Front Door endpoints.

Usage: This command is used within the Azure CLI to purge specific content paths from Azure Front Door.

frontDoorName="your-frontdoor-name"
resourceGroupName="your-resource-group-name"
contentPaths="/path1/* /path2/*"
az afd endpoint purge --resource-group $resourceGroupName --profile-name $frontDoorName --content-paths $contentPaths

When to Use:

  • When you need to purge cached content from Azure Front Door using Azure CLI.
  • Suitable for users who prefer command-line tools for automation and scripting.

Key Differences

Service Targeted:

  1. Invoke-AzFrontDoorPurge: Specifically targets Azure Front Door.
  2. Clear-AzFrontDoorCdnEndpointContent: Specifically targets Azure CDN endpoints.
  3. az afd endpoint purge: Specifically targets Azure Front Door.

Use Case:

  1. Invoke-AzFrontDoorPurge: Best for scenarios involving global load balancing and content delivery with Azure Front Door.
  2. Clear-AzFrontDoorCdnEndpointContent: Best for scenarios involving Azure CDN, which might or might not involve Azure Front Door.
  3. az afd endpoint purge: Best for users comfortable with CLI and needing to purge Azure Front Door content.

Conclusion

Understanding the differences between these commands helps you choose the right tool for your specific needs to Cache Purging in Azure Front Door. Whether you are managing caches at the CDN layer or the Azure Front Door layer, Azure provides flexible and powerful tools to help you maintain optimal performance and up-to-date content delivery.

How to Delete a Blob from an Azure Storage using PowerShell

In one of my automation (Delete a Blob), I need to delete the previously stored reports (reports will always append with timestamp) on daily basis in Azure storage account in automated way in the specific container. So i need to ensure my container is available before start deleting my report. This article will have detail explain about How to Delete a Blob from an Azure Storage Account using PowerShell.

New to storage account?

One of the core services within Microsoft Azure is the Storage Account service. There are many service that utilize Storage Accounts for storing data, such as Virtual Machine Disks, Diagnostics logs (specially application log), SQL backups and others. You can also use the Azure Storage Account service to store your own data; such as blobs or binary data.

As per MSDN, Azure blob storage allows you to store large amounts of unstructured object data. You can use blob storage to gather or expose media, content, or application data to users. Because all blob data is stored within containers, you must create a storage container before you can begin to upload data.

Delete a Blob from an Azure Storage

Step: 1 Get the prerequisite inputs

As in this example i am going to delete the one the sql db (backup/imported to the storage) stored as bacpac format in the container called SQL…

## prerequisite Parameters
$resourceGroupName="rg-dgtl-strg-01"
$storageAccountName="sadgtlautomation01"
$storageContainerName="sql"
$blobName = "core_2022110824.bacpac"

Step: 2 Connect to your Azure subscription

Using the az login command with a service principal is a secure and efficient way to authenticate and connect to your Azure subscription for automation tasks and scripts. In scenarios where you need to automate Azure management tasks or run scripts in a non-interactive manner, you can authenticate using a service principal. A service principal is an identity created for your application or script to access Azure resources securely.

## Connect to your Azure subscription
az login --service-principal -u "210f8f7c-049c-e480-96b5-642d6362f464" -p "c82BQ~MTCrPr3Daz95Nks6LrWF32jXBAtXACccAV" --tenant "cf8ba223-a403-342b-ba39-c21f78831637"

Step: 3 Get the storage account to Check the container exit or not

When working with Azure Storage, you may need to verify if a container exists in a storage account or create it if it doesn’t. You can use the Get-AzStorageContainer cmdlet to check for the existence of a container.

## Get the storage account to check container exist or need to be create
$storageAccount = Get-AzStorageAccount -ResourceGroupName $resourceGroupName -Name $storageAccountName
## Get the storage account context
$context = $storageAccount.Context

Step: 4 Check the container exist before deleting the blob

We need to use Remove-AzStorageBlob cmdlet to delete a blob from the Azure storage container

## Check if the storage container exists
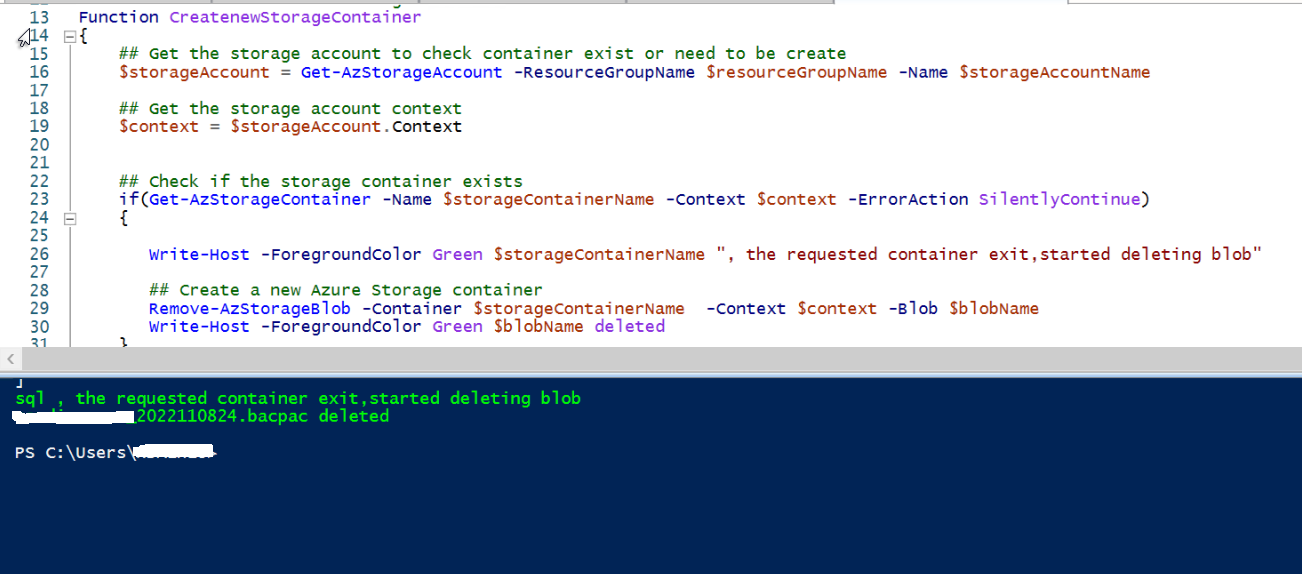
if(Get-AzStorageContainer -Name $storageContainerName -Context $context -ErrorAction SilentlyContinue)
{
Write-Host -ForegroundColor Green $storageContainerName ", the requested container exit,started deleting blob"
## Create a new Azure Storage container
Remove-AzStorageBlob -Container $storageContainerName -Context $context -Blob $blobName
Write-Host -ForegroundColor Green $blobName deleted
}
else
{
Write-Host -ForegroundColor Magenta $storageContainerName "the requested container does not exist"
}

Full Code:

## Delete a Blob from an Azure Storage
## Input Parameters
$resourceGroupName="rg-dgtl-strg-01"
$storageAccountName="sadgtlautomation01"
$storageContainerName="sql"
$blobName = "core_2022110824.bacpac"
## Connect to your Azure subscription
az login --service-principal -u "210f8f7c-049c-e480-96b5-642d6362f464" -p "c82BQ~MTCrPr3Daz95Nks6LrWF32jXBAtXACccAV" --tenant "cf8ba223-a403-342b-ba39-c21f78831637"
## Function to create the storage container
Function DeleteblogfromStorageContainer
{
## Get the storage account to check container exist or need to be create
$storageAccount = Get-AzStorageAccount -ResourceGroupName $resourceGroupName -Name $storageAccountName
## Get the storage account context
$context = $storageAccount.Context

## Check if the storage container exists
if(Get-AzStorageContainer -Name $storageContainerName -Context $context -ErrorAction SilentlyContinue)
{
Write-Host -ForegroundColor Green $storageContainerName ", the requested container exit,started deleting blob"
## Remove the blob in Azure Storage container
Remove-AzStorageBlob -Container $storageContainerName -Context $context -Blob $blobName
Write-Host -ForegroundColor Green $blobName deleted
}
else
{
Write-Host -ForegroundColor Magenta $storageContainerName "the requested container does not exist"
}
}
#Call the Function
DeleteblogfromStorageContainer

Output:


How to view the secret variables in Azure DevOps

Today, I will be taking about a technique using which you can view the secret variables in Azure DevOps.

Introduction

Azure DevOps supports us to store secrets within Azure DevOps variable Groups which could be used with the Pipelines. These secret variables couldn’t be viewed by us manually from the portal. Sometimes, we may want to view the password to perform some other activities.

Note: The best practice to have the secrets in Azure Key Vault and same you can read and execute in Azure pipeline in very secured way. Still some legacy projects are maintaining the secrets in Azure Variable group, so this article focus on them. You can read this to use Key Vault to handle the secrets

What are Secrets Variables in Azure Pipelines?

Secret Variables are placeholders for values which you want to store in an encrypted format and use while using running a pipeline. Secret Variables can be used for values like username, password, API key etc. Secret variables are encrypted variables that you can use in pipelines without exposing their value. Secret variables can be used for private information like passwords, IDs, and other identifying data that you wouldn’t want to have exposed in a pipeline. Secret variables are encrypted at rest with a 2048-bit RSA key and are available on the agent for tasks and scripts to use.

How to set Secret in Azure Variable group?

Set secret variables in the UI for a pipeline. Secret variables set in the pipeline settings UI for a pipeline are scoped to the pipeline where they are set. So, you can have secrets that only visible to users with access to that pipeline. Set secrets in a variable group. Variable groups follow the library security model. You can control who can define new items in a library, and who can use an existing item.

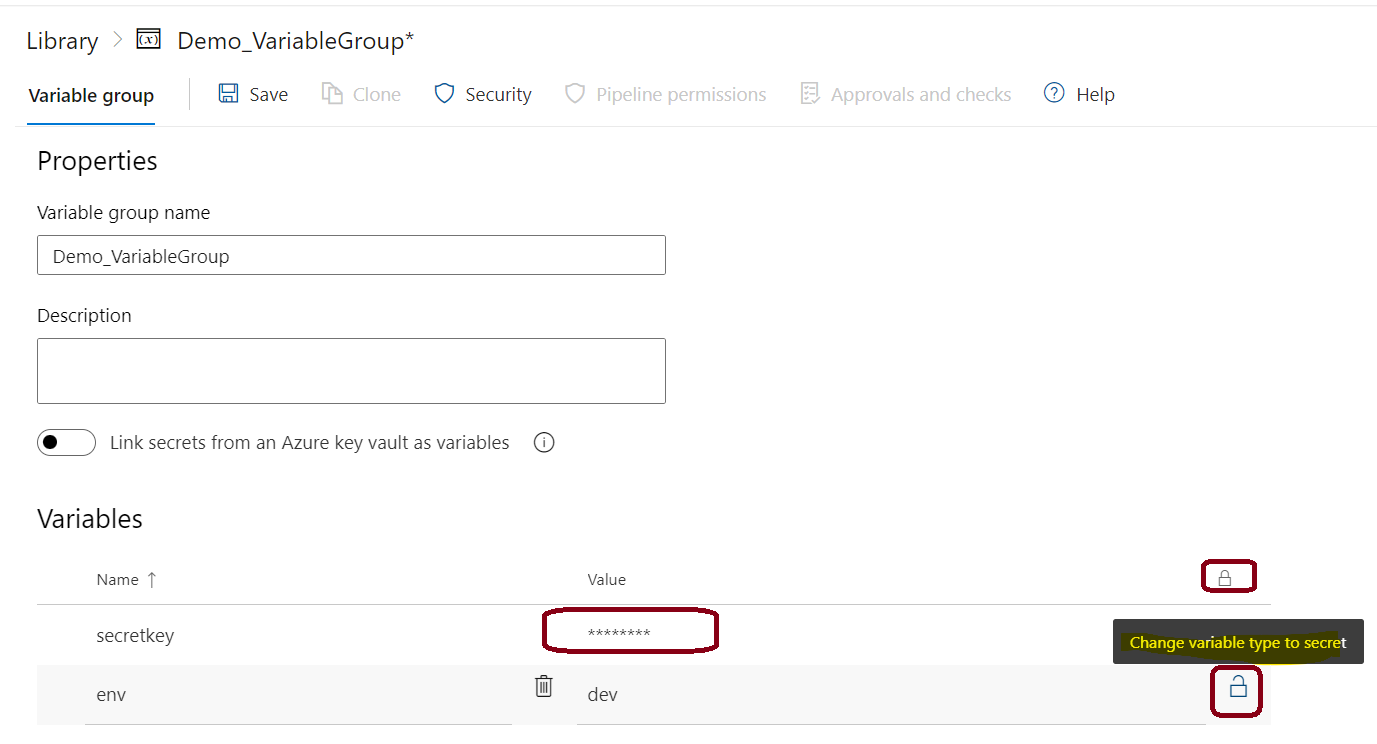
Let’s create a Secret variable in a Variable Group as shown below and make sure that you set it as a secret by locking it.

Once you mark it a secret (by clicking on the open lock icon as shown in below image), save the Variable Group, no one including admin will be able to view the secret. Let’s now understand how to view the secret with the help of Azure DevOps – Pipelines.

View the secret variables from Variable Group

You can create a simple Pipeline which has the below tasks to view the secrets in pipeline execution.

  1. PowerShell task which outputs a text (along with secret) into a file names ViewSecretValue.Txt
  2. Publish the ViewSecretValue.txt into Azure Pipeline artifacts.

Run the pipeline with with below PowerShell task

variables:
- group: Demo_VariableGroup
steps:
- powershell: |
    "The secretkey value is : $(secretkey)" | Out-File -FilePath  $(Build.ArtifactStagingDirectory)\ViewSecretValue.txt
- task: PublishBuildArtifacts@1
  inputs:
    PathtoPublish: '$(Build.ArtifactStagingDirectory)'
    ArtifactName: 'drop'
    publishLocation: 'Container'

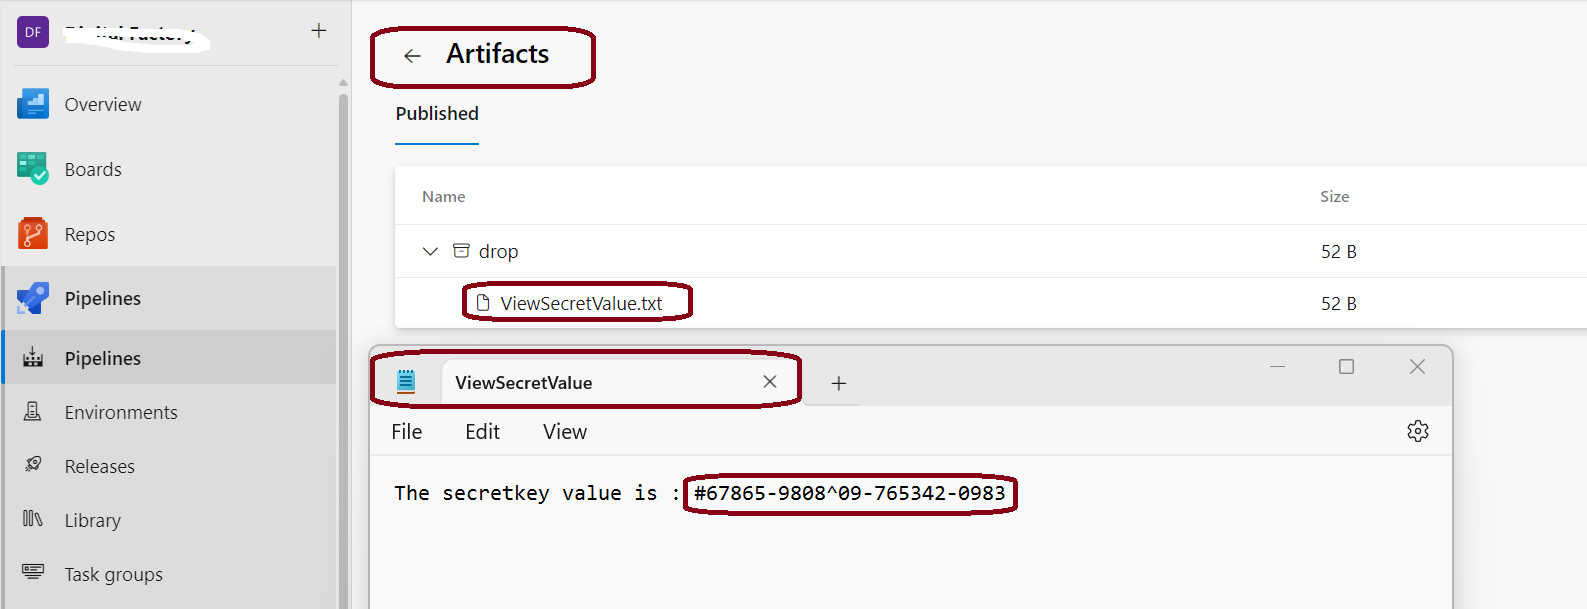
Now, click on the ViewSecretValue.txt file to download the file. Once you download it, view that in a Notepad which should below.

Conclusion

In summary, handling secret variables securely is crucial for maintaining data confidentiality in DevOps processes. Azure DevOps provides built-in features and best practices to keep sensitive data protected, making it a powerful platform for secure CI/CD pipeline management. Integrating with tools like Azure Key Vault can further strengthen your security posture and simplify secret management across multiple projects.


How to pass objects between tasks in Azure pipeline

In our previous post, we already discussed about “How to pass values between Tasks in a Pipeline” where we can pass single value from one task/job/stage to another in pipeline. But incase, if you want to share the object from one task/job/stage to another instead of single value then we need to perform some trick to achieve this. In this quick post we will discuss about trick that I have found recently to store an object in an Azure Pipelines variable from a PowerShell script (How to pass objects between tasks in Azure pipeline).

The problem

Setting a variable in a script for later use in an Azure DevOps’ pipeline is possible using the task.setvariable command as described in below post.

This works great for simple variables like below:

steps:
- pwsh: |
Write-Host "##vso[task.setvariable variable=variableName]variableValue"
- pwsh: |
Write-Host "Value from previous step: $(variableName)"

But it is bit trickier for sharing the complex variables likes objects, arrays, or arrays of objects between taks/stage/jobs in pipeline.

The solution

As an example, let’s we try to retrieve the name, type and resource group of all the resources in an Azure subscription as shown in the below script. Let we see how can pass this value of $resources in pipeline.

$azure_resources = Get-AzResource | Select-Object -Property Name,Type,ResourceGroupName

First you can store an object in an Azure Pipelines variable using the PowerShell task. Next, you can simply serialize it in JSON and apply in single input like below: -Compress flag which conver JSON to a single line.

$azure_resourcesJson = $azure_resources | ConvertTo-Json -Compress

Pass objects between tasks in Azure pipeline

pool:
name: devopsagent-win-pprd
steps:
- task: AzurePowerShell@5
inputs:
azureSubscription: 'Azure_Digital'
azurePowerShellVersion: LatestVersion
ScriptType: InlineScript
Inline: |
$azure_resources = Get-AzResource | Select-Object -Property Name,Type,ResourceGroupName -First 3
$azure_resourcesJson = $azure_resources | ConvertTo-Json -Compress
Write-Host "##vso[task.setvariable variable=resources]$azure_resourcesJson"
- pwsh: |
$resources = '$(resources)' | ConvertFrom-Json
Write-Host "There are $($resources.Count) resources in the list"
Write-Host "There are resources are" $resources.ResourceGroupName

OUTPUT


How to Create Log File using Start-Transcript cmdlet in PowerShell

What is Start-Transcript?

As per MSDN, The Start-Transcript cmdlet creates a record of all or part of a PowerShell session to a text file. The transcript includes all commands that the user types and all output that appears on the console. Starting in Windows PowerShell 5.0, Start-Transcript includes the hostname in the generated filename of all transcripts.

When & Where to use?

As system admin/DevOps, we are doing much automation inside the servers and it’s mandatory to capture all the details (maybe error or success ran) in the log to make an analysis if required. In simple, if you running PowerShell scripts automatically you need a way to log any errors or warnings that occur. Usually, we will create your own log function (the same I did for my previous automation, please refer to my implemented method), but there is an easier way which I found during my team discussion and thought to share with all of you. This is especially useful when your enterprise’s logging is centralized.

The Start-Transcript cmdlet writes everything that happens during a session to a log file. These are the commands that you enter in a PowerShell session and all output that normally appears in the console.

You can also refer : Try/Catch , Error HandlingError Logging

Example 1: Without any parameters (inside our script)

To start the transcript you can simply use the cmdlet Start-Transcript and Stop-Transcript to stoping it. You can place whatever script needs to be executed in between the Start and Stop Transcript.

Without any parameters, the transcript will be saved in the user’s documents folder. The filename will automatically be generated and consists of the device name, random characters followed by a timestamp. The default path is great when you are only using PowerShell on your own machine.

Start-Transcript
$destPath = "C:\dotnet-helpers\Destination\FinedMe"
$sourcePath = 'C:\dotnet-helpers\Source\'
Get-content $destPath
Stop-Transcript

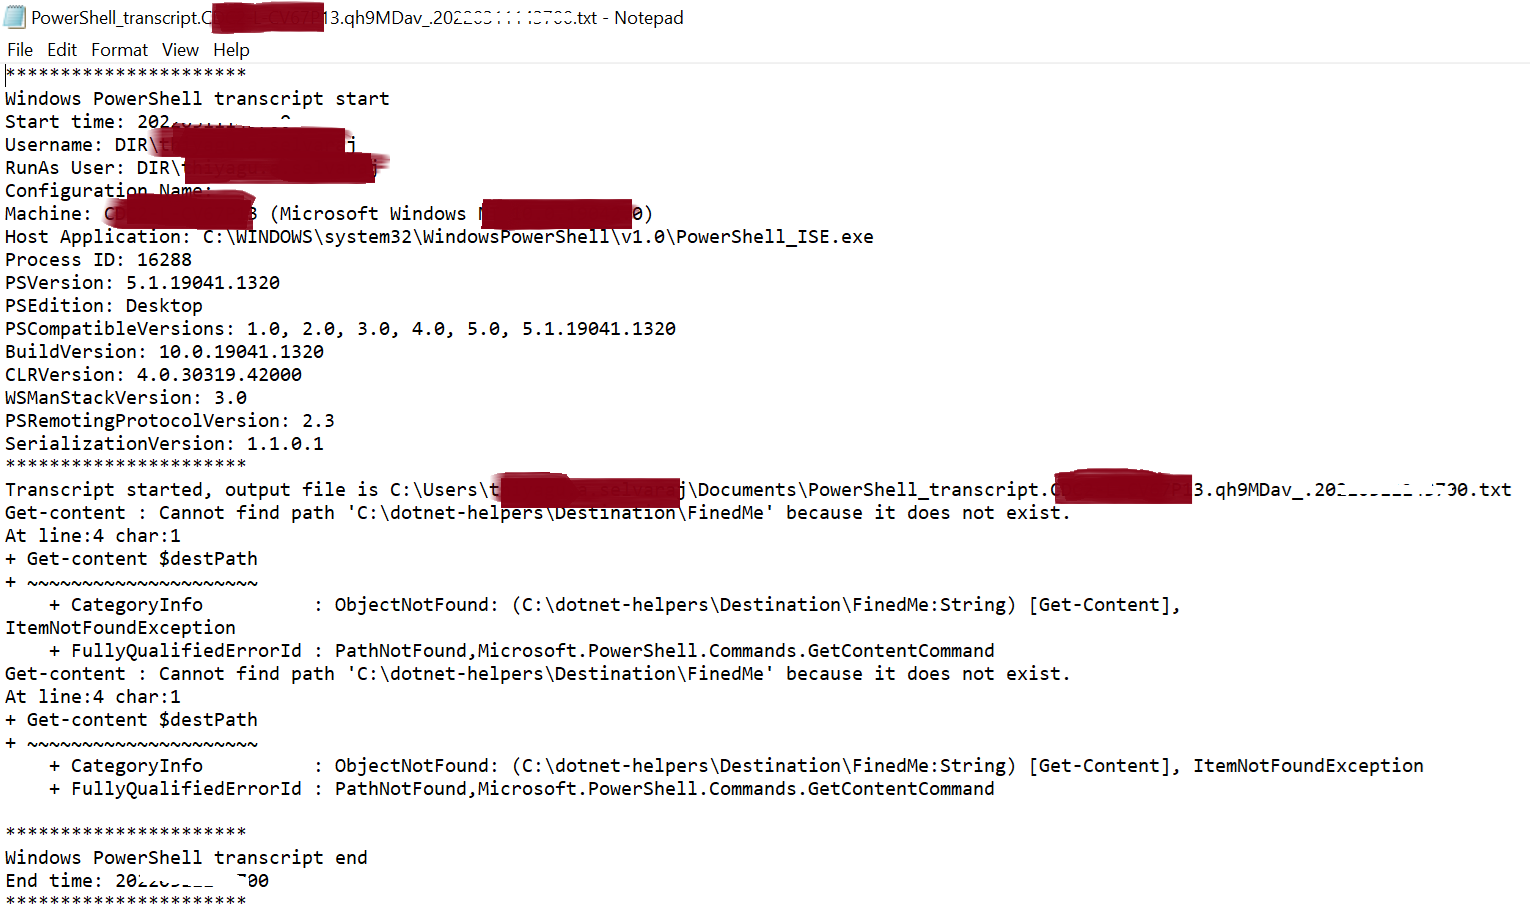
Output: 

The Transcript log will contain all the information that you see in the console as well, including a very detailed header with information of the host that you have used:

Example 2: With Parameters (-path & -Append)

The default path is great when you are only using PowerShell on your own machine. But most of the time you want to centralize the log files. There are two options for this, we can use the -Path parameter or the -OutputDirectory parameter for this.

# Append the transcript to an Error.log file.
Start-Transcript -Path c:\automationLog\Error.log -Append

For -Path parameter, we will need to specify the full path, including the file name. This is helpful when you want to have a single log file for a script and append all the transcripts into a single file. In the above example, we used the -Append parameter, by default it will overwrite any existing content in the file. To overcome this we need to use -Append or -NoClobber parameters to append in the same file.

# Use -NoClobber or -Append to prevent overwriting of existing files
Start-Transcript -Path c:\automationLog\Error.log -NoClobber

Example 3: With -OutputDirectory Parameters

You can also use the -OutputDirectory parameter to store the log file in a custom location, and this cmdlet allows to create of a unique filename.

Start-Transcript -OutputDirectory c:\automationLog\
$destPath = "C:\dotnet-helpers\Destination\FinedMe"
$sourcePath = 'C:\dotnet-helpers\Source\'
Get-content $destPath
Stop-Transcript

Output: 

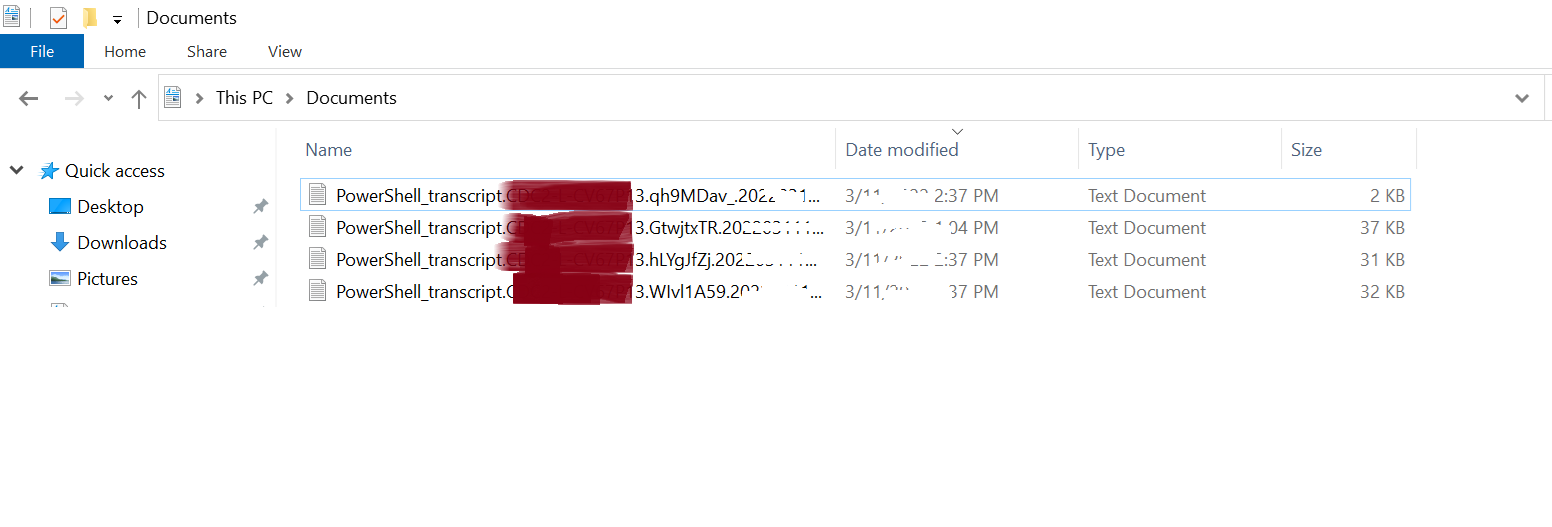
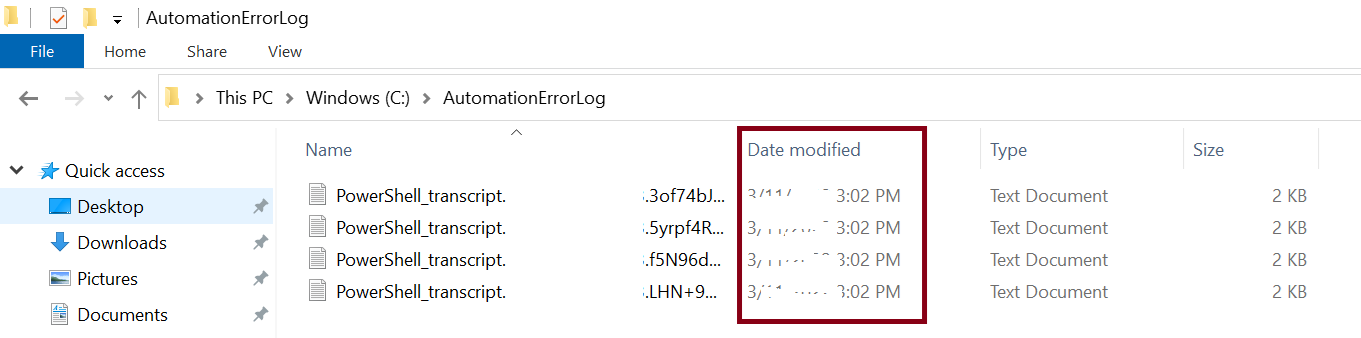
For this example, I had executed the script repeatedly and for each execution, the log file is created uniquely with appending of some random AlphaNumeric values as shown in the below snapshot (3of74bj, 5yrpf4R,..)

Points to remember:

Files that are created by the Start-Transcript cmdlet include random characters in names to prevent potential overwrites or duplication when two or more transcripts are started simultaneously.

The Start-Transcript cmdlet creates a record of all or part of a Windows PowerShell session in a text file. The transcript includes all commands that the user types and all output that appears on the console.

Each transcript starts with a fully detailed header with a lot of information. When using this for logging of automated scripts that run automatically this information is large and not much use. So from PowerShell 6 and higher, we have many parameters to make cut off this (like -UseMinimalHeader).

[/fusion_text][/fusion_builder_column][/fusion_builder_row][/fusion_builder_container]

How to remove Multiple bindings in IIS using PowerShell script

As you aware large number of unused URLs in the servers will lead critical to maintenance during the maintenance activity so we need to remove Multiple bindings in IIS which not in use . In our project, my team identified a large number of un-used URLs (almost 500+ URLs) across many servers and requested to make clean up in all the servers. It’s very hard to clean up the URLs manually and it will lead to manual error like wrongly removing others URLs which is already in use and almost it will take more days to complete the cleanup. So we decide to make this activity automated instead of manual cleaning to Remove multiple bindings in IIS.

To resolve the above scenario, we created the PowerShell script to remove large URLs in a single execution. Here let we discuss the script in detail. To demonstrate this, you’ll first either need to RDP to the webserver directly and open up a PowerShell console or use PowerShell remoting to connect to a remote session.

STEP: #1

First, we need to ensure query my default website using the Get-Website cmdlet. It will Get configuration information for an IIS Web site. After execution of the below line, it will return the configuration information for the “Default Web Site”.

Get-Website -Name “$(‘Default Web Site’)”

STEP: #2

After the execution of the above script, now the website information will be available, the next step we need to find the bindings (URLs) based on our parameters/criteria.

As you probably already know you can have multiple bindings attached to a single site. Using Get-WebBinding cmdlet, you can get bindings on the specified IIS site. We can get the binding based on the parameters like -Protocol, -Port, -HostHeader,-IPAddress, etc., From the below script, you can get the binding that matching HostHeader with HTTP/HTTPS with port 80/443.

Get-WebBinding -Protocol “http” -Port 80 -HostHeader $siteURL
Get-WebBinding -Protocol “https” -Port 443 -HostHeader $siteURL

STEP: #3

Now finally, we need to removed the URLs with help of Remove-WebBinding cmdlet. The Remove-WebBinding cmdlet will remove a binding from an Internet Information Services (IIS) website.

Remove-WebBinding

Full code (to remove multiple bindings in IIS )

Reading the list of URLs from the txt file and looping to remove the bindings from the IIS website.

##############################################################################
#Project : How to remove the IIS binding from server using PowerShell script.
#Developer : Thiyagu S (dotnet-helpers.com)
#Tools : PowerShell 5.1.15063.1155 
#E-Mail : mail2thiyaguji@gmail.com 
##############################################################################
#Get list of URLs from the Text file
$siteURLs = Get-Content -path C:\Desktop\ToBeRemoveURLs_List.txt
#looping the URLs list to remove one by one
foreach($siteURL in $siteURLs)
{
Get-Website -Name "$('Default Web Site')"  | Get-WebBinding -Protocol "http" -Port 80 -HostHeader   $siteURL| Remove-WebBinding
Get-Website -Name "$('Default Web Site')"  | Get-WebBinding -Protocol "https" -Port 443 -HostHeader $siteURL | Remove-WebBinding
}