All posts by Thiyagu

Linux Environment Variables

What Are Linux Environment Variables?

Linux environment variables are dynamic values that the operating system and various applications use to determine information about the user environment. They are essentially variables that can influence the behavior and configuration of processes and programs on a Linux system. These variables are used to pass configuration information to programs and scripts, allowing for flexible and dynamic system management.

These variables, often referred to as global variables, play a crucial role in tailoring the system’s functionality and managing the startup behavior of various applications across the system. On the other hand, local variables are restricted and accessible from within the shell in which they’re created and initialized.

Linux environment variables have a key-value pair structure, separated by an equal (=) sign. Note that the names of the variables are case-sensitive and should be in uppercase for instant identification.

Key Features of Environment Variables

  • Dynamic Values: They can change from session to session and even during the execution of programs.
  • System-Wide or User-Specific: Some variables are set globally and affect all users and processes, while others are specific to individual users.
  • Inheritance: Environment variables can be inherited by child processes from the parent process, making them useful for configuring complex applications.

Common Environment Variables

Here are some commonly used environment variables in Linux:

  • HOME: Indicates the current user’s home directory.
  • PATH: Specifies the directories where the system looks for executable files.
  • USER: Contains the name of the current user.
  • SHELL: Defines the path to the current user’s shell.
  • LANG: Sets the system language and locale settings.

Setting and Using Environment Variables

Temporary Environment Variables

You can set environment variables temporarily in a terminal session using the export command: This command sets an environment variable named MY_VAR to true for the current session. Environment variables are used to store information about the environment in which programs run.

export MY_VAR=true
echo $MY_VAR

Example 1: Setting Single Environment Variable

For example, the following command will set the Java home environment directory.

export JAVA_HOME=/usr/bin/java

Note that you won’t get any response about the success or failure of the command. As a result, if you want to verify that the variable has been properly set, use the echo command.

echo $JAVA_HOME

The echo command will display the value if the variable has been appropriately set. If the variable has no set value, you might not see anything on the screen.

Example 2: Setting Multiple Environment Variables

You can specify multiple values for a multiple variable by separating them with space like this:

<NAME>=<VALUE1> <VALUE2><VALUE3>

export VAR1="value1" VAR2="value2" VAR3="value3"

Example 3: Setting Multiple value for single Environment Variable

You can specify multiple values for a single variable by separating them with colons like this: <NAME>=<VALUE1>:<VALUE2>:<VALUE3>

export PATH="/usr/local/bin:/usr/bin:/bin:/usr/local/sbin:/usr/sbin:/sbin"

The PATH variable contains a list of directories where the system looks for executable files. Multiple directories are separated by colons.

Permanent Environment Variables

To make DOTNET_HOME available system-wide, follow these steps:

This command appends the line MY_VAR=”True” to the /etc/environment file, which is a system-wide configuration file for environment variables. By adding this line, you make the MY_VAR variable available to all users and sessions on the system. The use of sudo ensures that the command has the necessary permissions to modify /etc/environment

Example 1: Setting Single Environment Variable for all USERS

export DOTNET_HOME=true
echo 'DOTNET_HOME="true"' | sudo tee /etc/environment -a

Example 2: Setting Multiple value for single Environment Variable for all USERS

You can specify multiple values for a single variable by separating them with colons like this: <NAME>=<VALUE1>:<VALUE2>:<VALUE3>

export PATH="/usr/local/bin:/usr/bin:/bin:/usr/local/sbin:/usr/sbin:/sbin"
echo PATH="/usr/local/bin:/usr/bin:/bin:/usr/local/sbin:/usr/sbin:/sbin" | sudo tee /etc/environment -a

Breakdown of the Command

echo ‘DOTNET_HOME=”true”‘: This command outputs the string DOTNET_HOME=”/dotnet-helpers/execute”. Essentially, echo is used to display a line of text.

| (Pipe): The pipe symbol | takes the output from the echo command and passes it as input to the next command. In this case, it passes the string DOTNET_HOME=”/dotnet-helpers/execute” to sudo tee.

sudo tee /etc/environment -a: sudo: This command is used to run commands with superuser (root) privileges. Since modifying /etc/environment requires administrative rights, sudo is necessary.

tee: The tee command reads from the standard input (which is the output of the echo command in this case) and writes it to both the standard output (displaying it on the terminal) and a file.

/etc/environment: This is the file where tee will write the output. The /etc/environment file is a system-wide configuration file for environment variables.

-a: The -a (append) option tells tee to append the input to the file rather than overwriting its contents. This ensures that any existing settings in /etc/environment are preserved and the new line is simply added to the end of the file.

This command is used to add a new environment variable (DOTNET_HOME) to the system-wide environment variables file (/etc/environment). By appending it, you ensure that the new variable is available to all users and sessions across the entire system.

Quickly Display Files with PowerShell: Understanding Cat and Get-Content

PowerShell offers powerful cmdlets for managing and Display Files with PowerShell, and among them, Cat (alias for Get-Content) and Get-Content are commonly used to read and display file contents. Though they may seem similar, understanding the differences between Cat and Get-Content can help you use them more effectively in your scripts and commands.

Understanding Get-Content

Get-Content is a versatile cmdlet that reads the contents of a file and outputs each line as an individual string. It’s useful for working with files line by line, as it returns an array of strings where each element corresponds to a line in the file.

In PowerShell, Cat is an alias for the Get-Content cmdlet. This alias comes from Unix-like systems, where the cat command is used to concatenate and display file contents. In PowerShell, Cat serves the same purpose but is simply a shorthand for Get-Content.

Apart from cat, there are other aliases for the Get-Content command, which you can find out by running the below command. As you can see below, gc and type are also aliases of Get-Command, along with cat.

Displaying the Contents of a File with PowerShell Cat

The primary usage of the PowerShell cat is showing a file’s contents on the screen. Running the cat command followed by the filename will tell the command to output the file’s contents for display. Run the below command to read the tmp.txt file and output the data on the screen

cat "C:\path\to\tmp.txt"

Showing Lines from the Top & Bottom

Reading the first few lines of the file may help identify whether the file is what you need. PowerShell cat allows you to display a specific line or lines from a file to have a quick look as shown below.

cat tmp.txt -TotalCount 6

To View the contents from the bottom by specifying the -Tail parameter or its alias, which is -Last. This method is typical when troubleshooting with log files.

cat tmp.txt -Tail 5

Merging Contents Into a New File

Instead of simply showing the content on the screen, you can redirect the standard out of a command to a new file in PowerShell. Moreover, the PowerShell cat can read multiple files at once, which makes merging contents possible. Run the cat command to concatenate File1.txt and File2.txt as follows. The output redirect (>) sends the command output to the new file called catMerge.txt.

Method 1:

cat File1.txt,File2.txt > catMerge.txt

Method 2:

cat File1.txt,File2.txt | Out-File Merge1.txt

Appending the Contents of One File to Another

Another thing you can do with the Linux cat command is appending the contents of one file to another instead of overwriting the file or creating a new one.

# PowerShell cat with Add-Content
cat File1.txt | Add-Content File2.txt

This commands appends the contents of File1.txt to File2.txt.

# PowerShell cat with double redirection symbol (append)
cat File1.txt >> File2.txt


Delete File or Directory in Linux with Scheduled Azure DevOps Pipeline

In my working environment, we are managing more Linux based Agent machines for building the solution to create artifacts and we got required to clean the build artifacts on regular manner in automatic way so we though to write a bash scrip and make this as scheduled in release pipeline (Delete File or Directory in Linux). Base on my automation, though to write a post to explain How to Delete File or Directory in Linux with Scheduled Azure DevOps Pipeline

You can also read

step 1: Find the disk space usage

The df -h command is used to display information about disk space usage on a Unix-like system. When you run this command in a terminal, it will show the disk space usage in a human-readable format.

For more clear, disk free also known as `df`, which is a powerful utility that provides valuable information on disk space utilization. The df command displays information about file system disk space usage on the mounted file system. The -h flag makes the sizes human-readable, using units like KB, MB, GB, etc.

df -h

STEP 2:Get list of directories/files and assign to variable

Before we can remove a folder or director, we must first know its name. Therefore, we must first execute the “ls” command in the terminal to find a folder or directory, or to view all of the folders. In Linux and other operating systems based on Unix, the “ls” command is used to display the files or folders.

As i am going to clean my agent folder so path will be /agent/_work.
We are assigning the output of the command ls /agent/_work/ | grep [0-9] to the variable directorylist. This command lists the contents of the /agent/_work/ directory and filters the results to include only lines that contain numbers (as my agent machine folder will create with name as numbers).

directorylist=$(ls /agent/_work/ | grep [0-9])

 STEP 3: Loop the list of directories and delete

Next, we need to loop the directory list one by one in the while loop as shown in below script. while read line is a loop that reads each line of the processed output ( is used for bash shell to read a file using while loop).The option ‘-r’ in the above-mentioned syntax passed to read command that avoids the backslash escapes from being interpreted

  • tr ‘ ‘ ‘\n’: one of the use of tr command is to find and replace, here it will replace spaces with newline characters.
  • The loop body (between do and done) is where you can put your processing logic for each line. I’ve included a simple echo statement as an example.
echo $directorylist | tr ' ' '\n' | while read -r line
do
........... You logic to delete ...........
Done

STEP 4: Remove the directory/file from the list

We can Delete File or Directory in Linux by using rm command and -rf will be used to remove fore fully as shown below.

echo "removing folder $line"
rm -rf /agent/_work/$line

Full code: Delete File or Directory in Linux 

# Find the disk space usage
df -h
echo "Running a disk space clean up"
#Get list of directories/files and assign to variable
directorylist=$(ls /agent/_work/ | grep [0-9])
#Loop the list of directries and delete
echo $directorylist | tr ' ' '\n' | while read line
do
echo "removing folder $line"
rm -rf /agent/_work/$line
done

How to implement delete directory (above script) script in scheduled manner Azure DevOps pipeline?

  1. First enable the “Scheduled release trigger” as shown below in release pipeline. In same pipeline, create a new stage with the Bash task with the above script which shown to Delete File or Directory in Linux .
  2. Select the stage and click “pre-deployment condition” and schedule the pipeline condition when it need to execute and save. Post this action, the pipeline will ran on specific time and execute the cleanup task.


How to Drop SQL database using PowerShell

My Scenario:

As a System Admin/DevOps Guys, we got urgent cost optimization process and it need to done in very less time frame. From the cost optimization list, one of the action is to clean the unused database and backup file across all the environment. So we having 100+ database in each environment and its difficult to make manual clean up as it will take more time and there is lot of chance to wrong deletion of used database’s. So to avoid this we thought to automate this process to clean up database’s across all the environment. In this post we will discuss about how to How to drop SQL database using PowerShell

If you are working with Azure SQL Databases and want to use Azure PowerShell (Az module), you can use the Get-AzSqlDatabase cmdlet to retrieve information about SQL databases in an Azure SQL Server. Here’s an example script to get the list of all SQL database names:

Step 1: Declare SQL and resource details

#Assign the variables
$resourcegroup = "rg-dgtl-strg-prd-we-01"
$dbserverName = "sqlsrvr-dgtl-prd-we"
$username = "sqlprd01"
$password = "Srdc4$wm2t1F"

Step 2: Connect to the database using Get-AzSqlDatabase cmdlet

The Get-AzSqlDatabase cmdlet is used in Azure PowerShell to retrieve information about SQL databases (as shown in the below snap shot) in an Azure SQL Server. It’s part of the Az module, which is the recommended module for managing Azure resources. Below is a brief explanation of how to use the Get-AzSqlDatabase cmdlet:

SYNTAX:

Get-AzSqlDatabase
[[-DatabaseName] <String>]
[-ExpandKeyList]
[-KeysFilter <String>]
[-ServerName] <String>
[-ResourceGroupName] <String>
[-DefaultProfile <IAzureContextContainer>]
[-WhatIf]
[-Confirm]
[<CommonParameters>]

#Get the all the database for specific SQL server using -ServerName parameter
$SQLdbs = Get-AzSqlDatabase -ServerName $dbserverName -ResourceGroupName $resourcegroup

Step 3: Retrieve all database’s details Using foreach.

In step 1, we got all the database details which present inside sqlsrvr-dgtl-prd-we SQL server and as i said on top, I am having 100+ database present in the sql server so below loop will loop one by one to process the db’s details. Below, i am getting only database name for db using property name like “DatabaseName”

#Loop the list of databases and check on one by one
foreach ($SQLdb in $SQLdbs){
$SQLdb = $SQLdb.DatabaseName.ToString()
if (..) { check databasename contains or -eq to find activie dbs. }
else { logic to delete the non-active dbs. }
}

Step 4: Remove the database using Remove-AzSqlDatabase

The Remove-AzSqlDatabase cmdlet removes an Azure SQL database. This cmdlet is also supported by the SQL Server Stretch Database service on Azure.

SYNTAX :

Remove-AzSqlDatabase
[-DatabaseName] <String>
[-Force]
[-ServerName] <String>
[-ResourceGroupName] <String>
[-DefaultProfile <IAzureContextContainer>]
[-WhatIf]
[-Confirm]
[<CommonParameters>]

#Remove the database based on -DatabaseName parameter
Remove-AzSqlDatabase -ResourceGroupName $resourcegroup -ServerName $dbserverName -DatabaseName $dbName

Points to remember:

I am running above script inside my jump/AVD machine so if required please use -DefaultProfile parameter in the Get-AzSqlDatabase / Remove-AzSqlDatabase to authenticate the SQL server. This -DefaultProfile parameter used with credentials, tenant and subscription used for communication with azure.


Pull and Push Docker Image to Azure Container Registry using Azure Devops pipeline

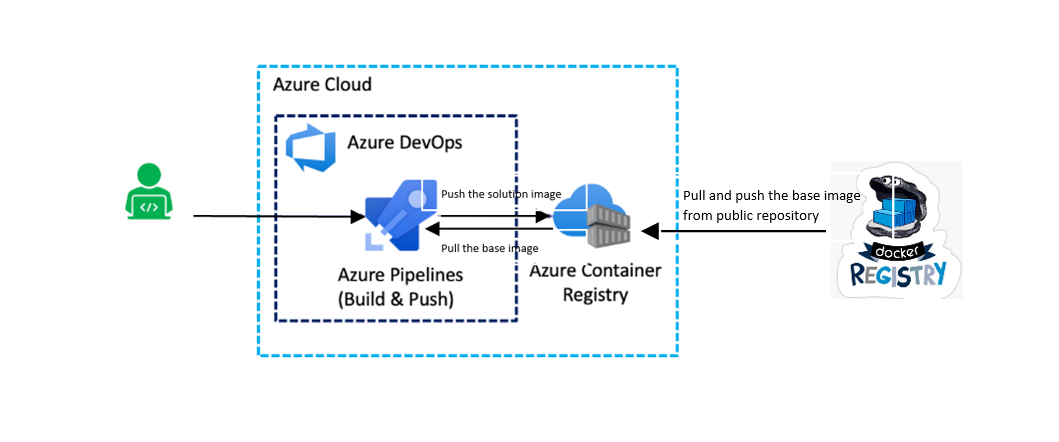
When you want to develop and implement the container application in Azure. The first and main step you would execute is to build the images and push them into the our own private Registry (ex: Azure Container registry). In this post, I will explain how to Pull and Push Docker Image to Azure Container Registry using Azure DevOps pipeline

If your solution is going to use base image from public repo then best practice in DevOps to pull & push the trusted public image to ACR, post that we need to use same in our custom solution build.

what is Azure container Registry (ACR)

Azure Container Registry also is the similar as hub.docker.com but is provided by azure cloud. The Azure Container registry can be private and can be used by only one team or users who have access. So, users with access can push and pull images.

It provides geo-replication so that images pushed in one datacenter in one region gets replicated in all the connected configured datacenters and gets deployed simultaneously to Kubernetes clusters in respective locations.

Pull and push Docker Image

The purpose of this article is to provide steps to guide how to pull the image from public repository and provide commands to push and pull images from registry using the Azure DevOps pipeline.

There can be two options when you want to push the container images into ACR.

Option 1: Import the pre-existing Docker image from the docker hub (docker.io)/public registry and deploy it to AKS.

Option 2: Create a new custom image based on our solution (we can use push and pull other public registry and use in our solution as base image to build our solution), push it to ACR, and then deploy it to AKS.

Note: If you are using Azure default Agent or your own Agent, then decide which type of image your pulling and pushing. If the image is build on windows then the window Agent need to use for the push and pull or linux Agent if image is build with linux as base image. In my case, i am pulling the linux based image from registry.k8s.io to my ACR. Post this action, we will refer the same image during the nginx ingress installation in my AKS

Push Image to Azure Container Registry

Step 1 : Login to Azure Container Registry with Non-Interactive mode

Syntax:  docker login –username demo –password example

- bash: |
docker login crdgtlshared02.azurecr.io -u crdgtlshared010 -p rtvGwd6X2YJeeKhernclok=UHRceH7rls

Step 2 : Pull the image and tag the image with registry prefix

In my case, I need to pull the image from public repository (registry.k8s.io) and from my ACR i need to refer this image during the ingress installation in AKS cluster. To be able to push Docker images to Azure Container Registry, they need to be tagged with the login Server name of the Registry. These tags are used for routing purposes when we push these Docker images to Azure. In simple words, Docker tags convey useful information about a specific image version/variant

Syntax:  docker pull [OPTIONS] NAME[:TAG|@DIGEST]
docker tag SOURCE_IMAGE[:TAG] TARGET_IMAGE[:TAG]

- bash: |
docker pull registry.k8s.io/ingress-nginx/controller:v1.3.0
docker tag registry.k8s.io/ingress-nginx/controller:v1.3.0 crdgtlshared02.azurecr.io/nginx-baseimage/controller:v1.3.0
displayName: 'push ingnix base image'
enabled: false

Pull Image to Azure Container Registry

Step 3 : Pull the image with registry name prefix

Now that the image is tagged (in step 2), we can use the “docker push” command to push this image to Azure Container Registry;

Syntax:  docker push [OPTIONS] NAME[:TAG|@DIGEST]

- bash: |
docker push crdgtlshared02.azurecr.io/nginx-baseimage/controller:v1.3.0
displayName: 'push ingnix base image'
enabled: false

This operation might take a few minutes and you will se the image being uploaded to Azure Container Registry in the console.

Note: To pull image directly onto docker-compose, kubernetes yml files, use appropriate logins. Usually in these scenarios, docker login is the first step before docker-compose up is called, so that images get pulled successfully

For this above example, to explain in step by step i used bash task for each action but we can do all to gether in single bask task in pipeline as shown below.

Full YAML code for Pipeline

- bash: |
docker login crdgtlshared02.azurecr.io -u crdgtlshared02 -p gbHdlo6X2YJeeKhaxjnlok=UHRceT9NR
docker pull registry.k8s.io/ingress-nginx/controller:v1.3.0 docker tag registry.k8s.io/ingress-nginx/controller:v1.3.0 crdgtlshared02.azurecr.io/nginx-baseimage/controller:v1.3.0
docker push crdgtlshared02.azurecr.io/nginx-baseimage/controller:v1.3.0 
displayName: 'push ingnix base image' 
enabled: false

Getting Redirected (301/302) URI’s in PowerShell

In my working environment, we are managing more than 500+ sites. Usually, sometimes users will make a redirect to other sites or put temporary maintenance (redirect to another page) and we are not aware of their changes so we thought to validate all the sites in-frequent manner to identify those changes so thought to write post on Getting Redirected (301/302) URI’s in PowerShell.

The above scenario is very difficult to check each URL in a regular manner , it will take a lot of manual work and it may lead to human errors so we thought to automate this task instead of Manual work. The result needs to be automatically populated in Excel so we can easily share it with our Managers.

One way to get redirected URL through PowerShell is WebRequest class. In this post, we’re going to cover how to build a PowerShell function that will query a specific URL to find out if that URL is being redirected to some other URL. Here we going to discuss how to achieve this using Invoke-Webrequest.

STEP #1: First grab the response head from an Invoke-Webrequest:

$request = Invoke-WebRequest -Method Head -Uri $Url

STEP #2: Next, we need to get the Response URL using AbsoluteUri

$redirectedUri = $request.BaseResponse.ResponseUri.AbsoluteUri

Full Code : Getting Redirected (301/302) URI’s in PowerShell 

This is a quick and easy way to pull the redirected URI’s for the given URI. Putting it all together we get the function below: In the Final code, I had incorporated the result in the result in Excel.

 ###########################################################################################
#Project: Getting Redirected (301/302) URI’s in Powershell using Invoke-WebRequest Method
#Developer: Thiyagu S (dotnet-helpers.com)
#Tools : PowerShell 5.1.15063.1155 [irp]
#E-Mail: mail2thiyaguji@gmail.com 
############################################################################################
function Get-RedirectedUrl
 {
     [CmdletBinding()]
     param
     (
         [Parameter(Mandatory)]
         [ValidateNotNullOrEmpty()]
         [string]$GetfilePath
     )
     $Result = @()
     $FormatGenerater = "<HTML><BODY background-color:grey><font color =""black"">
                         <H2>Finiding the Redireted URLs</H2>
                         </font><Table border=1 cellpadding=0 cellspacing=0>
                         <TR bgcolor=gray align=center><TD><B>Source URL</B>
                         <TD><B>RedirectedURL</TD></TR>"
     $filePath = $GetfilePath
     $fileContent = Get-Content $filePath
     foreach($singleURL in $fileContent )
     {
        try
        {
         $redirectionrequest = Invoke-WebRequest -Method HEAD $singleURL -ErrorAction Ignore
             if ($redirectionrequest.BaseResponse.ResponseUri -ne $null) 
             {
             $FormatGenerater += "<TR bgcolor=#CCFFE5>" 
             $redirectedURL = $redirectionrequest.BaseResponse.ResponseUri.AbsoluteUri
             $redirectedURL
             }
             $FormatGenerater += "<TD>$($singleURL)</TD><TD>$($redirectedURL)</TD></TR>" 
         }   
       Catch {  }
     }
    $FormatGenerater += "</Table></BODY></HTML>" 
    $FormatGenerater | out-file C:\dotnet-helpers\RedirectedURLs.xls
 }
 Get-RedirectedUrl "C:\dotnet-helpers\URLsList.txt"

OUTPUT:

How to run PowerShell Script from a Batch File

What is a .bat file?

A batch file is a text file that the Windows cmd.exe command line processor executes as a batch job. It contains a series of line commands in plain text that are executed to perform various tasks, such as starting programs or running maintenance utilities within Windows.

You can also read  – How to create Basic Chart by reading excel using PowerShell and How to remove the Multiple bindings (URLs) from IIS using PowerShell script

Why call my PowerShell script from a batch file

You can’t double-click to run .PS1 files, but you can execute a .BAT file that way. So, we’ll write a batch file to call the PowerShell script from the command line. There are several good reasons for doing this:

  • Non-technical Users are often tackled with PowerShell.
  • When a user double-clicks on a PowerShell script file (*.ps1) in default it will open the file in the editor rather than executing it.
  • Many scripts may require admin privileges in order to run correctly and in this case, the user need-aware of how to run a PowerShell script as admin without going into a PowerShell console and it will be difficult to run this for Non-technical users.

So in this post, we are going to discuss how you can call the PowerShell script from a batch file.

STEP #1: Creating sample .ps1 file

Writing simple site validation PowerShell script and save as SiteValidationTestThroughBATFile.ps1

#######################################################################<br>
#Project : Creating Powershell Mulitple Reports in HTML with CSS Format<br>
#Developer : Thiyagu S (dotnet-helpers.com)<br>
#Tools : PowerShell 5.1.15063.1155<br>
#E-Mail : mail2thiyaguji@gmail.com<br>
######################################################################
$_URL = 'https://dotnet-helpers.com'
$request= [System.Net.WebRequest]::Create($_URL)
$response = $request.getResponse()
if ($response.StatusCode -eq "200"){
write-host "`nSite - $_URL is up (Return code: $($response.StatusCode) - $([int] $response.StatusCode)) `n" -ForegroundColor green 
}
else {
write-host "`n Site - $_URL is down `n" ` -ForegroundColor red
}

STEP #2: Creating a batch file with .bat extension

I had created the simple notepad file and saved it with the .bat extension as shown below. The below .bat file has created file name with ClickToValidationSite_EXE.bat

STEP #3: Calling .ps file inside the .bat file

Open the ClickToValidationSite_EXE.bat by right with the Edit option, it will open in the notepad. Here we going to call the PowerShell script which will validate and provide the status of the site.

In the first line, the @echo off commands are used to disable the echoing or prevents the echo on the screen.
PowerShell.exe called from any CMD window or batch file to launch PowerShell. -ExecutionPolicy Unrestricted
-Commend will bypass the execution policy so the script will run without any restriction.

@echo off
powershell.exe -ExecutionPolicy Unrestricted -Command ". 'C:\PowerShell\SiteValidation.ps1'"
TIMEOUT /T 10

OUTPUT: Run PowerShell Script from a Batch


How to pass values between Tasks in a Pipeline using task.setvariable Command

Problem ?

Azure DevOps pipeline is a set of Tasks which can perform a specific task and these tasks will run inside a Agent Machine (ie., Virtual Machine). While Task is executing, it will be allocated some resources and after the Task execution is complete, the allocated resources will be de-allocated. The entire allocation / de-allocation process repeats for other tasks available within the pipeline. It means the Task1 cannot directly communicate with Task2 or any other subsequent Tasks in the pipeline (pass values between Tasks) as their scope of execution is completely isolated though they get executed in the same Virtual Machine .

In this article, we are going to learn about the scenario where you can communicate between Tasks and pass values between Tasks in a Pipeline .

How to Pass Values between tasks ?

When you use PowerShell and Bash scripts in your pipelines, it’s often useful to be able to set variables that you can then use in future tasks. Newly set variables aren’t available in the same task. You’ll use the task.setvariable logging command to set variables in PowerShell and Bash scripts.

what is Task.setvariable?

Task.setvariable is a logging command can be used to create a variable that be used across tasks within the pipeline whether they are in same job of a stage or across stages. VSO stands for Visual Studio Online, which is part of Azure DevOps’ early roots

“##vso[task.setvariable variable=myStageVal;isOutput=true]this is a stage output variable”

Example:

- powershell: |
Write-Host "##vso[task.setvariable variable=myVar;]foo"
- bash: |
echo "##vso[task.setvariable variable=myVar;]foo"

SetVariable Properties

The task.setvariable command includes properties for setting a variable as secret, as an output variable, and as read only. The available properties include:

  • variable = variable name (Required)
  • Issecret = true make the variable as a Secret
  • isoutput = To use the variable in the next stage, set the isoutput property to true
  • isreadonly = When you set a variable as read only, it can’t be overwritten by downstream tasks. Set isreadonly to true

Share variables between Tasks within a Job

Let’s now create a new variable in Task1, assign some value to it and access the Variable in next Task. 

  • Create a variable named Token using the setvariable syntax, assign it some test value (eg – TestTokenValue)
  • Display the value of the Token variable in the next Task as shown in below (Task name ‘Stage1-Job1-Task2’).
stages:
- stage: Stage1
jobs:
- job: Job1
steps:
- task: PowerShell@2
displayName: 'Stage1-Job1-Task1'
inputs:
targetType: 'inline'
script: |
Write-Host "##vso[task.setvariable variable=token]TestTokenValue"
- task: PowerShell@2
displayName: 'Stage1-Job1-Task2'
inputs:
targetType: 'inline'
script: |
Write-Host "the Value of Token : $(token)"

Now, view the output of the variable of the Stage1-Job1-Task2 as shown below. Share variables between Tasks across the Jobs (of the same Stage)

Share variables between Tasks across the Jobs (of the same Stage)

As we discussed in SetVariable property section, We need to use the isOutput=true flag when you desire to use the variable in another Task located in another Job.

>pool:
name: devopsagent-w-pprd01
stages:
- stage: Stage1
jobs:
- job: Stage1_Job1
steps:
- task: PowerShell@2
name: 'Stage1_Job1_Task1'
inputs:
targetType: 'inline'
script: |
Write-Host "##vso[task.setvariable variable=token;isoutput=true;]TestTokenValue"
- job: Stage1_Job2
dependsOn: Stage1_Job1
variables:
- name: GetToken
value: $[dependencies.Stage1_Job1.outputs['Stage1_Job1_Task1.token']]
steps:
- task: PowerShell@2
displayName: 'Stag1-Job2-Task1'
inputs:
targetType: 'inline'
script: |
Write-Host "the Value of Token : $(GetToken)"
  1. Navigate to Stage1_Job1_Task1 and add isoutput = true flag to the Logging Command which let’s us to access the value outside the Job.
  2. The Job in which you want to access the variable must be dependent on the other Job which produces the output. Add dependsOn: Stage1_Job1 in the Stage1_Job2.
  3. In the Stage1_Job2, Create a new variable named GetToken and set it’s values to $[dependencies.Stage1_Job1.outputs[‘Stage1_Job1_Task1.token’]]. This will help to access the variable value which is available in another dependent job. You can’ access this expression directly in the script. It’s mandatory to map the expression into the value of another variable.
  4. Finally, access the new variable in your script.
  5. Once the isoutput=true is added, it’s important to access the variable by prefixing the Task name. Otherwise, it wouldn’t work.

OUTPUT:

Below code where the Job2 can access the output of Job1.

Share variables between Tasks across Stages

As per below code, I didn’t specify dependency (using dependsOn) between Stages as Stage1 and Stage2 are one after the other. In case if you would like to access Stage1’s variable in Stage3 then the Stage2 must depend on Stage1.

Accessing value of one stage from another we need to use stageDependencies attribute where in between jobs we are used dependencies as shown in above YAML.

pool:
name: devopsagent-w-pprd01
stages:
- stage: Stage1
jobs:
- job: Stage1_Job1
steps:
- task: PowerShell@2
name: 'Stage1_Job1_Task1'
inputs:
targetType: 'inline'
script: |
Write-Host "##vso[task.setvariable variable=token;isoutput=true;]TestTokenValue"
- stage: Stage2
jobs:
- job: Stage2_Job1
variables:
- name: getToken
value: $[stageDependencies.Stage1.Stage1_Job1.outputs['Stage1_Job1_Task1.token']]
steps:
- task: PowerShell@2
displayName: 'Stag1-Job2-Task1'
inputs:
targetType: 'inline'
script: |
Write-Host "the Value of Token from Stage2: $(getToken)"

OUTPUT:

Export CSV file with Array values using Powershell

One of the best and easiest ways to put data into an easy-to-read format is with a CSV (comma-separated values ) file. The CSV file will have a line of headers to indicate column name and subsequent values for each column. The structured data is required for positioning in the CSV file, to achieve the PowerShell has few option for structured data. Since a CSV file is just like a text file, it can loosely be created with Powershell’s Add-Content cmdlet. Here i had explained how to Export CSV file with Array with help of simple Add-Content cmdle.

We can use both Add-Content OR Export-Csv to create and write the CSV files, the best way is use Export-Csv (if we created a structured data/object) else we can use Add-Content cmdlet . The Add-Content does not negatively understand a CSV file, it would still be able to read one.

############################################################
#Project : Read Array values and generate CSV file
#Developer : Thiyagu S (dotnet-helpers.com)
#Tools : PowerShell 5.1.15063.1155 
#E-Mail : mail2thiyaguji@gmail.com 
############################################################
#Declared the File path location with the CSV format.
$FilePathLocation = "C:\PowerShell\EmployeeDetails.csv"
#Declared the Array
$Empdetails =@();
$empCount = 3;
#Declared the Column names
$columnName = '"EmpName","EMPID","EMPemail","EMPpin"'
#Add the column tile to the Excel
Add-Content -Path $FilePathLocation -Value $columnName
#Loop will get user input for 3 time
for ($loopindex=0; $loopindex -lt $empCount; $loopindex++)
{
#Getting the User Input from the console
$Empdetails += Read-Host " Enter EMPName,EMPID,EMPemail,EMPpin by comma separator"
}
#looping the Emp details to print in the excel cell
$Empdetails | foreach { Add-Content -Path $FilePathLocation -Value $_ }

Output: 

Export CSV file with Array

What do you think?

I hope you have an idea of  How To Read Array values and generate CSV file with PowerShell. I would like to have feedback from my posts readers. Your valuable feedback, question, or comments about this article are always welcome.

Rebuild index to reduce Fragmentation in SQL Server

Here we will learn how to identify and resolve by Rebuild index to reduce Fragmentation in SQL Server. Index fragmentation identification and index maintenance are important parts of the database maintenance task. Microsoft SQL Server keeps updating the index statistics with the Insert, Update or Delete activity over the table. The index fragmentation is the index performance value in percentage, which can be fetched by SQL Server DMV. According to the index performance value, users can take the indexes in maintenance by revising the fragmentation percentage with the help of Rebuild or Reorganize operation.

Introduction:

In SQL Server, both “rebuild” and “reorganize” refer to operations that can be performed on indexes to address fragmentation. However, they are distinct operations with different characteristics. Let’s explore the differences between rebuilding and reorganizing indexes:

Note: Optimize index is one of the maintenance activity to improve query performance and reduce resource consumption. Ensure you will plan to Performing the database index during the off business hours or less traffic hours (less request to database).

Advantages of Rebuild index to reduce Fragmentation:

  • Removes both internal and external fragmentation.
  • Reclaims unused space on data pages.
  • Updates statistics associated with the index.

Considerations:

  • Requires more system resources.
  • Locks the entire index during the rebuild process, potentially causing blocking.

How to find the Fragmentation?

Here we executed the SQL script for checking the fragmentation details for the specific database , where the result shown in the percentage.

## Script will give details of fragmentation in percentage 
Method 1:
DECLARE @cutoff_date DATETIME = DATEADD(day, -20, GETDATE()); SELECT OBJECT_NAME(ip.object_id) AS TableName,
i.name AS IndexName,
ip.avg_fragmentation_in_percent
FROM sys.dm_db_index_physical_stats(DB_ID(), NULL, NULL, NULL, NULL) ip
JOIN sys.indexes i
ON ip.object_id = i.object_id AND ip.index_id = i.index_id
JOIN sys.dm_db_index_usage_stats ius
ON ip.object_id = ius.object_id AND ip.index_id = ius.index_id
Method 2:
SELECT
DB_NAME() AS DBName
,OBJECT_NAME(ps.object_id) AS TableName
,i.name AS IndexName
,ips.index_type_desc
,ips.avg_fragmentation_in_percent
FROM sys.dm_db_partition_stats ps
INNER JOIN sys.indexes i
ON ps.object_id = i.object_id
AND ps.index_id = i.index_id
CROSS APPLY sys.dm_db_index_physical_stats(DB_ID(), ps.object_id, ps.index_id, null, 'LIMITED') ips
ORDER BY ips.avg_fragmentation_in_percent DESC

Rebuild index to reduce Fragmentation:

The REBUILD operation involves recreating the entire index. This process drops the existing index and builds a new one from scratch. During the rebuild, the index is effectively offline, and there can be a period of downtime where the index is not available for queries. In simple, REBUILD locks the table for the whole operation period (which may be hours and days if the table is large). The syntax for rebuilding an index is as follows:

Rebuilding Full Index on selected database:

After executing the Rebuild index on specific database, you can able to view the fragmentation is reduce as shown in the below image.

-- Rebuild ALL Indexes
-- This will rebuild all the indexes on all the tables in your database.
SET NOCOUNT ON
GO
DECLARE rebuildindexes CURSOR FOR
SELECT table_schema, table_name  
FROM information_schema.tables
	where TABLE_TYPE = 'BASE TABLE'
OPEN rebuildindexes
DECLARE @tableSchema NVARCHAR(128)
DECLARE @tableName NVARCHAR(128)
DECLARE @Statement NVARCHAR(300)
FETCH NEXT FROM rebuildindexes INTO @tableSchema, @tableName
WHILE (@@FETCH_STATUS = 0)
BEGIN
   SET @Statement = 'ALTER INDEX ALL ON '  + '[' + @tableSchema + ']' + '.' + '[' + @tableName + ']' + ' REBUILD'
   --PRINT @Statement 
   EXEC sp_executesql @Statement  
   FETCH NEXT FROM rebuildindexes INTO @tableSchema, @tableName
END
CLOSE rebuildindexes
DEALLOCATE rebuildindexes
GO
SET NOCOUNT OFF
GO

Summary: 

Index fragmentation occurs due to frequent INSERT, UPDATE, and DELETE operations in SQL Server, leading to degraded query performance. Regular index maintenance, including identifying and resolving fragmentation, is crucial for database optimization.

Key Points:

  • Fragmentation Identification:
    • Use DMVs (Dynamic Management Views) like sys.dm_db_index_physical_stats to check fragmentation percentage.
    • Two methods are provided to analyze fragmentation levels across indexes.
  • Rebuild vs. Reorganize:
    • Rebuild: Drops and recreates the index entirely, removing internal and external fragmentation, reclaiming space, and updating statistics. However, it locks the index and consumes more resources.
    • Reorganize: Defragments the index without rebuilding it, suitable for low to moderate fragmentation.
  • When to Rebuild Indexes:
    • Recommended for high fragmentation (typically above 30%).
    • Should be scheduled during off-peak hours to minimize blocking.
  • How to Rebuild Indexes:
    • A script is provided to rebuild all indexes in a database dynamically.
    • Rebuilding reduces fragmentation, improving query performance and resource efficiency.

By regularly monitoring and rebuilding fragmented indexes, database administrators can maintain optimal SQL Server performance.