All posts by Thiyagu

Configure autoscaling in Azure Kubernetes Service with CPU & Memory

Introduction:

Azure Kubernetes Service (AKS) empowers you to dynamically scale your applications to meet fluctuating demands. By leveraging CPU and memory-based autoscaling, you can optimize resource allocation, minimize costs, and ensure your applications consistently deliver peak performance. This guide will walk you through the process of configuring and implementing effective autoscaling in Azure Kubernetes Service deployment.

By default, the Horizontal Pod Autoscaler (HPA) in Kubernetes primarily uses CPU utilization as a metric for scaling. However, it is also possible to configure HPA to use memory utilization or custom metrics. Here’s how you can set up HPA to consider memory usage in addition to CPU usage.

What is HPA?

Horizontal Pod Auto scaler (HPA) automatically scales the number of pods in a Kubernetes deployment based on observed metrics such as CPU and memory usage. It ensures your application can handle increased load and conserves resources when demand is low.

“AKS Autoscaling automatically adjusts the number of pods in your deployments, ensuring your applications can seamlessly handle fluctuating workloads.”

Why we monitor Memory and CPU Utilization?

In many applications, both memory and CPU usage are critical metrics to monitor. Memory-intensive applications require additional resources to maintain performance, so scaling based on memory ensures pods are added when usage increases, preventing performance degradation due to memory pressure. Similarly, CPU utilization is essential because high CPU demand can quickly lead to processing bottlenecks. By monitoring and autoscaling based on both memory and CPU, you achieve a more holistic and balanced approach that ensures your applications have the necessary resources to operate optimally under varying workloads.

Step-by-Step Guide to Configure AKS autoscaling

Prerequisites

Before we begin, ensure you have the following:

  1. Azure CLI installed and configured on your machine.
  2. kubectl installed and configured to interact with your AKS cluster.
  3. An AKS cluster up and running.

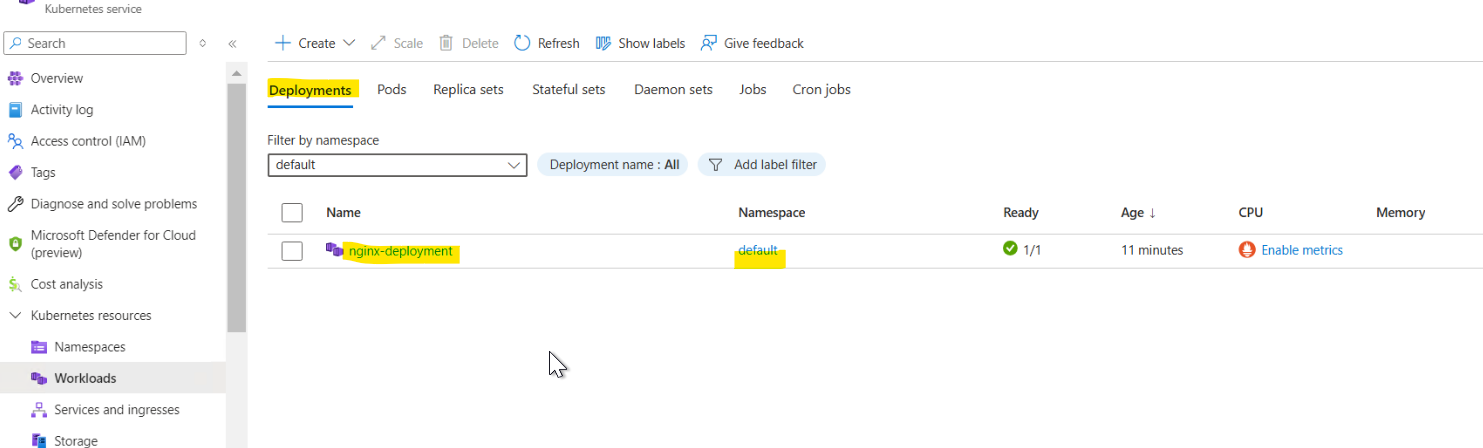
Step 1: Create a Deployment

First, Create a simple deployment using kubectl apply. Let’s create a simple NGINX deployment:

apiVersion: apps/v1
kind: Deployment
metadata:
  name: nginx-deployment
spec:
  replicas: 1
  selector:
    matchLabels:
      app: nginx
  template:
    metadata:
      labels:
        app: nginx
    spec:
      containers:
        - name: nginx
          image: nginx:1.14.2
          ports:
            - containerPort: 80

Save this YAML file as nginx-deployment.yaml and apply it using kubectl:

kubectl apply -f nginx-deployment.yaml

This will create a deployment named nginx-deployment with one replica of the NGINX container.

Step 2: Create  the HPA with Memory Utilization 

To create an HPA that uses both CPU and memory metrics, you need to define the metrics in the HPA configuration (Define an HPA that considers both CPU and memory utilization). Save the following YAML as hpa-nginx.yaml:

To associate the Horizontal Pod Autoscaler (HPA) with the specific deployment created in Step 1 (nginx-deployment), the autoscaling YAML must specify the kind: Deployment and name: nginx-deployment within the scaleTargetRef section, as shown in the example below.

apiVersion: autoscaling/v2
kind: HorizontalPodAutoscaler
metadata:
  name: nginx-hpa
spec:
  scaleTargetRef:
    apiVersion: apps/v1
    kind: Deployment
    name: nginx-deployment
  minReplicas: 1
  maxReplicas: 10
  metrics:
    - type: Resource
      resource:
        name: cpu
        target:
          type: Utilization
          averageUtilization: 50
    - type: Resource
      resource:
        name: memory
        target:
          type: Utilization
          averageUtilization: 70

Apply the HPA configuration:

kubectl apply -f hpa-nginx.yaml

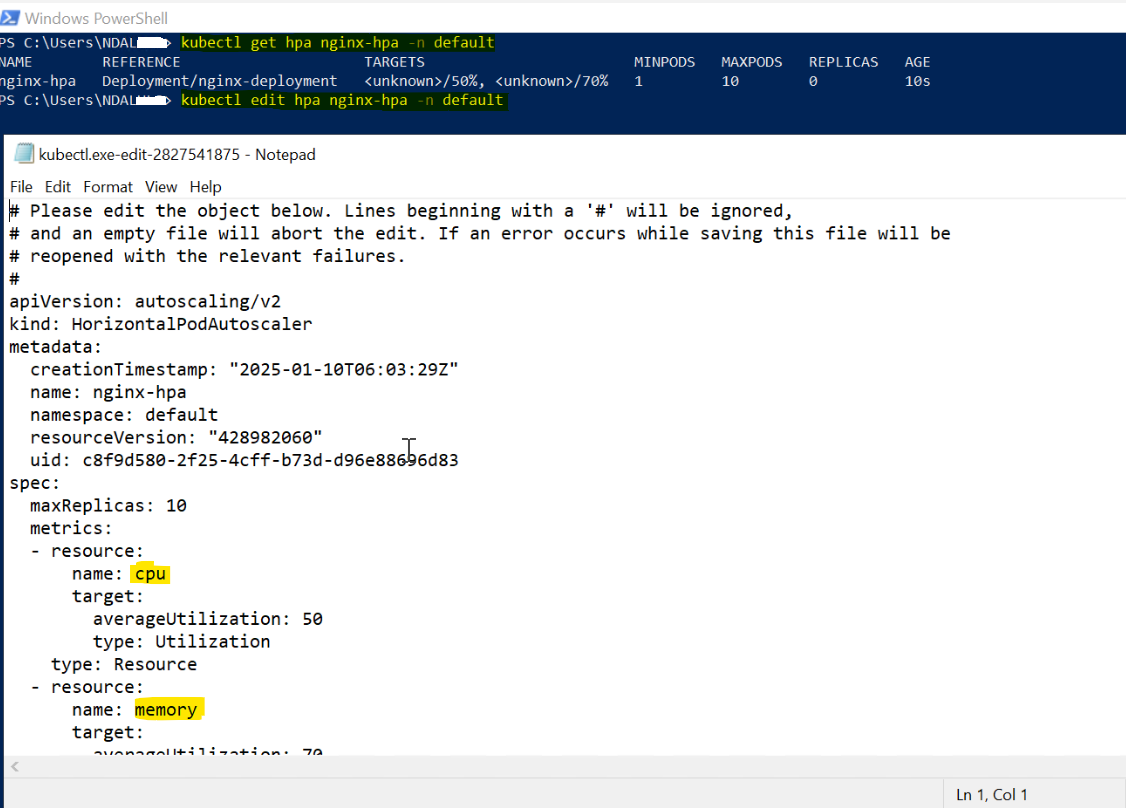
Step 3: Verify the HPA

Check the status of the HPA to ensure it includes both CPU and memory metrics: Use kubectl get hpa to confirm the HPA is configured correctly and includes both CPU and memory targets.

kubectl get hpa nginx-hpa

The output should display both CPU and memory utilization targets:

Step 4: Modify the HPA Configuration:

If you need to adjust the scaling parameters (e.g., minReplicas, maxReplicas, CPU/memory utilization targets), edit the hpa-nginx.yaml file accordingly as shown below and update the new value and save. For example, to increase the maximum number of replicas:

Key Considerations:

  • Monitor HPA Behavior: Regularly monitor the HPA’s behavior using kubectl describe hpa nginx-hpa. This will provide insights into the scaling activities, current pod count, and the reasons for scaling up or down.
  • Fine-tune Metrics: Experiment with different CPU and memory utilization targets to find the optimal values for your application’s workload.
  • Consider Custom Metrics: For more complex scenarios, explore using custom metrics for autoscaling (e.g., request latency, error rates).

Conclusion:

By following these steps, you can effectively update your HPA configuration in AKS to ensure your deployments scale efficiently and effectively based on both CPU and memory utilization. By incorporating memory utilization into your AKS autoscaling strategy, you optimize resource allocation, minimize costs, and enhance application performance. This proactive approach ensures your applications seamlessly handle varying workloads while maintaining high availability and delivering an exceptional user experience. Regularly monitor your HPA metrics and adjust scaling parameters as needed to fine-tune performance and achieve optimal resource utilization.


Understanding Environment Variables in Linux: A Must-Know for DevOps and System Admins

What Are Environment Variables in Linux?

Environment Variables in Linux are dynamic values that the operating system and various applications use to determine information about the user environment. They are essentially variables that can influence the behavior and configuration of processes and programs on a Linux system. These variables are used to pass configuration information to programs and scripts, allowing for flexible and dynamic system management.

These variables, often referred to as global variables, play a crucial role in tailoring the system’s functionality and managing the startup behavior of various applications across the system. On the other hand, local variables are restricted and accessible from within the shell in which they’re created and initialized.

Linux environment variables have a key-value pair structure, separated by an equal (=) sign. Note that the names of the variables are case-sensitive and should be in uppercase for instant identification.

Key Features of Environment Variables

  • Dynamic Values: They can change from session to session and even during the execution of programs.
  • System-Wide or User-Specific: Some variables are set globally and affect all users and processes, while others are specific to individual users.
  • Inheritance: Environment variables can be inherited by child processes from the parent process, making them useful for configuring complex applications.

Common Environment Variables

Here are some commonly used environment variables in Linux:

  • HOME: Indicates the current user’s home directory.
  • PATH: Specifies the directories where the system looks for executable files.
  • USER: Contains the name of the current user.
  • SHELL: Defines the path to the current user’s shell.
  • LANG: Sets the system language and locale settings.

Setting and Using Environment Variables

Temporary Environment Variables in Linux

You can set environment variables temporarily in a terminal session using the export command: This command sets an environment variable named MY_VAR to true for the current session. Environment variables are used to store information about the environment in which programs run.

export MY_VAR=true
echo $MY_VAR

Example 1: Setting Single Environment Variable

For example, the following command will set the Java home environment directory.

export JAVA_HOME=/usr/bin/java

Note that you won’t get any response about the success or failure of the command. As a result, if you want to verify that the variable has been properly set, use the echo command.

echo $JAVA_HOME

The echo command will display the value if the variable has been appropriately set. If the variable has no set value, you might not see anything on the screen.

Example 2: Setting Multiple Environment Variables

You can specify multiple values for a multiple variable by separating them with space like this:

<NAME>=<VALUE1> <VALUE2><VALUE3>

export VAR1="value1" VAR2="value2" VAR3="value3"

Example 3: Setting Multiple value for single Environment Variable

You can specify multiple values for a single variable by separating them with colons like this: <NAME>=<VALUE1>:<VALUE2>:<VALUE3>

export PATH="/usr/local/bin:/usr/bin:/bin:/usr/local/sbin:/usr/sbin:/sbin"

The PATH variable contains a list of directories where the system looks for executable files. Multiple directories are separated by colons.

Permanent Environment Variables in Linux

To make MY_VAR available system-wide, follow these steps:

This command appends the line MY_VAR=”True” to the /etc/environment file, which is a system-wide configuration file for environment variables.

By adding this line, you make the MY_VAR variable available to all users and sessions on the system.

The use of sudo ensures that the command has the necessary permissions to modify /etc/environment

Example 1: Setting Single Environment Variable for all USERS

export MY_VAR=true
echo 'MY_VAR="true"' | sudo tee /etc/environment -a

Breakdown of the Command

echo ‘MY_VAR=”true”‘: This command outputs the string MY_VAR=”true”. Essentially, echo is used to display a line of text.

| (Pipe): The pipe symbol | takes the output from the echo command and passes it as input to the next command. In this case, it passes the string MY_VAR=”true” to sudo tee.

sudo tee /etc/environment -a: sudo: This command is used to run commands with superuser (root) privileges. Since modifying /etc/environment requires administrative rights, sudo is necessary.

tee: The tee command reads from the standard input (which is the output of the echo command in this case) and writes it to both the standard output (displaying it on the terminal) and a file.

/etc/environment: This is the file where tee will write the output. The /etc/environment file is a system-wide configuration file for environment variables.

-a: The -a (append) option tells tee to append the input to the file rather than overwriting its contents. This ensures that any existing settings in /etc/environment are preserved and the new line is simply added to the end of the file.

This command is used to add a new environment variable (MY_VAR) to the system-wide environment variables file (/etc/environment). By appending it, you ensure that the new variable is available to all users and sessions across the entire system.

Example 2: Setting Multiple value for single Environment Variable for all USERS

You can specify multiple values for a single variable by separating them with colons like this: <NAME>=<VALUE1>:<VALUE2>:<VALUE3>

export MY_PATH="/usr/local/bin:/usr/bin:/bin:/usr/local/sbin"
echo MY_PATH="/usr/local/bin:/usr/bin:/bin:/usr/local/sbin" | sudo tee /etc/environment -a

Cross-Subscription Code Integration: How to Access External Azure DevOps Repos Like a Pro

Introduction

Efficiently integrating code from external Azure DevOps repositories is crucial for collaborative projects and streamlined development workflows. This comprehensive guide provides a step-by-step approach to accessing and utilizing external repositories within your Azure DevOps pipelines (Checkout External Repositories). We’ll cover essential steps, including creating Personal Access Tokens (PATs), configuring service connections, and referencing external repositories in your YAML pipelines. By following these instructions, you’ll enhance your development process by seamlessly incorporating code from various sources across different subscriptions.

Accessing an External Azure DevOps Repository Across Subscriptions

Accessing a repository from another Azure DevOps subscription can be essential for projects where resources are distributed across different organizations or accounts. This article provides a step-by-step guide on using a Personal Access Token (PAT) and a service connection to access an external repository within an Azure DevOps pipeline. By following these instructions, you’ll be able to integrate code from another subscription seamlessly.

Where it required?

In scenarios where you need to access resources (like repositories) that belong to a different Azure DevOps organization or subscription, you need to configure cross-subscription access. This setup is commonly required in the following situations:

  • Shared Repositories Across Teams: Teams working on interconnected projects in different organizations or subscriptions often need to share code. For example, a core library or shared services might be maintained in one subscription and used across multiple other projects.
  • Centralized Code Management: Large enterprises often centralize codebases for specific functionalities (e.g., CRM services, microservices). If your pipeline depends on these centralized repositories, you must configure access.
  • Multi-Subscription Projects: When an organization spans multiple Azure subscriptions, projects from one subscription might need to integrate code or services from another, necessitating secure cross-subscription access.
  • Dependency Management: A project may depend on another repository’s codebase (e.g., APIs, SDKs, or CI/CD templates) that resides in a different Azure DevOps subscription.
  • Separate Environments: Development and production environments might exist in separate subscriptions for security and compliance. For example, accessing a production-ready repository for release from a different subscription’s development repository.

Step-by-Step Guide

Step 1: Create a Personal Access Token (PAT) in External ADO

  • Navigate to the Azure DevOps organization containing the external repository.
  • Click on your profile picture in the top-right corner and select Personal Access Tokens.
  • Click on New Token and:

Provide a name (e.g., External Repo Access).
Set the Scope to Code (Read) (or higher if required).
Specify the expiration date.
Generate the PAT and copy it. Store it securely as you won’t be able to view it again.

Step 2: Create a Service Connection in your ADO

A service connection allows your pipeline to authenticate with the external repository.

  • Go to the Azure DevOps project where you’re creating the pipeline.
  • Navigate to Project Settings > Service Connections.
  • Click on New Service Connection and select Azure Repos/Team Foundation Server.

In the setup form:

Repository URL: Enter the URL of the external repository.
Authentication Method: Select Personal Access Token.
PAT: Paste the PAT you generated earlier.

Give the service connection a name (e.g., CRM Service Connection) and save it.

Step 3: Reference the External Repository in Your Pipeline

The repository keyword lets you specify an external repository. Use a repository resource to reference an additional repository in your pipeline. Add the external repository to your pipeline configuration.

SYNTAX

repositories:
- repository: string #Required as first property. Alias for the repository.
  endpoint: string #ID of the service endpoint connecting to this repository.
  trigger: none | trigger | [ string ] # CI trigger for this repository(only works for Azure Repos).
  name: string #repository name (format depends on 'type'; does not accept variables).
  ref: string #ref name to checkout; defaults to 'refs/heads/main'. The branch checked out by default whenever the resource trigger fires.
  type: string #Type of repository: git, github, githubenterprise, and bitbucket.

Update your pipeline YAML file to include:

resources:
  repositories:
  - repository: externalRepo
    type: git
    name: myexternal_project/myexternal_repo
    ref: external-ProductionBranch #Branch reference
    endpoint: dotnet Service Connection #Service connection name
  • References the external repository under resources.repositories.
  • name:  mention your external project and Repo name
  • ref: Specifies the branch (external-ProductionBranch)
  • endpoint: service connection (dotnet Service Connection).

Step 4: Checkout the External Repository

Include a checkout step in your pipeline: This ensures the external repository is cloned into the pipeline workspace for subsequent tasks.

steps:
- checkout: externalRepo

Step 5: Define the Build Pipeline

Add steps for building and packaging the code. In my case, the external project is dotnet core so i have added the build steps for the same as shown in below.

- script: |
    dotnet --version
    nuget restore ProjectSrc/dotnethelpers.FunctionApp.csproj
  displayName: 'Restore NuGet Packages'

- task: DotNetCoreCLI@2
  inputs:
    command: 'build'
    projects: '**/dotnethelpers.FunctionApp.csproj'
    arguments: '--output $(Build.BinariesDirectory)/publish_output'

- task: ArchiveFiles@2
  inputs:
    rootFolderOrFile: '$(Build.BinariesDirectory)/publish_output'
    includeRootFolder: false
    archiveType: 'zip'
    archiveFile: '$(Build.ArtifactStagingDirectory)/$(Build.BuildId).zip'
    replaceExistingArchive: true

- task: PublishBuildArtifacts@1
  inputs:
    PathtoPublish: '$(Build.ArtifactStagingDirectory)'
    ArtifactName: 'drop'
    publishLocation: 'Container'

Full YAML

resources:
  repositories:
  - repository: externalRepo
    type: git
    trigger: 
    - external-ProductionBranch
    name: myexternal_project/myexternal_repo
    ref: external-ProductionBranch # Branch reference
    endpoint:dotnet Service Connection # Service connection name

pool:
  vmImage: windows-latest

steps:
- checkout: externalRepo

- task: UseDotNet@2
  displayName: 'Install .NET SDK'
  inputs:
    packageType: 'sdk'
    version: '8.0.x'
    installationPath: $(Agent.ToolsDirectory)/dotnet

- script: |
    dotnet --version
    nuget restore ProjectSrc/dotnethelpers.FunctionApp.csproj
  displayName: 'Restore NuGet Packages'


- task: DotNetCoreCLI@2
  inputs:
    command: 'build'
    projects: '**/dotnethelpers.FunctionApp.csproj'
    arguments: '--output $(Build.BinariesDirectory)/publish_output'

- task: ArchiveFiles@2
  inputs:
    rootFolderOrFile: '$(Build.BinariesDirectory)/publish_output'
    includeRootFolder: false
    archiveType: 'zip'
    archiveFile: '$(Build.ArtifactStagingDirectory)/$(Build.BuildId).zip'
    replaceExistingArchive: true
  
- task: PublishBuildArtifacts@1
  inputs:
    PathtoPublish: '$(Build.ArtifactStagingDirectory)'
    ArtifactName: 'drop'
    publishLocation: 'Container'


Conclusion

Successfully accessing and integrating external Azure DevOps repositories requires careful authentication and configuration. By following the steps outlined in this guide, including creating PATs, establishing service connections, and effectively referencing external repositories within your YAML pipelines, you can seamlessly integrate code from various sources. This streamlined approach fosters enhanced collaboration, improved efficiency, and a more robust development process for your projects.


Search and Replace String Using the sed Command in Linux/Unix.

Introduction:

The sed command, a powerful stream editor in Linux/Unix, is a cornerstone for text manipulation. This guide will delve into the intricacies of using sed to search and replace strings within files. We’ll explore various scenarios, from replacing single occurrences to global substitutions, and even handling case-insensitive replacements. Whether you’re a seasoned system administrator or a budding developer, this comprehensive tutorial will equip you with the knowledge to effectively wield the sed command for your text processing needs. We will discuss more about how to Search and Replace String Using the sed.

My Requirement & solution:

We are maintaining the application in Linux machine (in AKS pods) and as a Devops team, we Got a requirement to replace some config values based on the environment (value need to be maintain in the AKS environment variable). To manage this, we thought to create one startup script in the docker image which will execute during the new image deployment ,where we used the sed command to achieve the find & replace of config value based on environments. Based on my experience i though to write this article (Search and Replace String Using the sed Command in Linux/Unix) immediately which will be helpful like me who are new to the Linux Operating system/Bash commands. 

What Is the Sed Command in Linux?

The SED command in Linux stands for Stream Editor and it helps in operations like selecting the text, substituting text, modifying an original file, adding lines to text, or deleting lines from the text. Though most common use of SED command in UNIX is for substitution or for find and replace.

By using SED you can edit files even without opening them, which is much quicker way to find and replace something in file, than first opening that file in VI Editor and then changing it.

[su_highlight color=”#2F1C6A”]Syntax: sed OPTIONS… [SCRIPT] [INPUTFILE…][/su_highlight]

  • Options control the output of the Linux command.
  • Script contains a list of Linux commands to run.
  • File name (with extension) represents the file on which you’re using the sed command.

[su_quote]Note: We can run a sed command without any option. We can also run it without a filename, in which case, the script works on the std input data.[/su_quote]

Key Advantages of Using sed

  • Efficiency: sed allows for in-place editing, eliminating the need to manually open and modify files in a text editor.
  • Flexibility: It supports a wide array of editing commands, enabling complex text manipulations.
  • Automation: sed can be easily integrated into scripts for automated text processing tasks.

Search and Replace String Using the sed

Replace First Matched String

The below example, the script will replace the first found instance of the word test1 with test2 in every line of a file

    sed -i 's/test1/test2/' opt/example.txt

The command replaces the first instance of test1 with test2 in every line, including substrings. The match is exact, ignoring capitalization variations. -i tells the sed command to write the results to a file instead of standard output.

Search & Global Replacement (all the matches)

To replace every string match in a file, add the g flag to the script (To replace all occurrences of a pattern within each line). For example

    sed -i 's/test1/test2/g' opt/example.txt

The command globally replaces every instance of test1 with test2 in the /example.txt.

The command consists of the following:

  • -i tells the sed command to write the results to a file instead of standard output.
  • s indicates the substitute command.
  • / is the most common delimiter character. The command also accepts other characters as delimiters, which is useful when the string contains forward slashes.
  • g is the global replacement flag, which replaces all occurrences of a string instead of just the first.
    “input file” is the file where the search and replace happens. The single quotes help avoid meta-character expansion in the shell.

Search and Replace All Cases

To find and replace all instances of a word and ignore capitalization, use the I parameter:

#I: The case-insensitive flag.    
sed -i 's/test1/tes2/gI' opt/example.txt

The command replaces all instances of the word test1 with test2, ignoring capitalization.

Conclusion 

The sed command is an invaluable tool for text manipulation in Linux/Unix environments. By mastering its basic usage and exploring its advanced features, you can streamline your text processing tasks and significantly improve your system administration and development workflows. This tutorial has provided a foundational understanding of sed’s search and replace capabilities. For further exploration, consider delving into more advanced sed scripting techniques and exploring its other powerful features.

I hope you found this tutorial helpful. What’s your favorite thing you learned from this tutorial? Let me know on comments!

How To Connect Azure Kubernetes Cluster Using Kubectl

Introduction

Azure Kubernetes Service (AKS) simplifies the deployment, management, and scaling of containerized applications using Kubernetes. To interact with an AKS cluster, you need to establish a connection using kubectl, the Kubernetes command-line tool. This guide provides a step-by-step process to explain How To Connect Azure Kubernetes Cluster Using Kubectl

Why Kubectl needed?

Connecting to an AKS cluster is an essential step for managing workloads, monitoring performance, and deploying applications. This process is especially critical for:

  • Monitoring Cluster Health: Using kubectl commands to retrieve performance metrics and check node status.
  • Application Deployment: Deploying and managing containerized applications in the AKS cluster.
  • Cluster Administration: Performing administrative tasks like scaling, updating, or debugging resources within the cluster.

Whether you’re a developer or administrator, establishing this connection ensures you can effectively manage your Kubernetes environment.

To connect to an Azure Kubernetes Service (AKS) cluster using kubectl, you will need to perform the following steps:

Prerequisites ( install both Azure CLI and Kubectl)

STEP: 1 Install the Azure CLI

If you haven’t installed the Azure CLI on your local machine, you can download and install it from the official Microsoft documentation here.

STEP: 2 Install Kubectl

Install the Kubernetes command-line (click here) tool “Kubectl” , if you haven’t installed it already.

Steps to connect Azure account:

STEP: 3 Authenticate with Azure

Open command prompt, run az login command to authenticate your CLI with your Azure account. Once you run this command, you will be prompted to enter your Azure account credentials.

az login

Steps to connect Azure AKS Cluster:

Go to Azure Portal -> Kubernetes Services -> Select the required Cluster -> Overview -> Connect -> to find the entire command for the specific cluster itself or follow the below commands one by one by replacing with subscription Id, cluster name and resource group name.

STEP: 4 Set the subscription

To set subscription, run

az account set --subscriptiond 95fe7-8d2c-4297-ad8b-a8eb08322955

STEP: 5 Generate kubeconfig file

Open command prompt, run the below command and run az aks get-credentials command to connect to your AKS cluster. The get-credentials command downloads credentials and configures the Kubernetes CLI to use them.

#Syntax: 
az aks get-credentials --resource-group <resource-group-name> --name <cluster-name>

Replace <resource-group-name> with the name of the resource group that contains your AKS cluster, and <cluster-name> with the name of your AKS cluster.

az aks get-credentials --resource-group rg-dgtl-pprd-we-01 --name aks-dgtl-pprd-we-01

Above command will create the kubeconfig file in the user root directory. To get kubeconfig file in the specific location

Connect Azure Kubernetes Cluster Using Kubectl

STEP: 6 Verify the connection

To verify that Kubectl is connected to your AKS cluster, run the Kubectl get nodes command. This command should display a list of the nodes in your AKS cluster. If the command returns the list of nodes, then you have successfully connected to your AKS cluster using Kubectl.

kubectl get nodes

Points to Remember

  • Go to Azure Portal -> Kubernetes Services -> Select the required Cluster -> Overview -> Connect -> to find the entire command for the specific cluster itself or follow the below commands one by one by replacing with subscription Id, cluster name and resource group name.
  • First we need to login to the Azure account by configuring Azure subscription and login details. And then we need to connect to Kubernetes Cluster only then we can able to run Kubectl commands.

Conclusion

Connecting to an AKS cluster using kubectl is a fundamental skill for managing Kubernetes workloads in Azure. By following this guide, you can authenticate, configure, and verify your connection to the AKS cluster seamlessly. This enables you to monitor cluster performance, deploy applications, and manage resources effectively.

As Kubernetes continues to be a vital platform for container orchestration, mastering tools like kubectl and Azure CLI is essential for efficient cluster management.

How To Copy Secrets From KeyVault To Another KeyVault In Azure

Introduction

Azure Key Vault is a secure cloud service for managing secrets, encryption keys, and certificates. In modern multi-region deployments, ensuring that application secrets are consistently available across regions is essential for high availability and disaster recovery. However, manually copying secrets from one Key Vault to another can be tedious, error-prone, and time-consuming, especially when dealing with numerous secrets.

This blog post demonstrates how to automate the process of copying secrets from one Azure Key Vault to another using a PowerShell script. By following this guide, you can efficiently replicate secrets between regions, ensuring consistency and reducing manual intervention.

Use Case:

In our application setup, we aimed to configure high availability by deploying the application in two Azure regions. The primary Key Vault in region 1 contained numerous secrets, which we needed to replicate to the Key Vault in region 2. Manually moving each secret one by one was impractical and error-prone.

To overcome this, we developed an automated process using PowerShell to copy all secrets from the source Key Vault to the destination Key Vault. This approach eliminates human errors, saves time, and ensures seamless secret replication for high availability.

e. This blog will help you to understand How To Copy Secrets From KeyVault To Another In Azure using PowerShell script.

To clone a secret between key vaults, we need to perform two steps:

  1. Retrieve/export the secret value from the source key vault.
  2. Import this value into the destination key vault.

You can also refer below link to learn how to maintain your secrets in key vault and access in YAML pipeline

Step 1: Install Azure AZ module

Use the below cmdlet to Install the Azure PowerShell module if not already installed

# Install the Azure PowerShell module if not already installed
  Install-Module -Name Az -Force -AllowClobber

Step 2: Set Source and destination Key Vault name

# Pass both Source and destination Key Vault Name
Param( [Parameter(Mandatory)] 
[string]$sourceKvName, 
[Parameter(Mandatory)] 
[string]$destinationKvName )

Step 3:  Connect the Azure portal to access the Key Vault (non-interactive mode)

As we are doing the automation, so you can’t use Connect-AzAccount (which will make the popup to authenticate), if want to execute without any manual intervention then use az login with non-interactive mode as shown in below.

# Connect to Azure portal (you can also use Connect-AzAccount)
az login --service-principal -u "0ff3664821-0c94-48e0-96b5-7cd6422f46" -p "XACccAV2jXQrNks6Lr3Dac2B8z95BAt~MTCrP" --tenant "116372c23-ba4a-223b-0339-ff8ba7883c2"

Step 4:  Get the all the secrets name from the source KV

# Get all the Source Secret keys
$secretNames = (Get-AzKeyVaultSecret -VaultName $sourceKvName).Name

Step 5: Copy Secrets From source to destination KV.

The below script will loop based on the number of key names to fetch both name of the key and its value from the source key Vault and started to set the key and value in the destination KvName.

# Loop the Secret Names and copy the key/value pair to the destination key vault
$secretNames.foreach{
Set-AzKeyVaultSecret -VaultName $destinationKvName -Name $_ `
-SecretValue (Get-AzKeyVaultSecret -VaultName $sourceKvName -Name $_).SecretValue
}

Full code

# Pass both Source and destination Key Vault Name
Param(
[Parameter(Mandatory)]
[string]$sourceKvName,
[Parameter(Mandatory)]
[string]$destinationKvName
)

# Connect to Azure portal (you can also use Connect-AzAccount)
az login --service-principal -u "422f464821-0c94-48e0-96b5-7cd60ff366" -p "XACccAV2jXQrNks6Lr3Dac2B8z95BAt~MTCrP" --tenant "116372c23-ba4a-223b-0339-ff8ba7883c2"

# Get all the Source Secret keys
$secretNames = (Get-AzKeyVaultSecret -VaultName $sourceKvName).Name

# Loop the Secret Names and copy the key/value pair to the destination key vault
$secretNames.foreach{
Set-AzKeyVaultSecret -VaultName $destinationKvName -Name $_ `
-SecretValue (Get-AzKeyVaultSecret -VaultName $sourceKvName -Name $_).SecretValue
}

Conclusion

Managing secrets across multiple Azure regions can be challenging but is crucial for ensuring high availability and disaster recovery. Automating the process of copying secrets between Key Vaults not only streamlines the operation but also enhances reliability and reduces the risk of errors.

By following the steps outlined in this blog, you can easily replicate secrets between Azure Key Vaults using PowerShell. This solution ensures that your applications in different regions are configured with consistent and secure credentials, paving the way for robust and scalable deployments.

Implement this process to save time, minimize errors, and focus on scaling your applications while Azure handles secure secret management for you.


Where to use the –replace operator and Replace() method & its difference

Introduction

Manipulating text is a common task in any scripting or programming language, and PowerShell is no exception. Whether you need to replace a single word, a pattern, or handle more complex transformations using regular expressions, PowerShell provides two powerful tools for the job: the .Replace() method and the -replace operator.

In this article, we’ll explore the differences between these two approaches, highlight their strengths, and demonstrate practical examples to help you choose the right one for your needs. From simple string substitutions to advanced regex-based replacements, you’ll learn how to effectively use these features to handle text in PowerShell scripts with ease.

By the end of this tutorial, you’ll understand:

  • When to use the .Replace() method for straightforward replacements.
  • How the -replace operator leverages the power of regular expressions for more complex scenarios.
  • Common pitfalls and tips for working with special characters.

Let’s dive into how you can make the most of these string replacement techniques in your PowerShell scripts!

–replace operator and Replace() method

In this post, you’re going to learn where to use the PowerShell replace() method and PowerShell replace operator. The tutorial will cover the basics and even drive into some regular expressions.

.Replace is a .NET method and -replace is a PowerShell operator that uses regular expressions. In another word, the .Replace() method comes from the .NET String class whereas the -Replace operator is implemented using System.Text.RegularExpressions.Regex.Replace().

The -replace operator takes a regular expression (regex) replacement rule as input and replaces every match with the replacement string.

When and where to use it?

Like other languages, PowerShell can work with strings and text. One of those useful features is to use PowerShell to replace characters, strings, or even text inside of files. In PowerShell, Replace() method and -replace operator is used to finding specified characters and replace them with a new string. To perform simple replacements, you can use the replace() method but if you need to match and replace anything more advanced, always use the replace operator.

.Replace Method:

Example 1: Replace characters in strings.

$string = ‘hello, dotnet-helpers.com’

In the above code, we gave the string that likes to replace. From the above string value, we would like to replace “hello” with “Welcome”. To do this in PowerShell, first you need to figure out the matched text. Once it’s found, need to replace that text with a user-defined value.

$string = ‘hello, dotnet-helpers.com’
$string.replace(‘hello’,’Welcome’)

The replace() method has two arguments; the string to find and the string to replace. As shown above, the “hello” string is going to replace with “Welcome”.

Points to Remember:

You can call the replace() method on any string to replace any literal string with another. If the string-to-be-replaced isn’t found, the replace() method returns nothing.

Example 2: Replacing multiple strings

You aware that replace() method returns a string, to replace another instance, you can append another replace() method at the end ( .replace(‘dotnet-helpers’,’dotnet-helpers.com!!!’) ). In the previous example, we try to replace “hello” with “Welcome”, in this example we trying to replace another string with one more .replace method as shown below.

$string = ‘hello, dotnet-helpers’
$string.replace(‘hello’,’welcome’).replace(‘dotnet-helpers’,’dotnet-helpers.com!!!’)

Points to Remember:

You can chain together as many replace() method calls as necessary

-Replace Operator:

The replace operator is similar to the .Replace method (in that you provide a string to find and replace). But, it has one big advantage; the ability to use regular expressions to find matching strings.

Example 1: Replacing single string

$string = ‘hello, dotnet-helpers.com’
$string -replace ‘hello,’, ‘Welcome to’

Example 2: Replacing multiple strings

Like the replace() method, you can also chain together usages of the replace operator.

$string = ‘hello, dotnet-helpers’
$string -replace ‘hello,’,’Welcome to’ -replace ‘dotnet-helpers’,’dotnet-helpers.com!!!’

-Replace Operator with Regex:

Replacing strings in PowerShell with the replace() method works but it’s limited. You are constrained to only using literal strings. You cannot use wildcards or regex. If you’re performing any kind of intermediate or advanced replacing, you should use the replace operator.

The -replace operator takes a regex (regular expression) replacement rule as input and replaces every match with the replacement string. The operator itself is used as shown in the following examples : <input string> -replace <replacement rule>,<replacement string>

Example 1: With Simple Regex

In this example, you can use the expression hello|hi to match both required strings using the regex “or” (|) character as you can see below. In the below regex, it finds the match for a string like “hello” or “hi” and if a match is found it will replace with the given string.

$string = ‘hi, dotnet-helpers.com’
$string -replace ‘hello|hi’,’Good day’

Example 2: Direct Replace of special character

As per the below example, you need to replace text in a string. That string contains a couple of regex special characters like a bracket and an exclamation mark. If you try to replace the string [dotnethelpers!] with dotnet-helpers.com as shown below, then it will not work as expected because the characters will have special meaning in regex language.

$string = “hi, [dotnethelpers!]”
$string -replace ‘[dotnethelpers!]’,’dotnet-helpers.com’

The problem is you often need to replace “[]”, “!” or other characters that have special meaning in regex language. One way to achieve this is to escape every special character by “\”.

To overcome this problem, you have two options. You can either escape these special characters by prepending a backslash to the front of each character or using the Escape() method (([regex]::Escape(‘[dotnethelpers]’)).

Points to Remember:

If you try to replace any special characters directly from the string using Replace operator then it won’t work correctly as characters will have special meaning in regex language.

Conclusion :

Replacing characters or words in a string with PowerShell is easily done using either the replace method or -replace operator. When working with special characters, like [ ], \ or $ symbols, it’s often easier to use the replace() method than the operator variant. Because this way you don’t need to escape the special character.

To perform simple replacements, you can use the replace() method but if you need to match and replace anything more advanced, always use the replace operator.

How to Use PowerShell for DNS Record Monitoring and Troubleshooting

Introduction

DNS (Domain Name System) records are the backbone of internet connectivity for web servers, mail servers, and other networked systems. Missing or misconfigured DNS records can lead to service disruptions, causing websites to become unreachable or emails to fail. PowerShell offers a robust cmdlet, Resolve-DnsName, that enables administrators to monitor, validate, and troubleshoot DNS configurations (PowerShell DNS record monitoring).

This article introduces a PowerShell script designed to simplify the process of checking DNS resolution for multiple domains. By leveraging this script, you can automate DNS checks, verify propagation of updates, and ensure compliance with best practices for security and network reliability.

The script processes a list of domain DNSLists and retrieves their resolution status, IP addresses, and any associated errors, providing a comprehensive overview in a single execution.

If you’re managing web or mail servers, you know how heavily these servers rely DNS records. Error/Missing DNS records can cause all sorts of problems, including users not being able to find your website or the non-delivery of emails. It is a good thing that the PowerShell Resolve-DnsDNSList cmdlet exists, and with it, monitoring DNS records can be automated through scripting.

This script is designed to check the DNS resolution status for a list of domain DNSLists against a set of DNS servers, and it returns detailed results including the IP address, status, and any error messages.

When to Use This Script

You might use this script in several scenarios:

Monitoring and Troubleshooting DNS Issues: If you’re managing multiple domains and want to verify that they resolve correctly across different DNS servers, this script provides a quick way to gather and assess that information.

Validation of DNS Configurations: When you’re updating DNS records (e.g., for a new website, email configuration, or any other service), you can use this script to confirm that the records have propagated properly and are resolving as expected.

Security and Compliance Checks: Ensuring that all your domains are resolving correctly can be a part of your security checks to avoid phishing or man-in-the-middle attacks due to incorrect or hijacked DNS records.

Network Operations: In a larger network or data center, you might want to regularly check the resolution of internal or external domains to ensure consistent access to critical services.

Explanation for PowerShell DNS record monitoring Script

Here’s a breakdown of how the script works:

# Its an array containing the domain DNSLists you want to check.
$DNSLists = @('dotnet-helpers.com','google.org','XXXXYYY.local')

# This is an array that will store the results of the DNS resolution for each domain.
$FinalOutput = @()

foreach ($DNSList in $DNSLists) {
    # Creates an empty object with properties DNSList, IPAddress, Status, and ErrorMessage.
    $dnsObj = "" | Select-Object DNSList, IPAddress, Status, ErrorMessage
    try {
        # Attempts to resolve the domain name and filters for 'A' records
        $dnsRecord = Resolve-DnsName $DNSList -ErrorAction Stop | Where-Object { $_.Type -eq 'A' }
        #  Assigns the current domain name to DNSList
        $dnsObj.DNSList = $DNSList
        # ($dnsRecord.IPAddress -join ','): Joins any IP addresses returned by the DNS query into a single string
        $dnsObj.IPAddress = ($dnsRecord.IPAddress -join ',')
        # 'OK': Sets the status to OK if the DNS resolution is successful
        $dnsObj.Status = 'OK'
        $dnsObj.ErrorMessage = ''
    }
    # Handles any errors that occur during the DNS resolution.
    catch {
        $dnsObj.DNSList = $DNSList
        $dnsObj.IPAddress = ''
        $dnsObj.Status = 'NOT_OK'
        $dnsObj.ErrorMessage = $_.Exception.Message
    }
    # Adds the result object to the $FinalOutput array.
    $FinalOutput += $dnsObj
}
return $FinalOutput

Conclusion

DNS record validation is a critical task for maintaining the functionality and security of web and mail servers. The PowerShell script outlined in this article provides a reliable way to monitor DNS resolution for multiple domains. By automating the DNS-checking process, administrators can quickly identify and address issues, ensuring minimal downtime and improved reliability of services.

Whether you’re validating recent DNS updates, troubleshooting network issues, or performing routine security audits, this script serves as an efficient tool for managing DNS records. Its ability to handle errors gracefully and provide detailed output makes it a valuable addition to any IT professional’s toolkit.


Cache Purging in Azure Front Door with Azure PowerShell and CLI

Introduction

Azure Front Door is a global, scalable entry point for fast delivery of your applications. It provides load balancing, SSL offloading, and caching, among other features. One critical task for maintaining optimal performance and ensuring the delivery of up-to-date content is cache purging. This article provides a step-by-step guide to performing cache purging in Azure Front Door using Azure PowerShell and the Azure Command-Line Interface (CLI).

What is Cache Purging?

Cache purging, also known as cache invalidation, is the process of removing cached content from a caching layer. This is essential when the content served to the end users needs to be updated or deleted. In the context of Azure Front Door, purging ensures that the latest version of your content is delivered to users instead of outdated cached versions.

Prerequisites for Cache Purging in Azure Front Door

Step 1: Open Azure PowerShell

Open your preferred PowerShell environment (Windows PowerShell, PowerShell Core, or the PowerShell Integrated Scripting Environment (ISE)).

Step 2: Sign in to Azure

Sign in to your Azure account using the following command:

Connect-AzAccount

Step 3: Select the Subscription

If you have multiple subscriptions, select the appropriate subscription:

Select-AzSubscription -SubscriptionId "your-subscription-id"

Step 4: Cache Purge using PowerShell

Method 1: Using Invoke-AzFrontDoorPurge

Purpose: Invoke-AzFrontDoorPurge is used specifically for purging content from the Azure Front Door caching service.

Usage: This cmdlet is part of the Azure PowerShell module and is used to remove specific cached content from the Azure Front Door service (ie., Cache Purging in Azure Front Door).

Use the Invoke-AzFrontDoorPurge cmdlet to purge the cache. You’ll need the name of your Front Door profile and the list of content paths you want to purge.

Here’s an example:

# prerequisite Parameters

$frontDoorName = "your-frontdoor-name"
$resourceGroupName = "your-resource-group-name"
$contentPaths = @("/path1/*", "/path2/*")

Invoke-AzFrontDoorPurge -ResourceGroupName $resourceGroupName -FrontDoorName $frontDoorName -ContentPath $contentPaths

This command purges the specified paths in your Front Door profile.

When to Use:

When you need to remove cached content specifically from Azure Front Door using Azure PowerShell.
Ideal for scenarios involving global load balancing and dynamic site acceleration provided by Azure Front Door.

Method 2: Using Clear-AzFrontDoorCdnEndpointContent

Purpose: Clear-AzFrontDoorCdnEndpointContent is used for purging content from Azure CDN endpoints, which might also be linked to an Azure Front Door service. However, it specifically targets the CDN layer.

Usage: This cmdlet clears content from Azure CDN endpoints, which can be part of a solution using Azure Front Door.

$endpointName = "your-cdn-endpoint-name"
$resourceGroupName = "your-resource-group-name"
$contentPaths = @("/path1/*", "/path2/*")

Clear-AzFrontDoorCdnEndpointContent -ResourceGroupName $resourceGroupName -EndpointName $endpointName -ContentPath $contentPaths

When to Use:

  • When working specifically with Azure CDN endpoints.
  • Useful for content distribution network scenarios where you need to clear cached content from CDN endpoints.

Step 5: Cache Purge using Azure CLI

Method 3: Using Clear-AzFrontDoorCdnEndpointContent

Purpose: az afd endpoint purge is an Azure CLI command used for purging content from Azure Front Door endpoints.

Usage: This command is used within the Azure CLI to purge specific content paths from Azure Front Door.

frontDoorName="your-frontdoor-name"
resourceGroupName="your-resource-group-name"
contentPaths="/path1/* /path2/*"

az afd endpoint purge --resource-group $resourceGroupName --profile-name $frontDoorName --content-paths $contentPaths

When to Use:

  • When you need to purge cached content from Azure Front Door using Azure CLI.
  • Suitable for users who prefer command-line tools for automation and scripting.

Key Differences

Service Targeted:

  1. Invoke-AzFrontDoorPurge: Specifically targets Azure Front Door.
  2. Clear-AzFrontDoorCdnEndpointContent: Specifically targets Azure CDN endpoints.
  3. az afd endpoint purge: Specifically targets Azure Front Door.

Use Case:

  1. Invoke-AzFrontDoorPurge: Best for scenarios involving global load balancing and content delivery with Azure Front Door.
  2. Clear-AzFrontDoorCdnEndpointContent: Best for scenarios involving Azure CDN, which might or might not involve Azure Front Door.
  3. az afd endpoint purge: Best for users comfortable with CLI and needing to purge Azure Front Door content.

Conclusion

Understanding the differences between these commands helps you choose the right tool for your specific needs to Cache Purging in Azure Front Door. Whether you are managing caches at the CDN layer or the Azure Front Door layer, Azure provides flexible and powerful tools to help you maintain optimal performance and up-to-date content delivery.

How to Delete a Blob from an Azure Storage using PowerShell

In one of my automation (Delete a Blob), I need to delete the previously stored reports (reports will always append with timestamp) on daily basis in Azure storage account in automated way in the specific container. So i need to ensure my container is available before start deleting my report. This article will have detail explain about How to Delete a Blob from an Azure Storage Account using PowerShell.

New to storage account?

One of the core services within Microsoft Azure is the Storage Account service. There are many service that utilize Storage Accounts for storing data, such as Virtual Machine Disks, Diagnostics logs (specially application log), SQL backups and others. You can also use the Azure Storage Account service to store your own data; such as blobs or binary data.

As per MSDN, Azure blob storage allows you to store large amounts of unstructured object data. You can use blob storage to gather or expose media, content, or application data to users. Because all blob data is stored within containers, you must create a storage container before you can begin to upload data.

Delete a Blob from an Azure Storage

Step: 1 Get the prerequisite inputs

As in this example i am going to delete the one the sql db (backup/imported to the storage) stored as bacpac format in the container called SQL…

## prerequisite Parameters
$resourceGroupName="rg-dgtl-strg-01"
$storageAccountName="sadgtlautomation01"
$storageContainerName="sql"
$blobName = "core_2022110824.bacpac"

Step: 2 Connect to your Azure subscription

Using the az login command with a service principal is a secure and efficient way to authenticate and connect to your Azure subscription for automation tasks and scripts. In scenarios where you need to automate Azure management tasks or run scripts in a non-interactive manner, you can authenticate using a service principal. A service principal is an identity created for your application or script to access Azure resources securely.

## Connect to your Azure subscription
az login --service-principal -u "210f8f7c-049c-e480-96b5-642d6362f464" -p "c82BQ~MTCrPr3Daz95Nks6LrWF32jXBAtXACccAV" --tenant "cf8ba223-a403-342b-ba39-c21f78831637"

Step: 3 Get the storage account to Check the container exit or not

When working with Azure Storage, you may need to verify if a container exists in a storage account or create it if it doesn’t. You can use the Get-AzStorageContainer cmdlet to check for the existence of a container.

## Get the storage account to check container exist or need to be create
$storageAccount = Get-AzStorageAccount -ResourceGroupName $resourceGroupName -Name $storageAccountName

## Get the storage account context
$context = $storageAccount.Context

Step: 4 Check the container exist before deleting the blob

We need to use Remove-AzStorageBlob cmdlet to delete a blob from the Azure storage container

## Check if the storage container exists
if(Get-AzStorageContainer -Name $storageContainerName -Context $context -ErrorAction SilentlyContinue)
{

Write-Host -ForegroundColor Green $storageContainerName ", the requested container exit,started deleting blob"

## Create a new Azure Storage container
Remove-AzStorageBlob -Container $storageContainerName -Context $context -Blob $blobName
Write-Host -ForegroundColor Green $blobName deleted

}
else
{
Write-Host -ForegroundColor Magenta $storageContainerName "the requested container does not exist"
}

Full Code:

## Delete a Blob from an Azure Storage
## Input Parameters
$resourceGroupName="rg-dgtl-strg-01"
$storageAccountName="sadgtlautomation01"
$storageContainerName="sql"
$blobName = "core_2022110824.bacpac"

## Connect to your Azure subscription
az login --service-principal -u "210f8f7c-049c-e480-96b5-642d6362f464" -p "c82BQ~MTCrPr3Daz95Nks6LrWF32jXBAtXACccAV" --tenant "cf8ba223-a403-342b-ba39-c21f78831637"

## Function to create the storage container
Function DeleteblogfromStorageContainer
{
## Get the storage account to check container exist or need to be create
$storageAccount = Get-AzStorageAccount -ResourceGroupName $resourceGroupName -Name $storageAccountName

## Get the storage account context
$context = $storageAccount.Context


## Check if the storage container exists
if(Get-AzStorageContainer -Name $storageContainerName -Context $context -ErrorAction SilentlyContinue)
{

Write-Host -ForegroundColor Green $storageContainerName ", the requested container exit,started deleting blob"
## Remove the blob in Azure Storage container
Remove-AzStorageBlob -Container $storageContainerName -Context $context -Blob $blobName

Write-Host -ForegroundColor Green $blobName deleted
}
else
{
Write-Host -ForegroundColor Magenta $storageContainerName "the requested container does not exist"
}

}
#Call the Function
DeleteblogfromStorageContainer

Output: