
Downloading Azure DevOps pipeline artifacts across projects sounds straightforward — until you actually try it. The first time our team needed to share build outputs between two separate Azure DevOps projects, we spent nearly half a day hitting permission errors, wrong project GUIDs, and silent failures that gave us zero useful output in the pipeline logs. The Microsoft docs show you the YAML. They do not show you the five things that go wrong when you actually run it.
This guide walks through exactly how the DownloadPipelineArtifact@2 task works for downloading Azure DevOps pipeline artifacts from another project — including the real-world configuration, how to find the project GUID and pipeline definition ID, the permissions you must set up first, and the mistakes that cause silent failures that the official docs never mention.
Contents
- 1 Why Download Pipeline Artifacts Across Projects?
- 2 Prerequisites: Permissions First
- 3 How to Find Your Project GUID and Pipeline Definition ID
- 4 YAML Configuration: DownloadPipelineArtifact@2
- 5 Real-World Example: Frontend Pipeline Consuming a Backend Build Artifact
- 6 Common Mistakes That Cause Silent Failures
- 7 Downloading the Latest vs a Specific Build Run
- 8 Conclusion
Why Download Pipeline Artifacts Across Projects?
Before diving into configuration, it helps to understand the real scenarios where downloading Azure DevOps pipeline artifacts across projects saves significant time. In our experience working on large enterprise Azure DevOps setups, three situations come up constantly:
- Multi-team deployments. A backend team builds and publishes API binaries in their project. The frontend team’s deployment pipeline needs those binaries to run integration tests — without triggering a full rebuild. Consequently, the frontend pipeline downloads the artifact directly from the backend project and proceeds immediately.
- Shared infrastructure components. A platform team maintains a base Docker image or shared configuration artifact. Multiple product teams across different projects consume it in their deployment pipelines. Furthermore, when the platform team publishes a new version, all downstream pipelines pull it automatically.
- Avoiding redundant builds. Rebuilding the same application three times — once for dev, once for staging, once for prod — wastes agent minutes and introduces inconsistency risk. Instead, build once, publish the artifact, and download it in each environment-specific pipeline. As a result, you guarantee that exactly the same binary reaches every environment.
💡 Key insight: The DownloadPipelineArtifact@2 task downloads artifacts that were published with the PublishPipelineArtifact@1 task. If the source pipeline used the older PublishBuildArtifacts@1 task, you need DownloadBuildArtifacts@0 instead — not DownloadPipelineArtifact@2. This mismatch is the most common source of silent failures.
Prerequisites: Permissions First
This is the step the official docs bury — and it is the one that blocks most teams. Before your pipeline can download Azure DevOps pipeline artifacts from another project, you must configure cross-project permissions in both directions. Without this, the task fails silently or throws a vague 403 error.
In the source project (the one that published the artifact), go to Project Settings → Pipelines → Settings and enable “Allow pipelines from other projects to access this project’s resources”. In addition, grant the build service account of the consuming project the Reader role on the source pipeline. Specifically, go to Pipelines → [Source Pipeline] → Edit → Security and add the consuming project’s build service as a Reader.
⚠️ If you skip the permissions step, the DownloadPipelineArtifact@2 task will either fail with “Pipeline not found” or silently download nothing — with no useful error message in the logs.
How to Find Your Project GUID and Pipeline Definition ID
The two values most engineers struggle to find are the project GUID and the definition ID. Here is exactly where to get both.
Finding the Project GUID
Call the Azure DevOps Projects List API — replace [YOUR_ORGANIZATION_NAME] with your actual org name:
https://dev.azure.com/[YOUR_ORGANIZATION_NAME]/_apis/projects?api-version=5.0
# Example
https://dev.azure.com/demojev/_apis/projects?api-version=5.0
Open this URL in your browser while logged into Azure DevOps. The response is a JSON array of all projects in your organisation. Each project has an id field — that is your project GUID. Copy the one that matches the source project name.

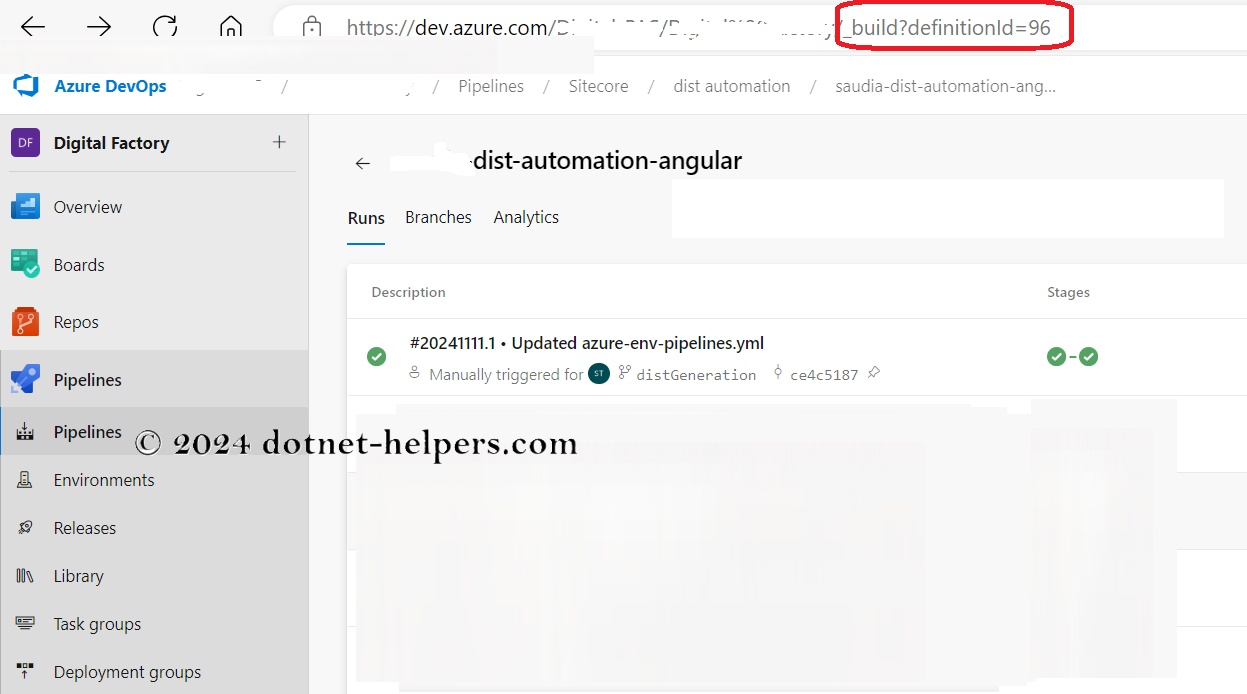
Finding the Pipeline Definition ID
Navigate to the source pipeline in Azure DevOps. Look at the URL in your browser — the definitionId value in the URL is your pipeline definition ID. For example:
https://dev.azure.com/demojev/MyProject/_build?definitionId=96
# In this example, the definition ID is 96
YAML Configuration: DownloadPipelineArtifact@2
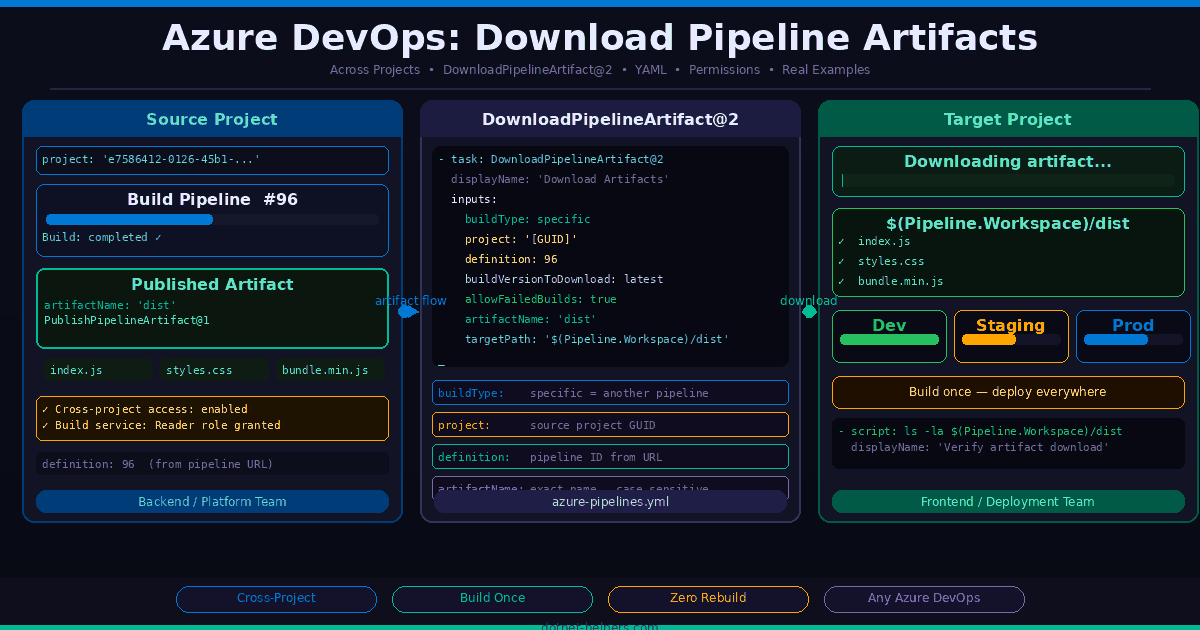
Here is the complete YAML configuration for downloading Azure DevOps pipeline artifacts from another project. This is the configuration that works in production — not just in a demo environment:
- task: DownloadPipelineArtifact@2
  displayName: 'Download Pipeline Artifacts from Source Project'
  inputs:
    buildType: specific
    project: 'e7586412-0126-45b1-92e4-465fb1710baf'   # source project GUID
    definition: 96                                      # source pipeline definition ID
    buildVersionToDownload: latest                      # always pull the latest successful build
    allowFailedBuilds: true                             # also allow artifacts from failed builds
    artifactName: 'dist'                                # name of the artifact to download
    targetPath: '$(Build.Repository.LocalPath)/dist'   # local path on the build agent
Every Parameter Explained
- buildType: specific — tells the task to pull from a specific pipeline rather than the current one. Use
currentwhen downloading artifacts from an earlier stage in the same pipeline. - project — the GUID of the source project (not the project name). Always use the GUID — project names can change, GUIDs never do.
- definition — the pipeline definition ID from the source project’s pipeline URL.
- buildVersionToDownload: latest — downloads the most recent successful build. Alternatively, use
specificand setbuildIdto pin to an exact build run. - allowFailedBuilds: true — allows the task to download artifacts even from failed pipeline runs. Useful when you need to debug a deployment using a partially-built artifact.
- artifactName — the exact name of the artifact as it was published by
PublishPipelineArtifact@1in the source pipeline. This is case-sensitive. - targetPath — the directory on the build agent where the artifact files land. Use
$(Pipeline.Workspace)as the base path rather than$(Build.Repository.LocalPath)when the agent workspace is outside the repo folder.
Real-World Example: Frontend Pipeline Consuming a Backend Build Artifact
Here is a complete real-world pipeline example. The backend team publishes API binaries as a pipeline artifact. The frontend team’s deployment pipeline downloads those binaries and uses them for integration testing — all without triggering a backend rebuild:
trigger:
  - main
pool:
  vmImage: 'ubuntu-latest'
stages:
  - stage: IntegrationTest
    displayName: 'Integration Test Stage'
    jobs:
      - job: RunTests
        displayName: 'Download Backend Artifact and Run Tests'
        steps:
          # Step 1: Download the backend API artifact from the backend project
          - task: DownloadPipelineArtifact@2
            displayName: 'Download Backend API Binaries'
            inputs:
              buildType: specific
              project: 'e7586412-0126-45b1-92e4-465fb1710baf'
              definition: 96
              buildVersionToDownload: latest
              artifactName: 'api-binaries'
              targetPath: '$(Pipeline.Workspace)/api'
          # Step 2: Verify the artifact downloaded correctly
          - script: |
              echo "Downloaded artifact contents:"
              ls -la $(Pipeline.Workspace)/api
            displayName: 'Verify Artifact Download'
          # Step 3: Run integration tests against the downloaded binaries
          - script: |
              cd $(Pipeline.Workspace)/api
              dotnet test ./IntegrationTests.dll
            displayName: 'Run Integration Tests'
Common Mistakes That Cause Silent Failures
Based on real production experience, here are the mistakes that waste the most time when working with DownloadPipelineArtifact@2:
- Using project name instead of project GUID. The
projectfield requires the GUID — not the display name. Using the display name causes a silent failure with no clear error. Always use the API call above to get the exact GUID. - Mismatched artifact task versions. If the source pipeline used
PublishBuildArtifacts@1(the old task), you must useDownloadBuildArtifacts@0to consume it — notDownloadPipelineArtifact@2. Mixing these two pairs is the single most common source of “artifact not found” errors. - Case-sensitive artifact names. The
artifactNamefield is case-sensitive. If the source pipeline published an artifact namedDistbut you specifydistin your download task, it will fail. Always copy the artifact name exactly as it appears in the source pipeline’s publish step. - Skipping cross-project permissions. As mentioned above, without explicitly granting the consuming project’s build service account access to the source pipeline, the task either silently downloads nothing or throws a vague permissions error. Set this up before you write a single line of YAML.
- Wrong targetPath base variable. Using
$(Build.ArtifactStagingDirectory)instead of$(Pipeline.Workspace)as the base path causes confusion when subsequent steps look for the files. Use$(Pipeline.Workspace)consistently for downloaded artifacts.
💡 Pro tip: Always add a verification script step immediately after DownloadPipelineArtifact@2 that lists the target directory contents. This one-liner — echo “$(Pipeline.Workspace)/dist” && ls -la — saves enormous debugging time when something goes wrong silently.
Downloading the Latest vs a Specific Build Run
One decision every team faces is whether to always download the latest artifact or pin to a specific build run. Each approach has clear trade-offs:
- buildVersionToDownload: latest — always pulls the most recent successful build. Good for continuous deployment pipelines where you always want the freshest artifact. However, this means your pipeline can break if the source team publishes a breaking change.
- buildVersionToDownload: specific + buildId — pins to an exact build run by its numeric ID. Good for release pipelines where you need to guarantee a specific tested version reaches production. Furthermore, this approach makes your deployments fully reproducible — the same build ID always produces the same result.
# Pin to a specific build run by ID
- task: DownloadPipelineArtifact@2
  inputs:
    buildType: specific
    project: 'e7586412-0126-45b1-92e4-465fb1710baf'
    definition: 96
    buildVersionToDownload: specific
    buildId: 1088  # exact build run ID from the pipeline URL
    artifactName: 'dist'
    targetPath: '$(Pipeline.Workspace)/dist'
Conclusion
Downloading Azure DevOps pipeline artifacts across projects with DownloadPipelineArtifact@2 is one of the most powerful ways to eliminate redundant builds and share outputs cleanly between teams. The configuration itself is straightforward — but only once you have the right project GUID, the correct pipeline definition ID, and the cross-project permissions set up correctly beforehand.
In summary, get the project GUID from the Projects List API, get the definition ID from the pipeline URL, set cross-project permissions before writing any YAML, match your publish and download task versions carefully, and always add a verification step after the download. Follow these five steps and the task works reliably every time.
Quick Reference
- Get project GUID:
https://dev.azure.com/[ORG]/_apis/projects?api-version=5.0 - Get definition ID: from pipeline URL —
definitionId=XX - Set permissions: Source project → Project Settings → Pipelines → Settings → allow cross-project access
- Match task versions:
PublishPipelineArtifact@1→DownloadPipelineArtifact@2 - Verify download: add
ls -la $(Pipeline.Workspace)/[artifactName]after the task
Frequently Asked Questions
Q: Can I download artifacts from a pipeline in a completely different Azure DevOps organisation?
No. The DownloadPipelineArtifact@2 task only works within the same Azure DevOps organisation. To share artifacts across organisations, you need to use Azure Artifacts feeds or an external storage solution like Azure Blob Storage.
Q: What is the difference between DownloadPipelineArtifact@2 and DownloadBuildArtifacts@0?
They consume different artifact types. DownloadPipelineArtifact@2 downloads artifacts published with PublishPipelineArtifact@1. DownloadBuildArtifacts@0 downloads artifacts published with the older PublishBuildArtifacts@1 task. Using the wrong download task for a given artifact type results in a silent failure or “artifact not found” error.
Q: Can I download multiple artifacts from the same source pipeline in one step?
Yes. Leave the artifactName field empty — the task will download all artifacts published by that pipeline run into separate subdirectories under your targetPath.
Q: The task runs but the target directory is empty. What is wrong?
The most common causes are a case-sensitive artifact name mismatch, using a project display name instead of the GUID, or missing cross-project permissions. Add a ls -la script step after the task and check that the targetPath directory exists and contains files.
Q: Does DownloadPipelineArtifact@2 work on self-hosted agents?
Yes — but the self-hosted agent must have outbound network access to dev.azure.com and *.vsblob.vsassets.io (the Azure Artifacts CDN). Firewall restrictions on self-hosted agents are a common cause of artifact download failures in corporate environments.
Related Articles
- Azure API Management Policy Fragments: Write Once, Apply Everywhere
- Azure APIM Mock API Responses: Unblock Your Team When the Backend Isn’t Ready