All posts by Thiyagu

How to use WebGrid from PartialView using Razor

WebGrid is used to display the data with paging and sorting. In this article, we will discuss about how to load the data to webgrid and would like to explore how can to use default paging and sorting.

Controller

Let we create simple controller which will return the UserDetailModel to the view. From the view we can bind the WebGrid using the model data.

public ActionResult LoadGridinPartialView()
{
UserDetailModel obj = new UserDetailModel();
obj.CountryDetail = new List<Country>()
{
new Country() { CountryId = 1, CountryName =  "INDIA" },
new Country() { CountryId = 2, CountryName= "US" },
new Country() { CountryId = 3, CountryName= "Russia" },
new Country() { CountryId = 4, CountryName= "UK" }
};
return View(obj);
}

View

From the below code, just passing the model data to the partial view for loading WebGrid.

@model RegistrationForm.Models.UserDetailModel
@{
ViewBag.Title = "Load WebGrid in Partial View";
}
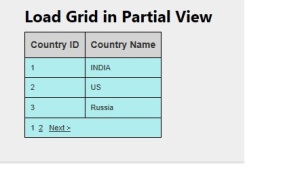
<h2>Load Grid in Partial View</h2>
@{
Html.RenderPartial("_LoadGrid", Model.CountryDetail);
}

Note :

   From Html.RenderPartial(“_LoadGrid”, Model.CountryDetail);

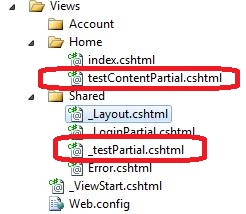
  •    _LoadGrid being created under the “Shared” folder
  •    Model.CountryDetail is model information being passed as parameter to the partial view

PartialView (_LoadGrid)

_LoadGrid Partial view bind the WebGrid by receiving model data from the view.
@{
Layout = null;
}
<!DOCTYPE html>
<html>
<head>
<meta name="viewport" content="width=device-width" />
<title>_LoadGrid</title>
</head>
<body>
<div>
@{

var grid = new WebGrid(source: Model, rowsPerPage: 3, canPage: true, canSort: true);
<div id="grvCountry">
@grid.GetHtml(
fillEmptyRows: false,mode: WebGridPagerModes.All,
htmlAttributes: "width:100%",firstText: "<< First",
previousText: "< Prev",nextText: "Next >",
lastText: "Last  >>",
columns: new
[] { grid.Column("CountryId", header: "Country ID"), grid.Column("CountryName", header: "Country Name") } ) </div> } </div> </body> </html>

OUTPUT

LoadGridinPartialView

How to create simple WebGrid in MVC (Razor engine)

Create simple WebGrid in MVC (Razor engine)

Controller

public class WebGridExampleController : Controller
{
public ActionResult Index()
{
UserDetailModel obj = new UserDetailModel();
obj.CountryDetail = new List<Country>()
{
new Country() { CountryId = 1, CountryName =  “INDIA” },
new Country() { CountryId = 2, CountryName= “US” },
new Country() { CountryId = 3, CountryName= “Russia” },
new Country() { CountryId = 4, CountryName= “UK” }
};

return View(obj);
}
}

View

@model RegistrationForm.Models.UserDetailModel
@{
ViewBag.Title = “Index”;
}
<style type=”text/css”>
th
{
font-size: 14px;
font-weight: normal;
color: #039;
padding: 10px 8px;
}
table
{
font-family: arial,sans-serif;
font-size: 11px;
border-width: 1px;
border-color: black;
}
table th
{
background: #D3D3D3;
border-width: 1px;
border-style: solid;
border-color: black;
}
table td
{
background: #AFEEEE;
border-width: 1px;
padding: 8px;
border-style: solid;
border-color: black;
}
.foot
{
text-align: center;
}
</style>
<h2>
Country Details</h2>
@{

var grid = new WebGrid(source: Model.CountryDetail, rowsPerPage: 3, canPage: true, canSort: true);

<div id=”grvCountry”>
@grid.GetHtml(
fillEmptyRows: false, mode: WebGridPagerModes.All,
htmlAttributes: “width:100%”, firstText: “<< First”,
previousText: “< Prev”, nextText: “Next >”,  lastText: “Last  >>”,
columns: new

[]
{  grid.Column(“CountryId”, header: “Country ID”, style: “column1”),
grid.Column(“CountryName”, header: “Country Name”, style: “column2”),
   })
</div>
}

Output :

Explanation:

      In first line(var grid…), we are assigning the mode,
rowperpage : how many rows want to display in Webgrid,
canpage : here want to set the default pagination in the webgrid to be true/false
canSort  : here want to set filter based on the column header (true/false)

Model.CountryDetail : Here being binding the other class inside the UserDetailModel model…

Getting Selected text/value using jquery in MVC Razor

In this post, we are going to discuss how to get the drop down selected value using Asp.Net MVC razor and jquery.

Model :

A simple Model which has Country ID, Country Name and SelectedCounty.

public class UserDetailModel
{
[Display(Name = “CountryDetail”)] public List<Country> CountryDetail;
[Display(Name = “selectedcountry”)]
public string SelectedCountry { get; set; }
}
public class Country
{
public int CountryId { get; set; }
public string CountryName { get; set; }
}

Controller :

Here we creating a collection which contain the list of countries for binding in the drop down list.

public ActionResult Index()
{
UserDetailModel obj = new UserDetailModel();
obj.CountryDetail = new List<Country>()
{
new Country() { CountryId = 1, CountryName =  “INDIA” },
new Country() { CountryId = 2, CountryName= “US” },
new Country() { CountryId = 3, CountryName= “Russia” },
new Country() { CountryId = 4, CountryName= “UK” }
};
return View(obj);
}

[HttpPost]
public void Save(FormCollection form, string selectedCountry)
{
}

View

A simple view which consist of Asp .Net MVC razor drop down list.  This drop down bind the mode which has return from the above view.

@Html.DropDownListFor(a => a.SelectedCountry, new SelectList(Model.CountryDetail, “CountryId”, “CountryName”)

Method 1: (Getting value using JQuery Selector)

<script type=”text/javascript”>
$(document).ready(function() {
$(“select[id^=’SelectedCountry’]”).change(function() {
alert($(‘option:selected’, $(this)).text());
});
});
</script>

Method 2: (Getting value using JQuery Onchange)

@Html.DropDownListFor(a => a.SelectedCountry, new SelectList(Model.CountryDetail,
“CountryId”, “CountryName”),new{onchange = “ddListChange()”  })

<script type=”text/javascript”>
function ddListChange()
{
alert($(‘#SelectedCountry option:selected’).text());
}
</script>

Output

MVC Razor : How to get the value of Html.DropDownListFor using controller

In this post, we are going the discuss about how to get the value from the Html. DropDownListFor razor control using a controller.

View

@using (Html.BeginForm("Save", "userdetail", FormMethod.Post, new { @id = "validationlist" }))
{
@Html.DropDownListFor(model => model.SelectedCountry, new SelectList

(Model.CountryDetail.OrderBy(s => s.CountryName), "CountryId", "CountryName",  Model.SelectedCountry), "-- Select Country --")
<input id="submit" type="submit" name="Submit" value="Submit" />
}

Model :

public class UserDetailModel
{
Display(Name = "CountryDetail")]
public List<Country> CountryDetail;

[Display(Name = "selectedcountry")]
public string SelectedCountry { get; set; }
}
public class Country
{
public int CountryId { get; set; }

public string CountryName { get; set; }
}

Controller :

public ActionResult Index()
{
UserDetailModel obj = new UserDetailModel();
obj.CountryDetail = new List<Country>()
{
new Country() { CountryId = 1, CountryName =  "INDIA" },
new Country() { CountryId = 2, CountryName= "US" },
new Country() { CountryId = 3, CountryName= "Russia" },
new Country() { CountryId = 4, CountryName= "UK" }
};

return View(obj);
}

[HttpPost]
public void Save(FormCollection form, string selectedCountry)
{

}

OutPut

[

How to use cascading DropDown in MVC Razor

How to use cascading DropDown in MVC Razor

Model

namespace RegistrationForm.Models
{
public class UserDetailModel
{
[Display(Name = "CountryDetail")] public List<Country> CountryDetail; [Display(Name = "selectedcountry")] public string SelectedCountry { get; set; } [Display(Name = "stateDetail")] public List<State> StateDetail { get; set; } } public class Country { public int CountryId { get; set; } public string CountryName { get; set; } } public class State { public int StateId { get; set; } public string StateName { get; set; } } }

Controller:

public class GettingTextInDDLController : Controller
{
public ActionResult Index()
{
var obj = new UserDetailModel();
obj.CountryDetail = new List<Country>()
{
new Country() { CountryId = 1, CountryName =  "INDIA" },
new Country() { CountryId = 2, CountryName= "US" },
new Country() { CountryId = 3, CountryName= "Russia" },
new Country() { CountryId = 4, CountryName= "UK" }
};

return View(obj);
}
public ActionResult FirstDdl(string selectedCountry)
{
var obj = new UserDetailModel();
if (selectedCountry == "INDIA")
{
obj.StateDetail = new List<State>()
{
new State() {StateId = 1, StateName = "Tamil Nadu"},
new State() {StateId = 2, StateName = "Karnataka"},
new State() {StateId = 3, StateName = "Delhi"},
new State() {StateId = 4, StateName = "J&K"}

};
}
else
{
//.... Bind states for other countries
obj.StateDetail = new List<State>()
{
new State() {StateId = 1, StateName = "Others"},
};
}

return Json(obj);
}
}

View  

use @model RegistrationForm.Models.UserDetailModel in the first line of view

<script type="text/javascript">
function ddListChange() {
$.ajax({
url: '@Url.Action("FirstDdl", "GettingTextInDDL")',
data: { selectedCountry: $('#SelectedCountry option:selected').text() },
cache: false,
type: "POST",
success: function (data) {
var parsedJsonData = data.StateDetail.length;
var state = "<option value=`0`>Select City</option>";
for (var x = 0; x < parsedJsonData; x++) {
state += "<option value=" + data.StateDetail[x]["StateId"] + ">" + data.StateDetail[x]["StateName"] + "</option>";
}
$('#ddlstate').html(state).show();
},
error: function (reponse) { alert("error : " + reponse); }
});
}
</script>

<table>
<tr>
<td id="tdcountry">
@Html.DropDownListFor(a => a.SelectedCountry, new SelectList(Model.CountryDetail, "CountryId", "CountryName"),
new
{
onchange = "ddListChange()"
})
</td>
</tr>
<tr>
<td id="tdstate">
<select id="ddlstate" name="ddlstate" style="width: 200px">
<option>Select Country</option>
</select>
</td>
</tr>
</table>

Output

Before Selecting Country:

After Selecting it will populate list of states belong to Country India

Confirmation message after clicking the ActionLink in MVC

In many scenario, it necessary to pop up the confirm alert box while deleting ,saving and editing  information in Asp .Net MVC application. So let us discuss about how can we achieve using JQuery code .

Controller

Create simple controller and generating view based on the controller as shown below.

View (index)

As shown below code, we had created ConfirmationDialog function using javascript to show the popup with alert message. Next creating a AcionLink control which will show the popup by calling the javascript method in the onclick event.

<script type="text/javascript">
function ConfirmationDialog() {
if(confirm("Are you sure to continue?"))
return true;
else
return false;
}
</script>

@Html.ActionLink("Click to Confirm", "Confirmation", null, new { onclick = "return ConfirmationDialog()" })

OUTPUT:

If you click ok, it will redirect to the Confirmation view

store array in viewbag and retrieving in the view

In this post, we will discuss about how to store the array in view bag and how to use them in view.

Controller

A simple Controller action which store the string array in the ViewBag and return to the view.

public ActionResult Index()
{
string[] Countries = {“India”, “US”,”Nepal” };
ViewBag.Countries = Countries;
return View();
}

View

<h2>List Of Cities</h2>
@foreach (string city in ViewBag.Countries) {
<li>@city
</li>
}

OUTPUT :

Validation in MVC4 Razor with the Data Annotation Validators in “MODEL”

Data Annotation

Data validation play major role when developing web application. In Asp.net MVC, we can easily implement validation to application by using Data Annotation attribute to model. Data Annotation attribute classes are present in System.ComponentModel. DataAnnotations namespace. It is a common validation attributes which extend the built-in ASP.NET DataAnnotations (Required, Range, RegularExpression, StringLength etc.,). ASP.NET MVC uses jquery unobtrusive validation to perform client side validation.

MODEL

using System.ComponentModel.DataAnnotations;
namespace validation.Models
{
public class ValidationModel
{
[Required] [Display(Name = "User name")] [StringLength(20,ErrorMessage = "Name not be exceed 20 char")] public string Name { get; set; } [Required(ErrorMessage = "Email_id must not be empty")] [RegularExpression(".+\@.+\..+", ErrorMessage = "Please Enter valid mail id")] public string Email { get; set; } [Required(ErrorMessage = "Please enter phone number")] [RegularExpression(@"^(?([0-9]{3}))?[-. ]?([0-9]{3})[-. ]?([0-9]{4})$", ErrorMessage = "Enter valid number")] public string Phone { get; set; } [Required(ErrorMessage = "Please enter your address")] public string Address { get; set; } [Range(0,120,ErrorMessage = "Please enter between 0 to 120")] public string Age { get; set; } } }

View

@model validation.Models.ValidationModel
@{
ViewBag.Title = "Index";
}
<h2>Index</h2>
@section Scripts {
@Scripts.Render("~/bundles/jqueryval")
}
@using (Html.BeginForm())
{
@Html.ValidationSummary(false)
<table>
<tr> <td>
Your Name: @Html.TextBoxFor(model => model.Name)
@Html.ValidationMessageFor(model => model.Name)
</td> </tr>
<tr> <td>
Your Age: @Html.TextBoxFor(model => model.Age)
@Html.ValidationMessageFor(model => model.Age)
</td></tr>
<tr> <td>
Your Email: @Html.TextBoxFor(model => model.Email)
@Html.ValidationMessageFor(model => model.Email)
</td></tr>
<tr><td>
Your Phone: @Html.TextBoxFor(model => model.Phone)
@Html.ValidationMessageFor(model => model.Phone)
</td></tr>
<tr><td>
Your Address: @Html.TextBoxFor(model => model.Address)
@Html.ValidationMessageFor(model => model.Address)
</td></tr>
<tr><td>
<input type="submit" value="Register Me" />
</td></tr>
</table>
}

OUTPUT:

Below output shows the Email validation and Range validation

NOTE :

Validation for password comparsion

[DataType(DataType.Password)]
[Display(Name = "Confirm new password")]
[Compare("NewPassword", ErrorMessage = "The new password and confirmation password do not match.")]

MVC Razor : Difference between @Html.Partial() and Html.RenderPartial()

Difference between @Html.Partial() and Html.RenderPartial()

  • Html.Partial returns a string, Html.RenderPartial returns void.
  • We can store the output of Html.Partial in a variable/able to return from function.
  • In Html.RenderPartial, we can’t result void.(ie.,directly writing to the output stream so it was bit faster than html.partial())

Example :

If want to refere partial view inside the shared, then it will

@{ Html.RenderPartial(“_testPartial”);}

If want to refere partial view inside the view, then it will be

@Html.Partial(“../Home/testContentPartial”)


Partial View in MVC

Introduction to Partial View in MVC

Partial view is special view which renders a portion of view content. Partial can be reusable in multiple views. It helps us to reduce code duplication. In other word a partial view enables us to render a view within the parent view. A partial view is like as user control in Asp.Net Web forms that is used for code re-usability.Partial views helps us to reduce code duplication. The partial view is instantiated with its own copy of a ViewDataDictionary object which is available with the parent view so that partial view can access the data of the parent view.

In simple , partial view is a child-view/sub-view that you can include in a parent view

Step 1 :

Creating a MVC project by clicking New à Project

Step 2:

After selecting the project , and select visual c# with ASP .NET MVC 4 Web Application and change the name of the project and location then click ok button

Step 3:

After  clicking ok it will open new wizard for choosing type of the application and engine. In that choose internet application and razor engine(what ever engine u going to use) and click ok

Step 4:

After clicking ok, the solution will structured like below screen

Step 5:

Now we going to create partial view to the default view(ie., index). Right click the Home folder as like below image and choose view option

Step 6:

After selecting view it will move to next wizard. In that choose Engin type and name of the partial view and click the “Create as a partial view” and click add button

Step 7:

Create sample paragraph inside the partial view and save

Step 8:

Call the partial view in the index by using @Html.Partial(“HeaderPartial”). “HeaderPartial” be the name of the partial view

Step 9:

Press F5 and see the content of partial view in the index view