ActionResult is a return type of a controller method in ASP.NET MVC. It help us to return models to views, other return value, and also redirect to another controller’s action method. There are many derived ActionResult types in MVC that we use to return the result of a controller method to the view.
What is ActionResult ?
An ActionResult is a return type of a controller method in MVC.
ActionResult are more specific for a particular view
It is abstract class that has many subtypes
Types of ActionResult :
ViewResult
PartialViewResult
ContentResult
RedirectResult
RedirectToRouteResult
JsonResult
EmptyResult
FileResult
JavaScriptResult
Let we start discussion about types of ActionResult in one by one…
ViewResult :
It renders a specified view to the response stream.
Example :
public ViewResult Index() { return View(“sampleResult”); }
PartialViewResult:
Renders a specifed partial view to the response stream.
Example :
public PartialViewResult SamplePartialView() { return PartialView(“_LoadSamplePartial”); }
Note :
It will load the partial view to the main view
ContentResult :
It display the response stream without requiring a view .(like a plain text).
It is used to perform an HTTP redirect to a given URL.
Example :
public ActionResult SampleRedirectResult() { return Redirect(“http://www.google.com/”); }
RedirectToRouteResult :
RedirectToResult is used to redirect by using the specified route values dictionary.
Example :
public ActionResult SampleRedirectToRouteResult() { return new RedirectToRouteResult(new System.Web.Routing.RouteValueDictionary(new { controller = “Sample”, action = “SampleRedirectToRouteResultTest”, Id = new int?() })); }
JsonResult :
Action methods return JsonResult (JavaScript Object Notation result) that can be used in ajax based application.
Example :
public ActionResult SampleJsonResult { … Logic here return Json(sampleinfo); }
EmptyResult :
It return NULL that is EmptyResult
return instance of EmptyResult class
Example :
return new EmptyResult();
FileResult :
Return a file from an action. (Pdf,Excel,image file,Html…)
Example :
public FileResult DownloadCustomerDetails() { //Parameters to file are //1. The File Path on the File Server //2. The content type MIME type //3. Name of file To be save by Browser string contentType = “application/pdf”; string filepath = AppDomain.CurrentDomain.BaseDirectory + “/FileFolder/CustomerDetails.pdf”; return File(filepath, contentType, “CustomerDetails.pdf”);
Output:
After calling the action method in browser , the file will ask for download as shown in below
from above, first URL shows the image resource as the output… same thing for all other URL with different identifiers. Here image/audio/video/static page… every thing are treated as resource instead of thinking physical file/data.
Unique identifier
Every resources identifies by an URL, in earlier for identify all the resource by URL. For example to identify the user detail we use like below
www.aadharsh.com/GetUserDetails.aspx
Now in REST, added one more constrain. That is every resources must represent by an unique URL, For example
Here if we want to get the user detail for the kavi then we can get GetUserDetails/Kavi in same way for other users ( we want to append username at the end) not as before like this
www.aadharsh.com/GetUserDetails?Name=Kavi Instead of using Generic page, REST point the unique identifiers to identify the resource
Uniform Interface :
Use simple and uniform interface, for example if client want to Add/Insert/Select/Delete user detail, we use like below method name to perform the above operation
AddUserDetails (it combine with PUT)
InsertUserDetails (it combine with PUT)
SelectUserDetails (it combine with GET)
DeleteUserDetails (it combine with DELETE)
When we watch closely the method name, it seems to be inconsistent and difficult to remember,so REST says to uses simple and uniform interface. This can be obtain by the uniform methods of HTTP protocol and combine the name with the resource operation.Let we see the HTTP protocol methods
GET : Get the Resource
PUT : Create/Update the resource
DELETE : Delete the resource
POST : submit the data to the resource
Communication should be representation :
Representation is nothing but request and response between the client and the server.
Stateless :
Each request from client to server must contain all the information necessary to understand the request, and cannot take advantage of any stored context on the server. In simple, HTTP have nothing to indicates when a session starts or ends.
Here we will create simple Web API Application using MVC 4 with Razor
What is Web API?
From msdn, ASP.NET Web API is a framework that makes it easy to build HTTP services that reach a broad range of clients, including browsers and mobile devices. ASP.NET Web API is an ideal platform for building RESTful applications on the .NET Framework.
When to use Web API?
Web API when you want to create a resource based services over HTTP that can use the full features of HTTP (like URIs, request/response headers,various content formats).
Use Web API when we want to expand service at wide way like mobile,browser,tablet…
If we need a Web Service and without using SOAP, then ASP.Net Web API is best choice.
why we use Web API ?
WCF gives you the flexibility to use other protocols, but the REST implementation is a bit more complicated when compare to Web API
Create new project -> choose MVC Web Application and click ok
Step : 2
Next, in project template choose Web API and click ok
After creating Web API application we can see the same structure as MVC Application but in App_start, separate router file is created for Web API (that is WebApiConfig.cs) as shown below.
Step : 3
Open Values controller (which was created in default for Web API) ie., ValuesController
Here i made with simple changes like below ,
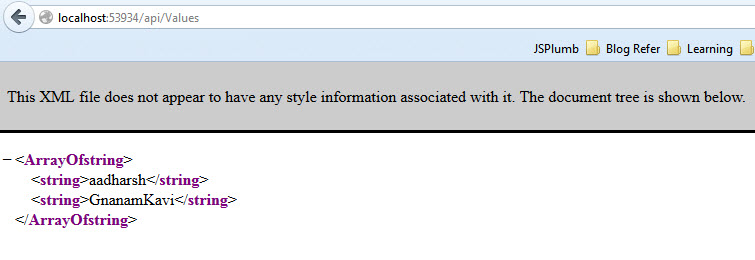
public class ValuesController : ApiController { // GET api/values public IEnumerable<string> Get() { return new string
[] { “aadharsh”, “GnanamKavi” }; } public string Get(int id) { if (id == 1){ return “Get value using id” +”–>”+ id; } if (id == 2){ return “Get value using id” + “–>” + id; } return null; } }
NOTE :
In MVC Application controller implements Controller interface but in Web API controller implements ApiController as base
In web API controller, action methods are actually HTTP methods ie., GET,PUT…
Step : 4
Run the Application. When we run the Web API using below URL,
http://localhost:53934/api/Values : The Web API route to Get() method (WebApiConfig.cs) as shown below, because there is no parameter append after the method (URL without parameter)
http://localhost:53934/api/Values/1 : The Web API route to Get(int id) method (WebApiConfig.cs) as shown below, because there is a parameter append after the method (URL with parameter)
Note :
Web API is a light weight architecture and good for various device which have limited bandwidth like smart phones.
It also supports the MVC features such as routing, controllers, action, filter… this makes us very simple and robust
Using Web API, we can get the resource in various format (like xml,json..)
let we see how to call PUT,DELETE methods with simple explanation
This article explains the ASP.NET MVC server-side validation using the Data Annotation classes. ASP.NET MVC Framework validates the data passed to the controller action and it populate ModelState with validation state based on the success/failure. Then the Model State passed object to the controller for the further process. Server side validations are play important role with sensitive information of a user.
Server Side Model Validation
Server side validations are required for ensuring that the received data is correct and in-valid.
If the received data is valid,then it will continue with further processing else show the Error message
Why we go for server-side Validation :
Some user may disable script in his browser, In this scenerio we must require to validate our data from dirty input values from the user. To avoid this we can use sever-side validation. we can validate a “MODEL” in server-side by two ways:
Model Validation with Data Annotations
Explicit Model Validation
We already discussed about Model validation using Data Annotation here, so let we discuss Explicit validation using simple registration form with user input.
Model :
public class UserRegistrationModel
{
public string UserName{get;set;}
public string Password{get;set;}
public string Address{get;set;}
public string MobileNo{get;set;}
public bool TermsAndCondtionAccepted{get;set;}
}
Controller :
public ActionResult Index(UserRegistrationModel mUserDetails)
{
if (Request.HttpMethod == "POST")
{
if (string.IsNullOrEmpty(mUserDetails.UserName))
{
ModelState.AddModelError("UserName", "Please enter your name");
}
if (!string.IsNullOrEmpty(mUserDetails.UserName))
{
Regex emailRegex = new Regex(".+@.+\..+");
if (!emailRegex.IsMatch(mUserDetails.UserName))
ModelState.AddModelError("UserName", "Please enter valid email");
}
if (string.IsNullOrEmpty(mUserDetails.Password))
{
ModelState.AddModelError("Password", "Please enter your password");
}
if (string.IsNullOrEmpty(mUserDetails.Address))
{
ModelState.AddModelError("Address", "Please enter your address");
}
if (string.IsNullOrEmpty(mUserDetails.MobileNo))
{
ModelState.AddModelError("MobileNo", "Please enter your mobile no");
}
if (!mUserDetails.TermsAndCondtionAccepted)
{
ModelState.AddModelError("TermsAndCondtionAccepted", "Please accept the terms");
}
if (ModelState.IsValid)
{
return View("SuccessfullPage");
}
else
{
return View();
}
}
return View();
}
Note :
ModelState: Gets the model state dictionary object that contains the state of the model. As per below, we can see that input values listed in the model-state.
while pressing the submit button, it will post the data. If input data is not valid then it will add error to model-state using AddModelError() using ModelStateDictionary class
Output :
After pressing the submit button, it will post the data.If input data is not valid then it will show the error msg using @Html.ValidationMessageFor
Here , In controller i am using if (Request.HttpMethod == “POST”) instead of checking ispostback. Using this we can use same action method for loading and validating using Html.BeginForm()
If many user are trying to accessing the site, it means your server has so many requests by the user, If every request hit the server for the response then it will lead to performance issues.
For example,if a page may contain some static information in your web site, in this scenario we can cache those content and don’t force your server to get them from data base in every request.This will increase your perfomance.
Advantage of Caching
Reduce Database and hosting server round-trips
Reduce network traffic
Improve performance
Remember while using Cache :
While caching of dynamic contents that change frequently, set minimum cache–expiration time.
Avoid caching for contents that are not accessing frequently.
Output Cache Filter :
It’s used to cache the data that is output of an action method.In default, this will cache the data upto 60 seconds.After 60 seconds, Asp.Net MVC will execute the action method again and start caching the output again.
Let we see with example..
Controller :
public class OutputCachingController : Controller {
Run the application, first time it will show the output like below
up to 20 seconds it will show the same time in the browser without changing after we refresh the page because it will not call the action method upto 20 seconds ( so no new time updated in the viewbag)
VaryByParam : This property enables you to create different cached versions of the content when a form parameter or query string parameter varies.
VaryByParam = “aadharsh”
If it find records matching “aadharsh” string then a cache will be created,if paremeter/querystring changes than it will replace the old one with new content
Let we discuss about Donut caching and Donut Hole caching in Part 2
In ASP.NET MVC, every public method of controller is accessible through the url regardless of return type. If we create any public method in the controller which is not intend to response as like action method. But it also accessible through the browser ULR. To overcome this scenario, the NonAction attribute has introduced
“All methods in MVC are treated as a action method. “
Purpose of using :
As per above statement, all public methods of a controller class are basically treated as action methods in Asp .Net MVC. The methods which are
By using this we changing the default behavior.
Example
Both GetUserDetail are treated as action methods.
public ActionResult GetUserDetail(){ // some code inside here return View(); }
public void GetUserDetail(){ // some code inside here }
So overcome this we are using NonAction Attribute method
[NonAction] public void GetUserDetail(){ // some code inside here }
[NonAction] public ActionResult GetUserDetail(){ // some code inside here return View(); }
Now above two methods are treated as Non action method.
The ChildActionOnly attribute ensures that an action method can be called only as a child method from within a view. In simple, ChildActionOnly attribute make controller action method to consider as non-action methods (It treated as normal method).
Where to use ChildActionOnly?
ChildActionOnly it related with partial views but it is not compulsory. If decided not to access through url then we may declare action method as ChildActionOnly.
This attribute used to prevent the action method being invoked as a result of a user request, that is it prevent from accessing via url.
Creating a Child Action Method
Let we discuss with example,
public class ChildActionTestingController : Controller {
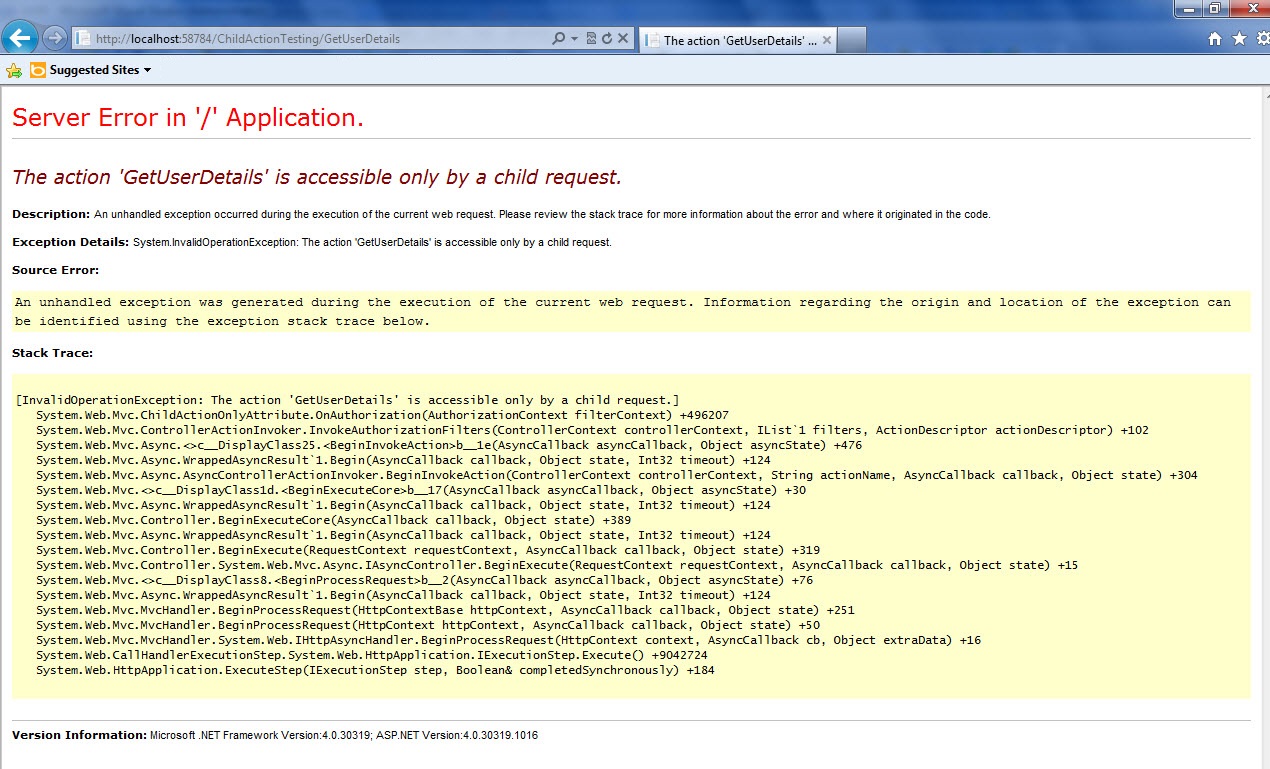
[ChildActionOnly] public ActionResult GetUserDetails(int userId) { //Your Logic Here !!! return PartialView(“GetUserDetails”, null); } }
Here GetUserDetails method is non-action method. The GetUserDetails method cant able to access by URL like ChildActionTesting/GetUserDetails.
After declare GetUserDetails as childactiononly attribute, then it can’t allow to access through url. If you try to access, it show the error msg like below. It will treat as a normal method.
“The action ‘GetUserDetails’ is accessible only by a child request.”
Asynchronous controller enables us to create asynchronous action methods in our application. This allows us to perform long running operation without making the running thread idle. Asynchronous action methods are useful when an action must perform several independent long running operations.
Synchronous
In Synchronous, if you making request, then you will have to wait till the response, you may not do other process until it response.
Asynchronous
In Asynchronous , if you making request, then you don’t need to wait for the response and we can perform any other process/task. Whenever the response arrive, you can receive in call back delegate.
What is Thread starvation in WebServer ?
From above, the request from Request A, Request B are accepted and processing but Request C not able to get the thread because the size of the pool is 2 so this situation is called thread starvation.
In this case we may get Server Busy Error
As per MSDN, When a request arrives, a thread from the pool is dispatched to process that request. If the request is processed synchronously, the thread that processes the request is blocked while the request is being processed, and that thread cannot service another request.
This might not be a problem, because the thread pool can be made large enough to accommodate many blocked threads. However, the number of threads in the thread pool is limited. In large applications that process multiple simultaneous long-running requests, all available threads might be blocked. This condition is known as thread starvation
If you have multiple long-running requests, all available threads might be blocked and the Web server rejects any additional request with an HTTP 503 status
(Server Too Busy).
To overcome this, ASP.NET MVC provide asynchronously call in controller/action
Here let we see the asynController
How to convert controller to asynchronously
To convert a synchronous action method to an asynchronous action method involves the following steps: 1) Before we deriving the controller from Controller, now we want to derive it from AsyncController. Controllers that derive from AsyncController enable
ASP.NET to process asynchronous requests, and they can still service synchronous action methods.
Example
We want to apply “Async” before controller like
public class AsynchronuosController : AsyncController
The “OutstandingOperations” property tells ASP.NET about how many operations are pending. It is needed because ASP.NET dont known how many operations were initiated by the action method or when those operations are complete. When OutstandingOperations property is zero, ASP.NET completes its process by(asynchronous operation) calling the Completed method.
To provide the best experiences, we use technologies like cookies to store and/or access device information. Consenting to these technologies will allow us to process data such as browsing behavior or unique IDs on this site. Not consenting or withdrawing consent, may adversely affect certain features and functions.