Contents
Introduction
Efficiently integrating code from external Azure DevOps repositories is crucial for collaborative projects and streamlined development workflows. This comprehensive guide provides a step-by-step approach to accessing and utilizing external repositories within your Azure DevOps pipelines (Checkout External Repositories). We’ll cover essential steps, including creating Personal Access Tokens (PATs), configuring service connections, and referencing external repositories in your YAML pipelines. By following these instructions, you’ll enhance your development process by seamlessly incorporating code from various sources across different subscriptions.
Accessing an External Azure DevOps Repository Across Subscriptions
Accessing a repository from another Azure DevOps subscription can be essential for projects where resources are distributed across different organizations or accounts. This article provides a step-by-step guide on using a Personal Access Token (PAT) and a service connection to access an external repository within an Azure DevOps pipeline. By following these instructions, you’ll be able to integrate code from another subscription seamlessly.
Where it required?
In scenarios where you need to access resources (like repositories) that belong to a different Azure DevOps organization or subscription, you need to configure cross-subscription access. This setup is commonly required in the following situations:
- Shared Repositories Across Teams: Teams working on interconnected projects in different organizations or subscriptions often need to share code. For example, a core library or shared services might be maintained in one subscription and used across multiple other projects.
- Centralized Code Management: Large enterprises often centralize codebases for specific functionalities (e.g., CRM services, microservices). If your pipeline depends on these centralized repositories, you must configure access.
- Multi-Subscription Projects: When an organization spans multiple Azure subscriptions, projects from one subscription might need to integrate code or services from another, necessitating secure cross-subscription access.
- Dependency Management: A project may depend on another repository’s codebase (e.g., APIs, SDKs, or CI/CD templates) that resides in a different Azure DevOps subscription.
- Separate Environments: Development and production environments might exist in separate subscriptions for security and compliance. For example, accessing a production-ready repository for release from a different subscription’s development repository.
Step-by-Step Guide
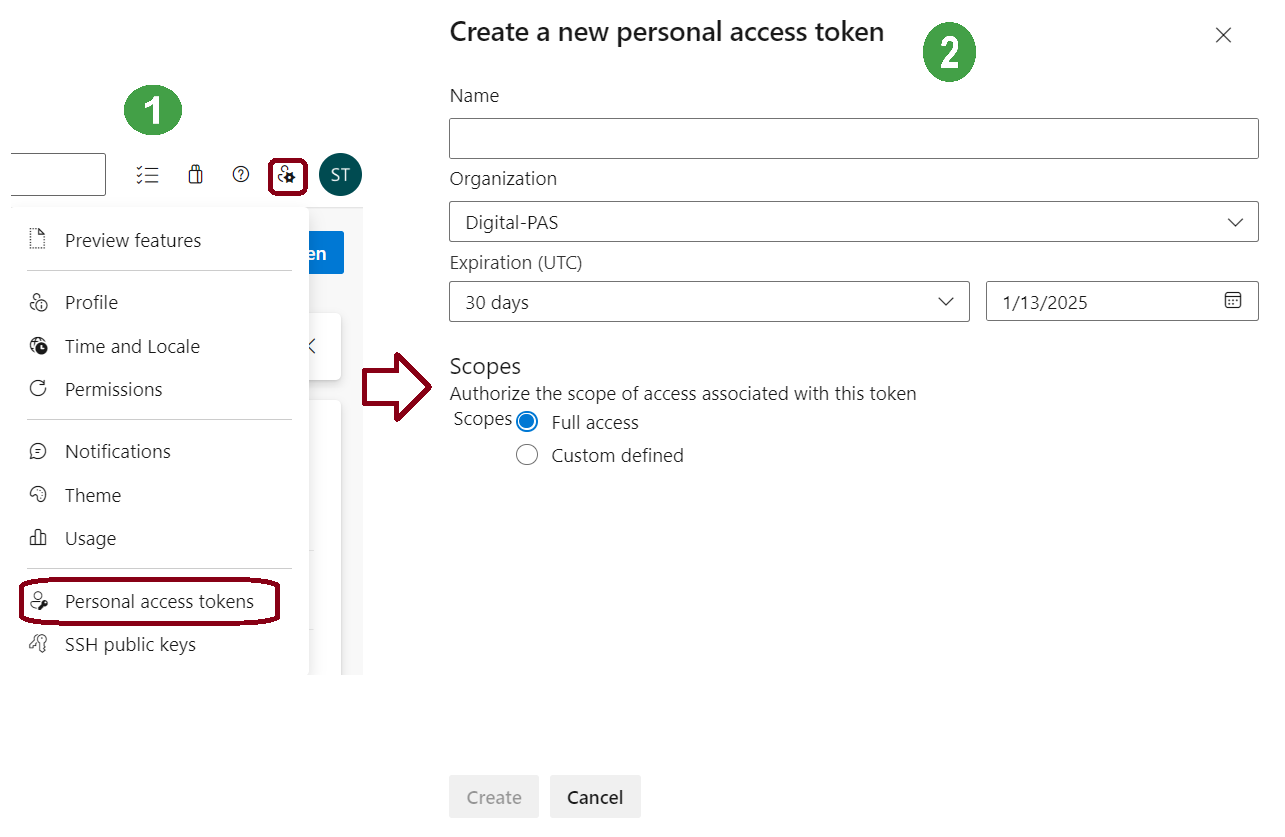
Step 1: Create a Personal Access Token (PAT) in External ADO
- Navigate to the Azure DevOps organization containing the external repository.
- Click on your profile picture in the top-right corner and select Personal Access Tokens.
- Click on New Token and:
Provide a name (e.g., External Repo Access).
Set the Scope to Code (Read) (or higher if required).
Specify the expiration date.
Generate the PAT and copy it. Store it securely as you won’t be able to view it again.
Step 2: Create a Service Connection in your ADO
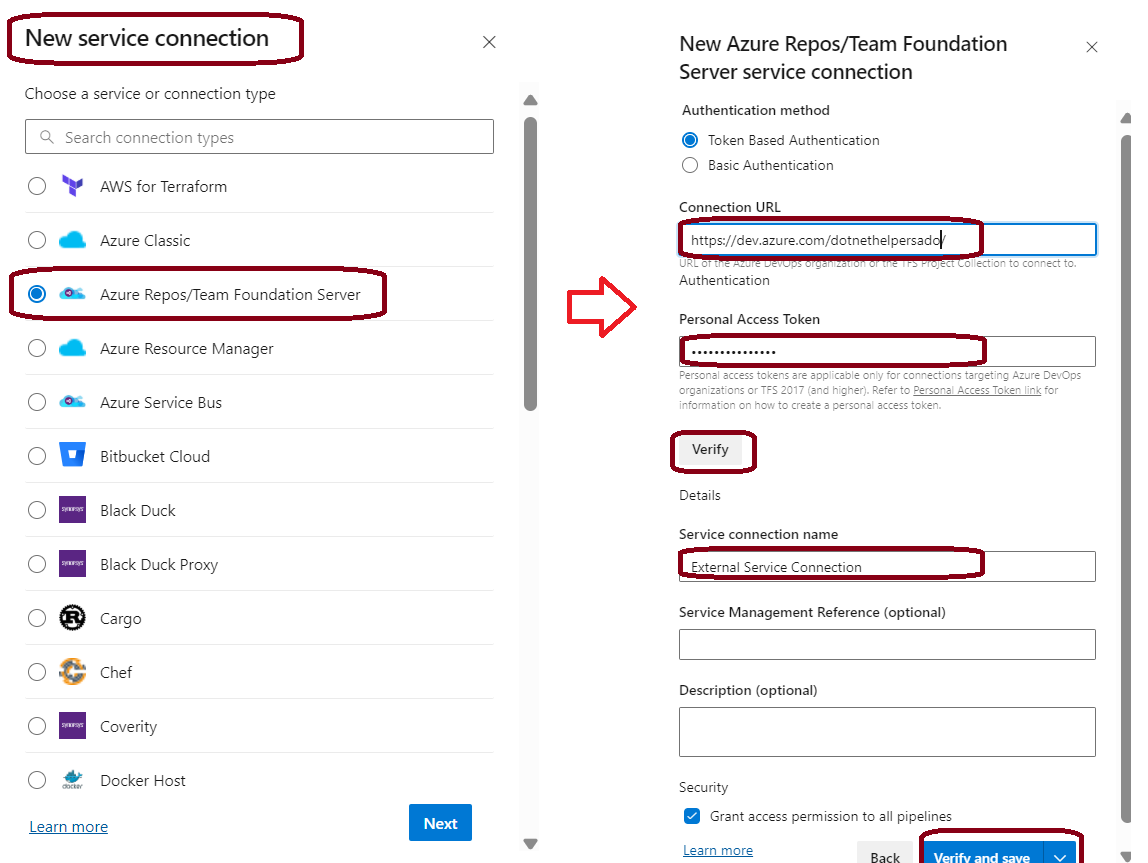
A service connection allows your pipeline to authenticate with the external repository.
- Go to the Azure DevOps project where you’re creating the pipeline.
- Navigate to Project Settings > Service Connections.
- Click on New Service Connection and select Azure Repos/Team Foundation Server.
In the setup form:
Repository URL: Enter the URL of the external repository.
Authentication Method: Select Personal Access Token.
PAT: Paste the PAT you generated earlier.
Give the service connection a name (e.g., CRM Service Connection) and save it.
Step 3: Reference the External Repository in Your Pipeline
The repository keyword lets you specify an external repository. Use a repository resource to reference an additional repository in your pipeline. Add the external repository to your pipeline configuration.
SYNTAX
|
1 2 3 4 5 6 7 8 9 |
repositories: - repository: string #Required as first property. Alias for the repository. endpoint: string #ID of the service endpoint connecting to this repository. trigger: none | trigger | [ string ] # CI trigger for this repository(only works for Azure Repos). name: string #repository name (format depends on 'type'; does not accept variables). ref: string #ref name to checkout; defaults to 'refs/heads/main'. The branch checked out by default whenever the resource trigger fires. type: string #Type of repository: git, github, githubenterprise, and bitbucket. |
|
1 2 3 4 5 6 7 8 9 |
resources: repositories: - repository: externalRepo type: git name: myexternal_project/myexternal_repo ref: external-ProductionBranch #Branch reference endpoint: dotnet Service Connection #Service connection name |
- References the external repository under resources.repositories.
- name: mention your external project and Repo name
- ref: Specifies the branch (external-ProductionBranch)
- endpoint: service connection (dotnet Service Connection).
Step 4: Checkout the External Repository
Include a checkout step in your pipeline: This ensures the external repository is cloned into the pipeline workspace for subsequent tasks.
|
1 2 3 4 |
steps: - checkout: externalRepo |
Step 5: Define the Build Pipeline
Add steps for building and packaging the code. In my case, the external project is dotnet core so i have added the build steps for the same as shown in below.
|
1 2 3 4 5 6 7 8 9 10 11 12 13 14 15 16 17 18 19 20 21 22 23 24 25 26 |
- script: | dotnet --version nuget restore ProjectSrc/dotnethelpers.FunctionApp.csproj displayName: 'Restore NuGet Packages' - task: DotNetCoreCLI@2 inputs: command: 'build' projects: '**/dotnethelpers.FunctionApp.csproj' arguments: '--output $(Build.BinariesDirectory)/publish_output' - task: ArchiveFiles@2 inputs: rootFolderOrFile: '$(Build.BinariesDirectory)/publish_output' includeRootFolder: false archiveType: 'zip' archiveFile: '$(Build.ArtifactStagingDirectory)/$(Build.BuildId).zip' replaceExistingArchive: true - task: PublishBuildArtifacts@1 inputs: PathtoPublish: '$(Build.ArtifactStagingDirectory)' ArtifactName: 'drop' publishLocation: 'Container' |
Full YAML
|
1 2 3 4 5 6 7 8 9 10 11 12 13 14 15 16 17 18 19 20 21 22 23 24 25 26 27 28 29 30 31 32 33 34 35 36 37 38 39 40 41 42 43 44 45 46 47 48 49 50 |
resources: repositories: - repository: externalRepo type: git trigger: - external-ProductionBranch name: myexternal_project/myexternal_repo ref: external-ProductionBranch # Branch reference endpoint:dotnet Service Connection # Service connection name pool: vmImage: windows-latest steps: - checkout: externalRepo - task: UseDotNet@2 displayName: 'Install .NET SDK' inputs: packageType: 'sdk' version: '8.0.x' installationPath: $(Agent.ToolsDirectory)/dotnet - script: | dotnet --version nuget restore ProjectSrc/dotnethelpers.FunctionApp.csproj displayName: 'Restore NuGet Packages' - task: DotNetCoreCLI@2 inputs: command: 'build' projects: '**/dotnethelpers.FunctionApp.csproj' arguments: '--output $(Build.BinariesDirectory)/publish_output' - task: ArchiveFiles@2 inputs: rootFolderOrFile: '$(Build.BinariesDirectory)/publish_output' includeRootFolder: false archiveType: 'zip' archiveFile: '$(Build.ArtifactStagingDirectory)/$(Build.BuildId).zip' replaceExistingArchive: true - task: PublishBuildArtifacts@1 inputs: PathtoPublish: '$(Build.ArtifactStagingDirectory)' ArtifactName: 'drop' publishLocation: 'Container' |
Conclusion
Successfully accessing and integrating external Azure DevOps repositories requires careful authentication and configuration. By following the steps outlined in this guide, including creating PATs, establishing service connections, and effectively referencing external repositories within your YAML pipelines, you can seamlessly integrate code from various sources. This streamlined approach fosters enhanced collaboration, improved efficiency, and a more robust development process for your projects.


Leave A Comment